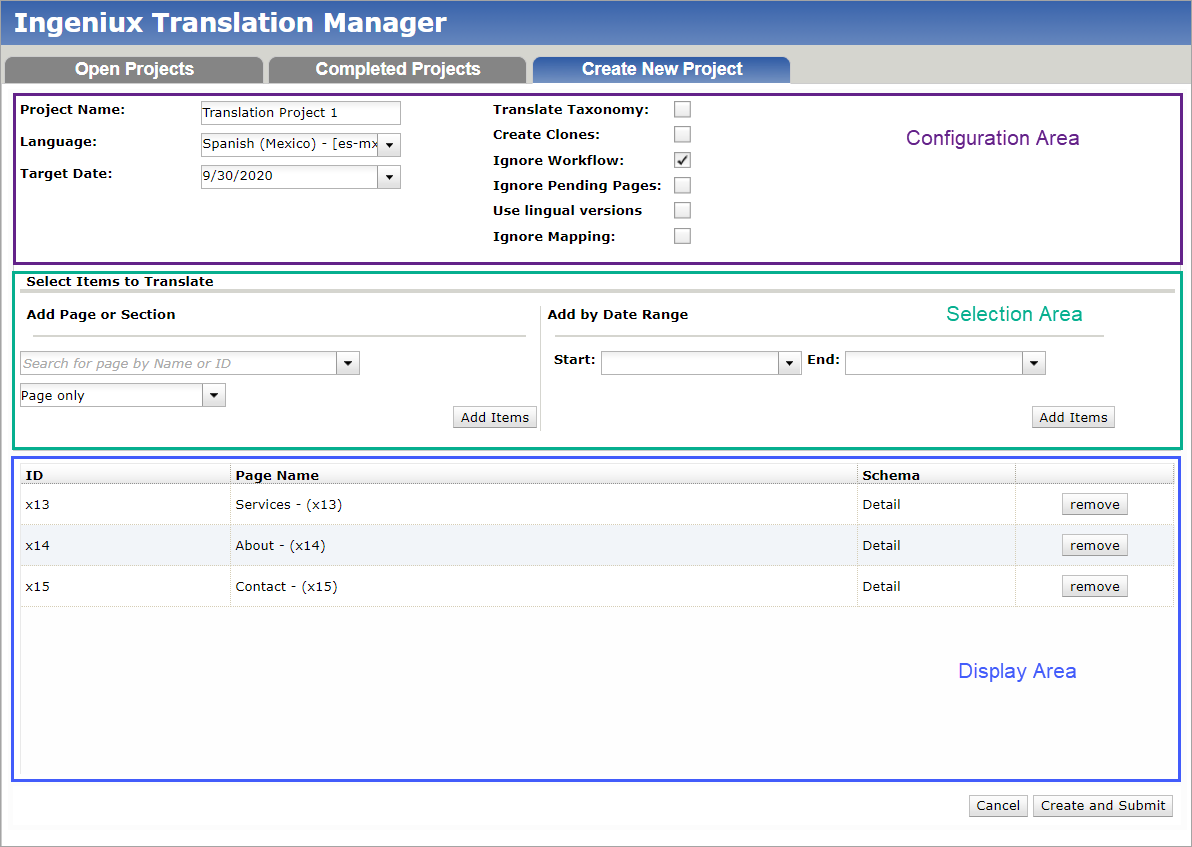
Creating Ingeniux Translation Projects
Prerequisites:
- See Translation Prerequisites for details.
- Before creating translation projects, system administrators must deploy the Ingeniux Translation Manager package and configure the TM tab. See Deploying Translation Manager for details.
- User must be a systems administrator to access the translation manager files in the Ingeniux CMS file system.
After configuring Ingeniux Translation Manager, administrators must set up a project.
To create a translation manager project:
- Navigate to Apps.
- In the list of applications, click Translation Manager.
- Click the Create New Project tab. The Ingeniux
Translation Manager tab displays.

- Provide project information and choose options in the Configuration Area:
- Project Name: Project's display name.
- Language: Language into which the project is being
translated.ImportantIn Administration > System Options > CMS > WorldView, you must enable the Available languages for page language settings option to the appropriate target languages before they will display in the Language drop-down menu.
- Target Date: Scheduled date of completion.
- Translate Taxonomy: When selected, translation manager
includes taxonomy in the project. When translating taxonomy:
- The file, [ProjectName]_Taxonomy.xml, is created within the translation project, which includes the entire Taxonomy Tree.
- Translation vendors translate within the taxonomy file.
- When vendors translate the entire Taxonomy Tree, the returned taxonomy
file is mapped to the Taxonomy Manager for the target language(s). ImportantThe taxonomy file returned from the vendor must have all taxonomy terms translated. Partial translations of taxonomy are not allowed.
- Create Clones: If the master page is selected but has no
clone, this option creates clones for reference xIDs and assets if they do not
already exist. NoteImporting a translated page that references an asset of a master locale now updates the Asset ID value to reflect the cloned asset for the target locale.
- Ignore Workflow: When enabled, allow adding pages to the
current project even if the pages are currently not in the defined translation
workflow/workstate.NoteThis option is only applicable when either WorkFlowName or WorkFlowTitle are configured in Settings.xml. See Deploying Translation Manager for configuration details.
- Ignore Pending Pages: If any page in workflow is in a pending state (e.g., page for translation isn't checked in), then translation manger will skip the page.
- Use Lingual Versions: If a translated version of the page exists, then translation manager sets the page to be read-only.
- Ignore Mapping: When selected, translations replace the
master pages after import. This option submits specific pages in their target
languages and not their associated master pages. NoteThis option should be selected when no master/clone page relationship exists.
- Add content items for translation by ID or by date range in the Selection Area,
then click Add Items:
- Add Page or Section:
- Page only: Enter the xID of a page or component.
- Include Children: When selected, the children of the page in the Add Page or Section field are included.
- Include References: Ingeniux Translation Manager adds internal resources (i.e., pages and components) referenced by the selected content items.
- Add by Date Range:ImportantEnable the Ignore Mapping and Ignore Workflow options in the Configuration Area to add content items by date range.
- Start: Use the date picker to add the start date. From this date, all master content items return (unless Ignore Mapping is enabled).
- End: Use the date picker to add the end date. Up to this date, all master content items return (unless Ignore Mapping is enabled).
NoteIf you add content items by date range, you must provide both Start and End values.
- Add Page or Section:
- Optional: Click Remove in the Display Area to remove content items from the translation project.
- Click Create and Submit when finished and close the submission success message. The translation manager submits the translation project to the vendor for translation.
Next Steps: Manage Translation Projects to view details, copy projects, view logs, and import projects.
