CMS 10.6 Adding Child Layouts to Forms


Prerequisites:
  • Administrators must complete prerequisites to enable user access to the Design tab. Developers must create the appropriate Page Builder views before the content unit styling displays properly. See Page Builder Prerequisites for details.
  • A form template (e.g., the Visual Form Builder - Form component content unit) must exist in the presentation container. See CMS 10.6 Setting Up Form Templates for details.

The basic setup of Page Builder⁠—placing content units within layout units⁠—can be expanded to create complex page designs that meet your organization's needs. Page Builder supports multiple levels of content and layout units. Users can place form layout units within a form content unit and then more content units within that layout unit. This concept is known as child layouts.

Child layouts expand the functionality and complexity of a site's page designs. While it's possible to nest non-form content units, it's more common to employ nesting in form-based scenarios.

To create a child layout and add content units within a form:
  1. Navigate to Site > Site Tree.
  2. Select the page with the Page Builder presentation.
  3. Check out the page with the Page Builder form, and select the Design tab.
    The Design tab workspace and accordion menu displays.
  4. Complete the following steps to add a child layout to the form template.
    1. Select or hover your mouse over the header of the form content unit in the presentation canvas grid via the Design tab workspace.
      The toolbar displays in the content unit header. If you select the header, then the content unit displays as selected (i.e., the header fill color changes to blue).
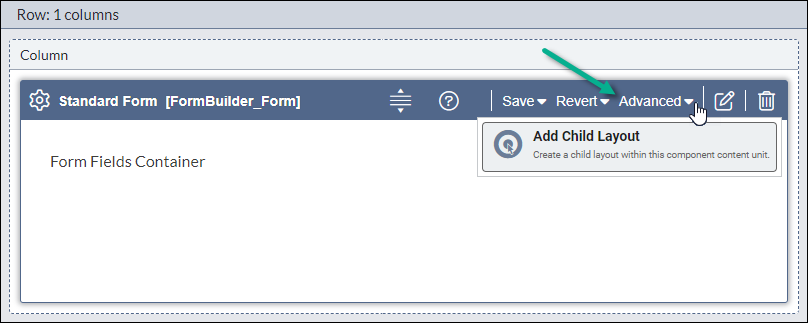
    2. Select Advanced > Add Child Layout in the content unit header toolbar.

      Advanced > Add Child Layout

      The Add Child Layout to Component dialog displays.
      Note
      The child layout creation process shares similarities with the Page Builder presentation creation process. This dialog provides elements (e.g., containers) to choose from that will contain the child layout.
    3. Choose an element within the current component unit to contain the child layout.
      The following three element containers display:
      • Parent container layout (the Form Name value displays for this container)
      • (Auto-generated) form content component layout
      • (Auto-generated) message container layout
      Tip
      We recommend selecting an element with a unique ID. You can use the visibility toggle icon Container Visibility Toggle Icon associated with container names to hide or display the container highlighting within the Design tab workspace.
    4. Select Create Child Layout.
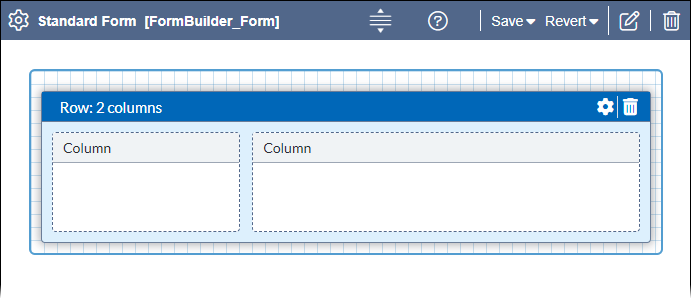
      Page Builder creates the child layout, and the layout canvas grid displays within the element of the form content unit block.

      New Child Layout

  5. Complete the following steps to add one or more row layouts to the child layout canvas grid.
    1. Expand the Design accordion menu option, and select the Row Layouts section.
    2. Choose the row layout to add to the child layout canvas grid. See CMS 10.6 Adding Row Layouts for details to add row layouts to the presentation.

      To build a sample form, you can use the Left Sidebar row layout.

    3. Child layouts can hold multiple row layouts. Repeat the steps to add row layouts as needed.

    Child Layout with Row Layout

  6. Complete the following steps to add one or more content units to the child layout canvas grid.
    1. Select the Content section in the Design pane.
    2. Choose the content unit to add to the column in the child layout canvas grid. See CMS 10.6 Adding Content Units for details to add content units to the presentation.
      Tip
      Page Builder provides built-in Visual Form Builder content units. See CMS 10.6 Visual Form Builder Content Units for details.
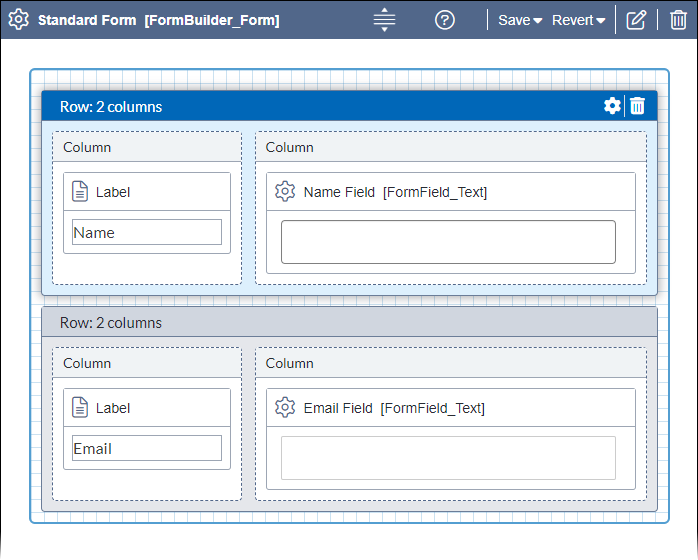
      To build a sample form, drop the Visual Form Builder - Form Field - Label field unit in the leftmost column, and drop the Visual Form Builder - Form Field - Text component unit in the rightmost column of the child layout.
    3. Repeat the steps to add content units as needed.
    4. Save the Page Builder presentation before editing the content units. Select Save in the Design tab toolbar.

    Form Labels and Fields

  7. You can leave the content as embedded, or you can save the content as a new referenced component by completing the following steps.
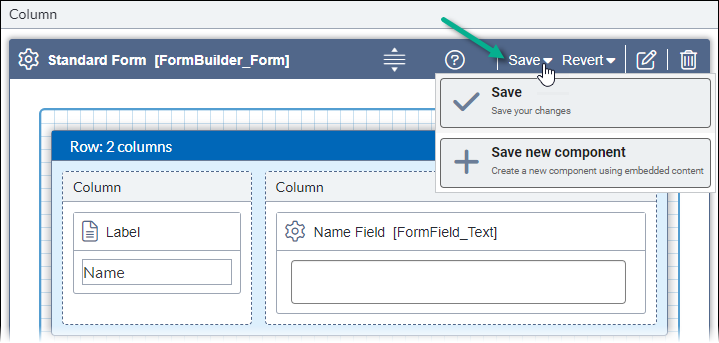
    1. Select Save > Save new component in the form template content unit header.

      Save Form

      The Select parent page for component sharing dialog displays.
    2. Enter a parent page for the new component, and click Select.
      Additional Information
      Keep the following in mind.
      • After saving your form as a new component, you can only edit the form in the component instance and not in the current presentation. To edit the form, select Edit > Edit original component form template content unit header.
      • You can view component instances of forms in the Design accordion pane's Content section. See CMS 10.6 Viewing Component Instances of Forms for details.
  8. Save Page Builder presentation changes by selecting Save in the Design tab toolbar.
    Warning
    Always save after making Page Builder presentation changes. Otherwise, the system will not preserve your new changes.

Next Steps (optional):