Managing Pages in Workflow
A site administrator (or another user with appropriate permissions) can check pages in and out, mark and unmark them for publish, and publish them. In most cases, however, it's a good idea to automate these actions by using workflow. By folding actions into workflow, you ensure that content contributors perform the correct actions at the appropriate times. In fact, with a workflow configured, authors and editors won't even need to be aware of actions like check in and mark for publish.
Workflows are customizable and must be created before they can be used. Once a page has been added to a workflow, it can only be modified by the approved groups of users for that stage of workflow. This means that administrators are often unable to make changes to a page while it is in workflow.
However, administrators have permission to add and remove pages from workflow. If you need to make changes to a page in workflow, you can simply remove the page, modify it, and then add it back to a workflow. Also, pages created outside of page creation rules can be added to workflows for later editing, and pages created in workflow can be removed from workflow to prevent future editing.
Adding a Page to Workflow
A page creation rule (PCR) can automatically put a new page into workflow. A page created without a PCR can only be manually entered into workflow.
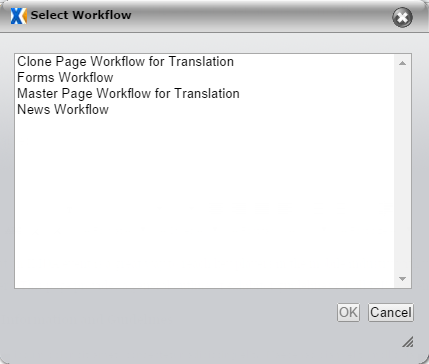
To add a page to workflow:
- Right-click the page in the site tree and select Add to Workflow.
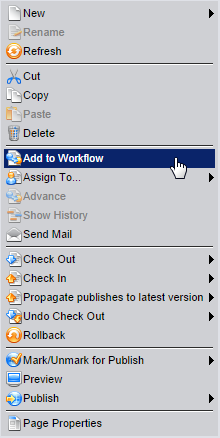
- Choose a workflow in the Select Workflow dialog and click OK.
To view a page's workflow values (workstate, work group, etc.) expand the Page Properties box. The edit form must be refreshed to see recent changes to page properties. Refresh the edit form by clicking the Refresh button in the toolbar.
Removing a Page from Workflow
When a page is removed from workflow, an administrator can intervene in the content-creation process. This can be useful if you need to make immediate changes to the page or add the page to a different workflow. Page assignment doesn't automatically change when the page is removed from workflow, so you'll need to check the page out to yourself if you want to modify it.
To remove a page from workflow:
- Right-click the page in the site tree.
- In the context menu, select Remove from Workflow and click OK.
Pages outside of workflow cannot be modified by authors with restricted permissions. If a page is removed from workflow, ensure it is assigned to a user with permission to perform the necessary actions outside of workflow.
Viewing Workflow History and Reports
Workflow history shows all assignments and transitions for the selected page as it has moved through workflow. Workflow history is only available for pages that are in workflow.
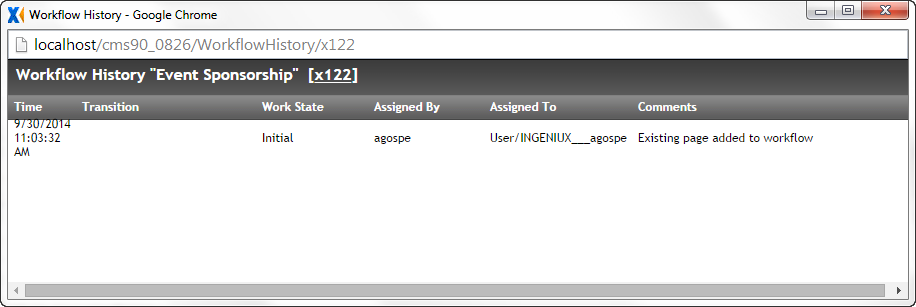
To view workflow history:
- Right-click a page in the site tree.
- Choose Workflow, Show History. Pressing Ctrl+Shift+H also displays workflow history.
Workflow reports display the name, xID, workflow, workstate, group, and assigned user for each page in workflow. You can view a report for each workflow and sort the results table by column in ascending or descending order. To view workflow reports, click the Reports tab.