The Oxygen XML Editor PDF transformation scenarios don't
automatically include the image alternative text metadata from the DITA source, as FO doesn't
support alternative text in the default stylesheets (i.e., no alternative text displays on
images when users hover over them in the PDF output).
To display image alternative text on
hover in PDF outputs, the system requires users to create a new PDF customization plugin for
the Oxygen XML Editor.
To create a PDF customization plugin that includes image alternative text on
hover:
- Navigate to the PDF Plugin Generator website.
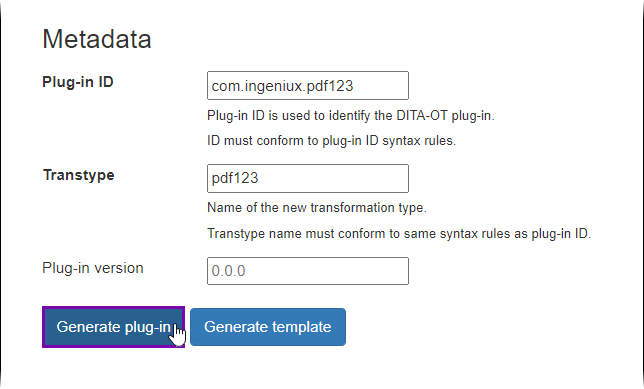
- Complete the fields to meet your PDF transformation needs, and click
Generate Plug-in when you finish.
Note
The PDF generator requires you to complete the following fields in the
Metadata section.
The PDF plugin downloads as a .zip file to your local file
system.
- Extract the PDF plugin zip file contents to your DITA Open Toolkit plugins
folder.The Oxygen XML Editor default DITA Open Toolkit plugins filepath is
[Drive]:\[path-to-oxygen-xml-editor-installation]\frameworks\dita\DITA-OT3.x\plugins.
Important
You may require administrator permissions to extract the zip file and
to make changes to files within this folder
The PDF plugin deploys to the DITA Open Toolkit plugins folder for the Oxygen
XML Editor application.
- Open the new PDF plugin folder that you deployed, and navigate to the
xsl\fo folder.
- Open topic.xsl in a text editor, and complete the following
steps.
- Add the following namespace attribute to the
<
xsl:stylesheet> element.xmlns:fox="http://xmlgraphics.apache.org/fop/extensions"
- Nest the following XSL template within the
< xsl:stylesheet>
element.<xsl:template match="*|@alt" mode="graphicAlternateText">
<xsl:attribute name="fox:alt-text">
<xsl:apply-templates select="." mode="text-only"/>
</xsl:attribute>
</xsl:template>
- Save and close topic.xsl.
- Navigate to \plugins\org.dita.pdf2.fop\cfg in your DITA Open
Toolkit plugins (e.g.,
[Drive]:\[path-to-oxygen-xml-editor-installation]\frameworks\dita\DITA-OT3.x\plugins\org.dita.pdf2.fop\cfg.
- Open fop.xconf in a text editor, and complete the following
steps.
- Add the following
<accessibility> element so that the code
displays directly above the <!-- Strict FO validation -->
comment in fop.xconf.<accessibility>true</accessibility>
For example, after adding the <accessibility> element,
fop.xconf should look similar to
this:
<?xml version="1.0"?>
<!-- $Id: fop.xconf 1616312 2014-08-06 19:19:31Z gadams $ -->

<!--

This is an example configuration file for FOP.
This file contains the same settings as the default values
and will have no effect if used unchanged.

Relative config url's will be resolved relative to
the location of this file.

-->

<!-- NOTE: This is the version of the configuration -->
<fop version="1.0">

  <accessibility>true</accessibility>
  <!-- Strict FO validation -->
  <strict-validation>false</strict-validation>

[...]
- Save and close fop.xconf.
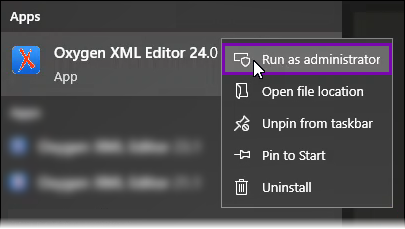
- Right-click the Oxygen XML Editor application, and select Run As Admininstrator
in your file system.
Important
Running the Run DITA-OT Integrator transformation scenario
requires the you to have administrator permissions.
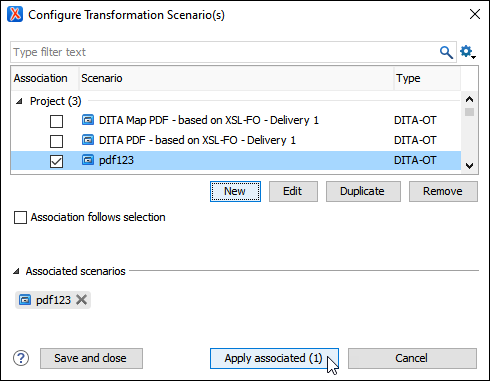
- Choose one of the following steps:
- Open a DITA map or topic in the main pane Editor, and click
the Configure Transformation Scenario(s) button (or press
CTRL+Shift+C on your keyboard) in the
Oxygen XML Editor toolbar.

- Open a DITA map in the DITA Maps Manager view, and click
the Configure Transformation Scenario(s) button in the
DITA Maps Manager toolbar.
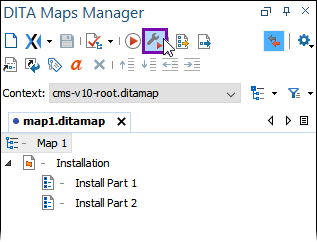
The Configure Transformation Scenario(s) dialog
displays.
- Enter integrator as the keyword filter text in the dialog search
field, and click the Search icon.
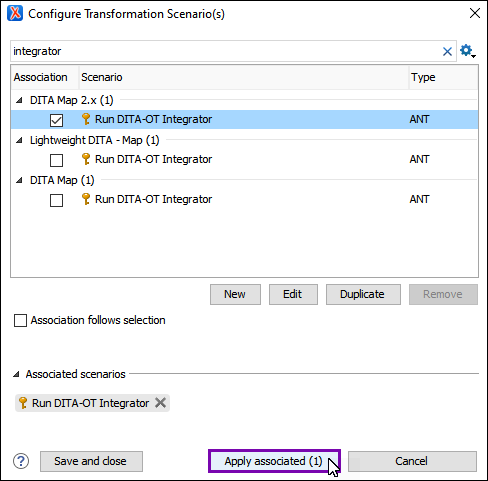
- Select the Run DITA-OT Integrator transformation scenario under the
Dita Map 2.x section, and click Apply
Associated.
The Configure Transformation Scenario(s) dialog closes, and
the DITA-OT Integrator transformation registers your new PDF plugin in the
system.
- Reopen the Configure Transformation Scenario(s) dialog.
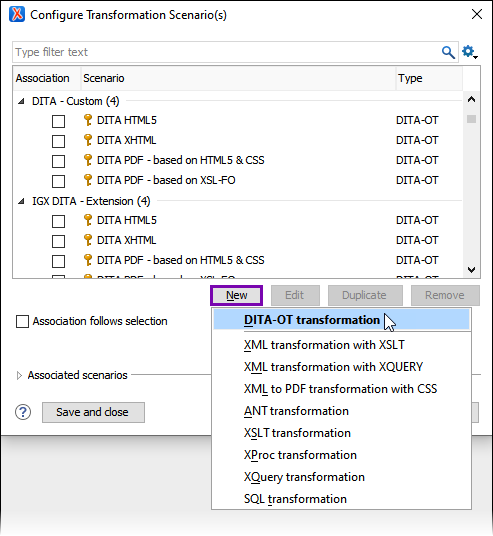
- Click New, and select DITA-OT Transformation.
The
DITA Transformation Type dialog displays.
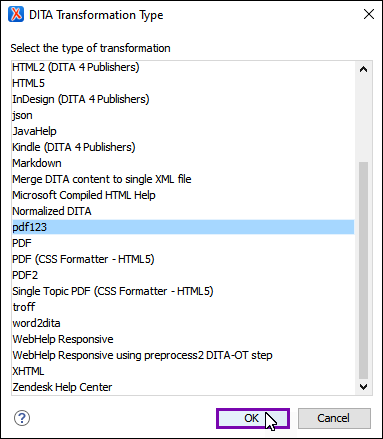
- Select the transformation type associated with your new PDF plugin (i.e., the
Transtype field value you used when generating the PDF plugin),
and click OK.
The New scenario dialog displays.
- Complete the settings to suit your needs for the
new PDF transformation scenario.
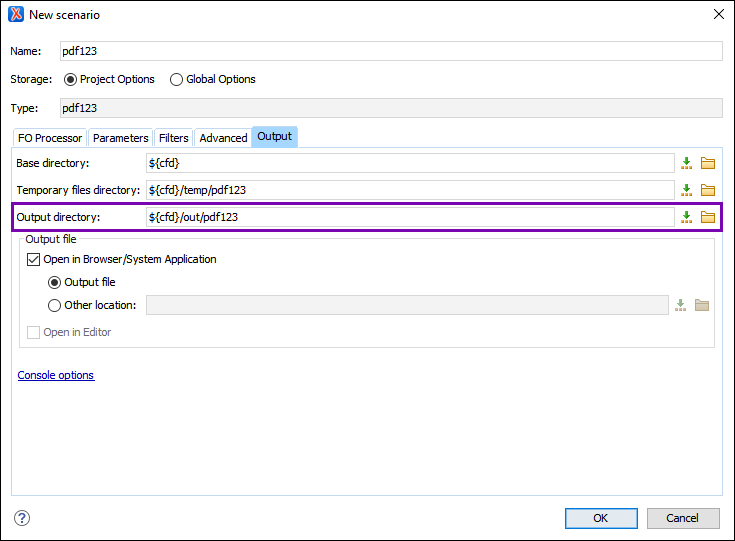
Tip
We recommend creating a directory folder for your generated PDF outputs
instead of using Oxygen XML Editor's default output directory. By designating a
directory for PDFs, you can quickly access your PDF outputs as needed after successfully
running transfomration scenarios.
You can change the Output directory
field value in the Output tab of the New
Scenario dialog.
- Click OK when you finish in the New
Scenario dialog, and then click Save and Close in the
Configure Transformation Scenario(s) dialog.
The system adds the new PDF plugin to the list of available transformation
scenarios.
When users apply PDF transformation plugin associated with the PDF customization plugin,
the PDF outputs now display alternative text on moused-over images in Adobe Acrobat Reader.
