Prerequisites: CMS administrators must create a DITA
root asset folder in the Asset Tree and then set the ID of that asset folder in . After doing so, administrators can upload DITA assets to the CMS.
Note
Keep in mind you will be unable to
publish DITA assets until all required tasks to set the DITA publishing environment
have been completed. See Initial DITA Configuration for details about DITA publishing
prerequisites.
Before uploading DITA collections to
Ingeniux CMS, we recommend you validate the content to ensure compliance with the DITA
rules standard.
- If you are uploading a DITA collection containing peer-scoped references, consult with
your DITA administrator to ensure the peer-scope option is set, appropriately. See DITA Advanced Publishing Options for details.
You can upload zip files containing DITA content or individual DITA
assets. Often the most convenient way to upload DITA assets is to create a zip file prior to
the transfer.
To upload DITA Content to the Assets Manager:
- In Assets, navigate to the DITA
root asset folder or any asset folder under the DITA root.
- Right-click the asset folder that will
receive the new DITA assets, then select .
Note
This upload method
should only be used for uploading individual DITA assets. For zipped DITA assets you
will have more control over conflict handling by selecting Create New Asset
below.
An upload field in the main work area of
Assets displays.
- Choose one of the following ways to
populate the upload field with the DITA assets that you want to upload into the CMS.
Drag DITA assets, either a zip, folder,
or individual files, from your file system (e.g., via File Explorer) into the
upload field.
Click within the upload field. In the
Open dialog,
select your DITA asset(s). Click Open.
The selected DITA assets display in the
upload field.
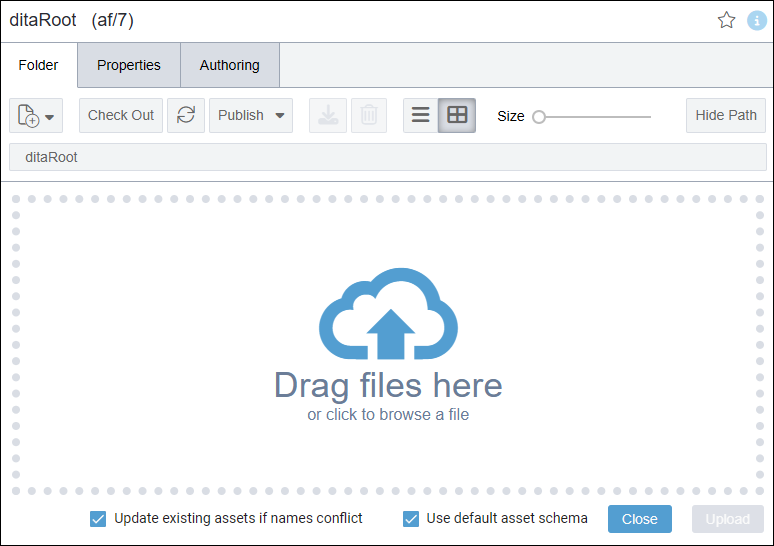
- Select or clear the Update existing assets for conflicting
names checkbox.
Note
If you select this checkbox and you
upload an asset with a file name already used within the chosen upload directory, then
the system uploads the new asset file to the pre-existing a/ID that uses the same
name. If you clear this checkbox and you upload the asset, then you can choose to
create a new a/ID for the uploaded asset. See Uploading Assets from Toolbar
for details.
- By default, Use default asset schema is
enabled. Clear this option if your organization has created an alternative asset schema to
the default one provided.
- Click Upload.
The Zip Unpack Option dialog
displays.

- Optional: If your upload is a zipped file or
contains zipped files, indicate how to handle these compressed files:
Unpack zip packages:
(Default: Enabled)
Clear this option if you want Ingeniux
CMS to leave zip files compressed when it encounters them.
Remove existing folder when name
matches package: (Default: Disabled)
Enable this option if you want Ingeniux
CMS to remove if the uploaded zip package matches the folder in the Asset Tree.
Conflict handling : You
need to provide the CMS with the appropriate instructions as to how to handle
collisions of incoming paths, file names, or asset IDs with those already in the Asset
Tree.
If paths match, update asset
content.
If you keep this default setting,
the CMS retains the original asset IDs and updates their content.
Create new assets to replace
existing ones.
If you choose to enable this
setting, assets with the same filename receive new asset IDs upon upload. The
updated assets will retain the original files names, but new IDs will be generated
for them.
Caution
Consult your DITA administrator before using this
option. Enabling this option replaces existing asset IDs with new ones.
Before applying this option ensure the DITA content you plan to replace is free
of dependencies and not used by other DITA resources; otherwise, dependency
errors will occur that will prevent you from publishing the affected content
until they are resolved.
Create new assets with unique
names.
If you choose to enable this
setting, the conflicting assets will be replaced by the incoming ones. The updated
assets will have unique files names and IDs. The original assets will remain
unchanged.
Change asset file extension from
*.xml to *.dita: (Default: Disabled)
If you choose to enable this setting,
all uploaded DITA files with the .xml extension will be
changed to the .dita
extension.
Note
Your DITA set could contain XML files
with the .xml
extension, such as XML code samples. If this is the case, consider that enabling
this option will apply the .dita extension, which may not be your intention.
- Click Upload.
Depending on the size of the DITA
collection, the upload process may take a few minutes.
The DITA content uploads to the CMS.
Next Steps: If you encounter errors while uploading your DITA collection, see Troubleshooting
DITA Upload Issues for steps to correct these errors.