Extending Structure Through Presentation in Cartella
In this article we explore how to extend structure through presentation in Cartella.
Cartella is based on the ASP.NET MVC system. This makes it possible to separate model-view-controller into individual modules. Each module may be customized without compromising the core system or requiring recompilation of the code.
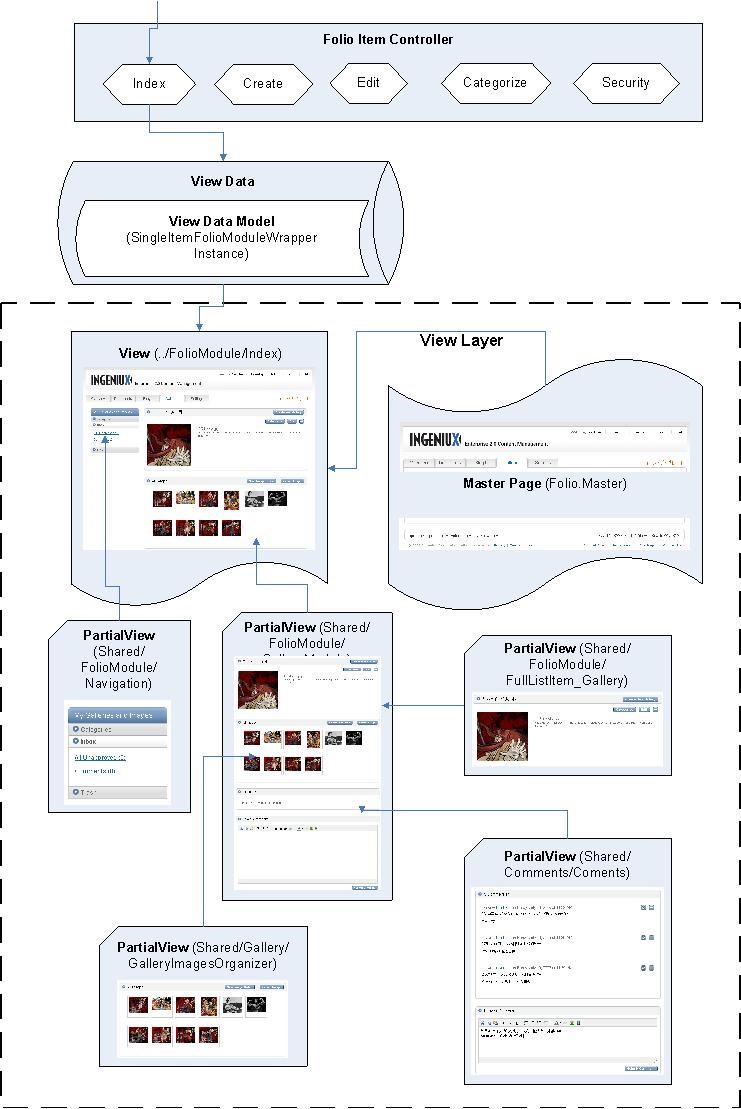
A gallery page is used as an example. The URL to this page is “/Folio/20966/Module/Galleries/Item/21008”. The page is assembled using a master page and a collection of partial-view pages.

The URL request (to display the page) goes first to the “FolioItemController” where it is assigned to the Action method as “Index”. This method passes the resulting data into the view code. The view module is not involved in data retrieval.
The assembled package is collected as “ViewData”. It contains a strongly typed object “SingleItemFolioModuleWrapper” as the main holder of information.
ViewData is sent to the View Layer, starting with the designated view “FolioModule/Index”. This view entry point brings in the master page and all the necessary Partial views. It constructs the presentation and returns it to the browser as an HTTP response.
The Controller code is embedded in the DLLs; ViewData is decided by the controller. Only the View Layer may be customized.
View Layer
In the View Layer, there are two styles of HTML markup shown. The first that we will show is NavigationPanel.ascx. It is a partial view. The Model object for this page is of type Cartella.Models.MenuPanel as can be seen by the Inherits attribute.
In the View Layer, there are two styles of HTML markup shown. The first that we will show is NavigationPanel.ascx. It is a partial view. The Model object for this page is of type Cartella.Models.MenuPanel as can be seen by the Inherits attribute.
<%@ Import Namespace="Cartella.Models" %>
<%@ Import Namespace="Cartella.Models.EditForm" %>
<%@ Import Namespace="Cartella.Classes" %>
<%@ Import Namespace="Cartella.Interfaces" %>
<%@ Import Namespace="Cartella.Support" %>
<%@ Control Language="C#" Inherits="System.Web.Mvc.ViewUserControl<cartella.models.menupanel>" %>
<%
    if (Model != null)
    {
        if (!Model.Hidden)
        {
            bool isOpen = Model.Selected;
            string panelID = Model.ID;
            string title = Model.Title;
%>
<div dojotype="dijit.layout.AccordionPane" title="<%= title%>" selected="selected" id="categoryMenu_<%=panelID %>">
<div class="content border postList borderBottom">
        <%
            Model.MenuItems.Each((item) =>
            {
                string classStr = (item.Selected) ?
                    "selected" : "";

                string widgetType = "igx.Cartella.widget.FolioModuleNavItem_" + title.Trim();

                object attributes = new
                {
                    @class = classStr,
                    @dojoType = widgetType
                };

                var attrDict = attributes.ToDictionary();

                //append additional attributes from menu item definition, on top of class str and dojoType attributes
                if (item.Attributes != null)
                {
                    item.Attributes.Each((entry) =>
                    {
                        attrDict.Add(entry.Key, entry.Value);
                    });
                }

                using (Html.BeginCustomTag("p", attrDict))
                {
        %>
        <a href="<%=item.Url %>">
            <%=item.Label%>
            (<span dojoattachpoint="[<%=widgetType%>]countNode"><%=item.Count%></span>) </a>
        <%
                }
            });
        %>
    </div>


</div>


<%
        }
    }
%>
        </cartella.models.menupanel>
This is similar to traditional ASP code with instances of <% %> marker pairs separating HTML and server-side code. The resulting code can be convoluted and difficult to maintain.
Using the HTML extension methods in MVC provides an alternative to generating raw HTML.
For example:
string classStr = (item.Selected) ?
                    "selected" : "";

                string widgetType = "igx.Cartella.widget.FolioModuleNavItem_" + title.Trim();

                object attributes = new
                {
                    @class = classStr,
                    @dojoType = widgetType
                };

                var attrDict = attributes.ToDictionary();

                //append additional attributes from menu item definition, on top of class str and dojoType attributes
                if (item.Attributes != null)
                {
                    item.Attributes.Each((entry) =>
                    {
                        attrDict.Add(entry.Key, entry.Value);
                    });
                }

                using (Html.BeginCustomTag("p", attrDict))
                {
                    …… ……
                }
The result is a paragraph tag with a dynamic list of attributes.
The traditional coding would be:
string pAttributes = .....
        %>
        <p pattributes="">< ...</p>
This method is more abstract. The result is a <p> tag with attributes. Using the using (Html.BeginCustomTag("p", attrDict)), only a dictionary is needed. This results in cleaner code. Note also that the <p> tag is now closed by the }.
This approach sacrifices HTML validation but gains the benefit of clean, easy to maintain code.
Using TagBuilder
TagBuilder can generate clean HTML code, but the result will not immediately be seen as HTML. Ingeniux recommends using TagBuilder in two situations:
- When the number of attributes varies depending on server-side values.
- When the attributes are case sensitive (i.e. dojo widget markups).
Debug Mode
Use Debug mode to identify the View/PartialView rendering of the HTML segment. By appending the query string with ?debug=true”, the display enters debug mode. The debug browser view is similar to normal mode, but the source code is changed to help locate the desired component.
Here is an example of the comments introduced in debug mode:
<!--
    Begin of Partial View: SelfEditContent.ascx,
    Instance Name: WelcomeTitle,
    Instance ID: 53433171-6ac0-48b3-8d8e-278a6095e159
 -->
Ingeniux Sales Extranet Rocks
<!--
    End of Partial View: SelfEditContent.ascx,
    Instance Name: WelcomeTitle,
    Instance ID: 53433171-6ac0-48b3-8d8e-278a6095e159
 -->
The comments mark the beginning and end of the PartialView “SelfEditContent.ascx”. These matching Instance IDs are helpful in nested views.
Instance Name is used to separate the same type of child views in nest view structure, which is rendered with the “Html.CartellaRenderNested” command.

There are no comments yet.