Manually Convert Storage Type from Esent to Voron
This knowledge base article provides step-by-step instructions on how to convert a CMS 10 storage type from Esent to Voron.
Description
In the very near future, RavenDB will no longer support Microsoft Esent in future releases of RavenDB. The Ingeniux Development Team has been investigating Voron, RavenDB's own storage type, as a viable replacement for Esent. There currently is no option to switch from an Esent storage type to a Voron storage type for existing in place upgrades. This knowledge base topic provides manual steps to convert your storage type from Esent to Voron.
Purpose
Currently, it's not possible to switch from an Esent storage type to a Voron storage type automatically, so it must be done, manually.
Requirements
The manual process to convert the storage types requires a local Administrator account for the CMS server.
Because you must export the database of the existing site, you need to make sure that there is enough disk space to ensure that the database can be exported, successfully.
Step-by-Step
Export Databases on Command Line via Smuggler
If you are working with a large export (over 1 GB in size) and your CMS server has plenty of RAM, it is better to use the Raven.Smuggler.exe, included with the CMS installation, and smuggle the export in using an administrative command prompt.
To export databases on command line via Smuggler:
- Open an administrative command prompt.
- Change to the following directory where Raven.Smuggler.exe exists: (site folder)/site/bin
-
The following command will smuggle out the entire database (the export command also supports batch/chunk sizes):
Raven.Smuggler.exe out http://mysite.com/contentstore "D:\sitedump.ravendbdump" --database=IGXContentStore --username=(username) --password=(password)
The username and password in this command must be a local administrator account so that it can access the database on the server.
Depending on the batch size you choose and how big the export is, the export process could take several hours.
Create Voron Storage Type
Once the database has smuggled successfully, you will need to create the Voron storage type in the RavenDB studio first.
To create a Voron storage type:
- Log into the RavenDB studio by going to http://mysite.com/contentstore
- You will see the existing Esent db/IGXContentStore in the studio after log in.
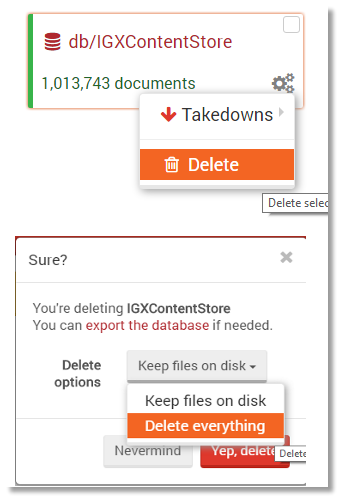
- Click the settings (icon with the 3 gears) on the IGXContentStore, choose Delete, choose Delete everything from the Delete options drop-down menu, and finally choose Yep, delete:

- In Resources, click Create one now to create a new database storage type.
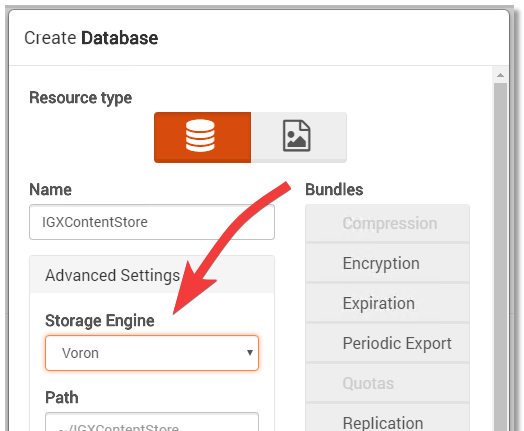
- In the next dialog, name the instance IGXContentStore, then click on Advanced Settings and select the Voron storage engine:

You are simply recreating the database with the same name as before, so that when we import the data, we will not have to update the connectionstrings in the site web.config and DSS preview web.config.
Import Database Dump to Voron Storage Type
The final step is to import into the new Voron Storage Type that was just created. If you are working with a large export (over 1GB in size), we recommend performing the import using an administrative command prompt.
To import a database dump to the Voron storage type:
- Open an administrative command prompt.
- Change to the following directory where Raven.Smuggler.exe exists: [Drive]:\[path-to-cms-installation]\site\bin.
-
The following command will smuggle in the entire database. (The export command also supports batch/chunk sizes):
Raven.Smuggler.exe in http://mysite.com/contentstore "D:\sitedump.ravendbdump" --database=IGXContentStore --username=(username) --password=(password) --timeout:36000000
As noted during the export process, the import could take several hours depending on the batch size you choose and the size of the export.
Post Database Import
To post database import:
- Once the import is complete, log into the RavenDB studio to verify that there are no stale indexes. If there are, please wait until all stale indexes have completed indexing.
- Once the indexing is complete, log into the CMS and validate that all of the content exists within your site.

There are no comments yet.