Setting Up Google Tag Manager in Ingeniux CMS
This guide on how to set up Google Tag Manager in Ingeniux CMS will give you the foundation you need to start using and managing tags on your website.
Google Tag Manager (GTM) is a free tag management solution that allows you to create and edit code segments, called tags, that collect and send data to a third party.
The data that tags collect can be used to help analyze user behavior, which in turn can inform the strategy we put in place to achieve certain goals.
GTM stores and manages tags (i.e., it’s a container). There is no interface in GTM where you can analyze the data your tags collect. Analysis is done via third party platforms, such as Google Analytics, Twitter, Facebook, LinkedIn, Hotjar, CRMs and other marketing platforms.
One of the most common uses of tags is to send information about site visitors to Google Analytics for data analysis.
Google Analytics is a complex platform used for in-depth data analysis. When a tag is placed on a web page, it can relay information about interactions that occur on that page – a pageview or form submit for example – back to Google Analytics, where that data can be analyzed.
It’s important to note that GTM and Google Analytics are two separate tools that work together to provide insights that can inform goal-driven action.
Benefits and Considerations
One of the great things about Google Tag Manager is that it acts as a middleman between your website or application and third-party platforms. The GTM interface makes it pretty easy to create and manage third-party tags – for example, LinkedIn Ads or Hotjar. As a result, GTM lessens reliance on developers because there is no need to touch the source code to create and set up a tag on a website.
While using GTM does not require in-depth coding knowledge, it does involve some technical implementation. You’ll need to add tags to pages in your site, which could involve a developer, especially if you have pre-existing tags in place that need to be removed first (to avoid duplicate data).
GTM has tag templates that are easy for non-developers to work with, but more complex or customized tags are likely to require assistance from someone who understands coding.
Another benefit of using GTM is increased site speed relative to the use of other tags. Tags created in GTM load asynchronously by default, so each tag can fire whenever it’s ready. When multiple tags fire at the same time (synchronously), a slower tag can hold up the rest of the tags from firing resulting in a sluggish page load.
Getting Started with Google Tag Manager
The main steps you’ll take to getting started with GTM are:
- Create a GTM account
- Install the GTM container on your website
- Add tags to collect and send information
Create an Account
To create an account, go to tagmanager.google.com.
Under “Setup Account” enter the name of the company whose site is being managed and click “Continue”.

You’ll be taken to the second step, setting up your container. In the field labeled “Container Name” enter your domain name, then choose which type of page or app it will be used on and click “Create”.
After you’ve created your container, you will be prompted to read and accept the GTM terms of service. After you’ve accepted, you’ll be given your container code.
Install Google Tag Manager
Now that your account is set up, it’s time to install GTM on your website.
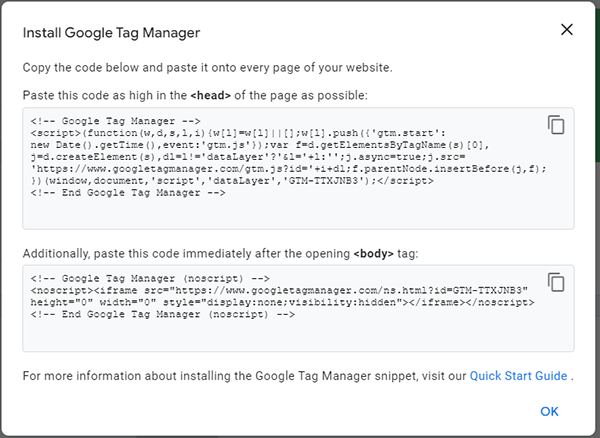
Copy the container code and follow the instructions provided by Google Tag Manager to install the code on your website.
Considerations for Installing GTM in Ingeniux CMS
Installing GTM requires the insertion of scripts into your code to connect your interface to the container and tags that you want to use. There are currently two of these scripts, one that goes as near to the top as possible in the <head> tag, and one that goes as near to the top as possible in the <body> tag. Your setup process on GTM provides these two scripts.
Getting these scripts into place for your site in Ingeniux CMS has a few options and considerations.
- Do you anticipate adding a lot of scripts and changing them often?
- Who will be doing the editing of scripts? Do you have a developer on staff to make changes to scripts when needed or is this work done by a site administrator?
- Does your institution have guidelines that must be followed for publishing code to production such as checking code into a version control software, code review policies, or limits on timing of publication?
Depending on how you answered the above questions, you’ll want to follow one of two processes.
Scripts Editable Through the CMS Publishing Pipeline
The first possible location is in your CMS where a user can locate and edit the scripts as needed. While these scripts could be placed in a workflow or have similar controls, anyone with administrative rights to the CMS could locate, edit, and publish content of the scripts. This is best if there is a small, trusted team of administrators and scripts need to get edited often enough by non-developers to warrant this level of facility.
When using this location for your script the best current method to use is to have two plain text fields added to a component that all pages in your site share. In most implementations this is called the Site Control.
Name the two fields appropriately to indicate that they serve the purpose of putting GTM code into the <head> and <body> of your pages. A CMS developer implements the fields in the DSS project. Once the fields are in place you can paste the scripts into their respective fields and publish the Site Control.
How to Implement CMS Editable Script Fields
In a dev instance of your CMS:
- Go to Administration > Schema Designer and add the following two plain text fields to the Site Control schema. The fields can be placed anywhere in your schema as you like.
- Topmost Head Scripts
- Topmost Body Scripts
- Save the schema.
- Sync the schema.
- Go to the Site Control component.
- Paste your GTM scripts into their respective fields. Preferably in preview mode.
- Publish your Site Control as normal.
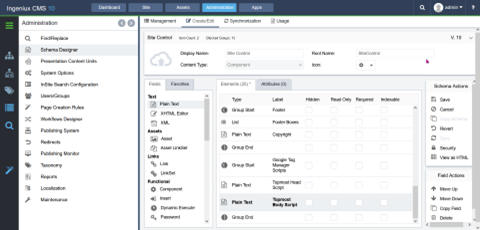
Pictured Above: Ingeniux CMS Schema Designer with Google Tag Manager Fields
In the DSS project:
- Implement the plain text fields to render into the <head> and <body> tags, respectively.
- QA your implementation.
- Replicate the changes to your prod CMS and DSS as per your typical protocols.
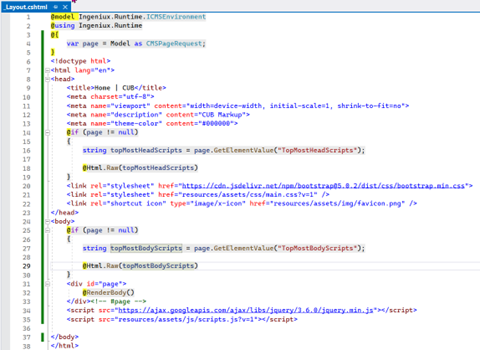
Pictured Above: Example View Implementation of Google Tag Manager Fields
You can find simplified schema and view examples attached to this article.
Scripts Editable Through the Development Pipeline
The second is to have the scripts added directly to your DSS project code by a developer. The scripts would not be editable through the CMS and would be controlled by your code publishing pipeline. Changes would have to be routed through the developer.
Considerations
Either way you decide to implement your container you will want to ensure that your tags are not processing live data in CMS preview or in QA/staging publishes of your website. For staging and QA websites, GTM has a preview mode that can be used to test new tags, see how the tags fire, and provide debug information to help you fix what isn’t working. Your implementation will need to address this and only turn on GTM preview mode when you are browsing those versions of your site, with live data collection on production.
Create and Manage Tags
So, you’ve created your Google Tag Manager account and installed the container on your website. Now it’s time for the fun part: create and manage tags.
Create a Tag
From the GTM dashboard, click “Add a New Tag”.
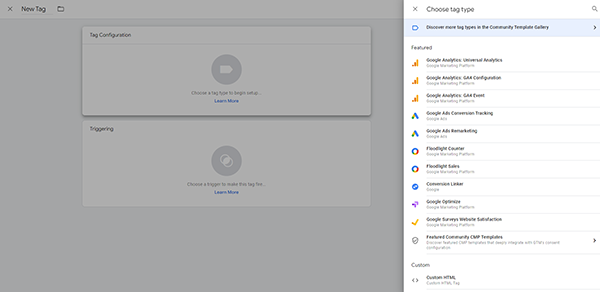
A window will appear with two options: “Tag Configuration” and “Triggering” – click “Tag Configuration.” A list of tag templates will appear. Choose the template you wish to use – or choose “Custom HTML to add your own code – then follow the prompts to create your tag.
Create a Trigger
To create a tag, you’ll need to create at least one trigger. A trigger refers to a specific event or action. For example, maybe you want to have a tag send information when someone downloads a document from the resources section of your site or when an outbound link is clicked. In these scenarios, the download or click is the trigger that gives the tag purpose.
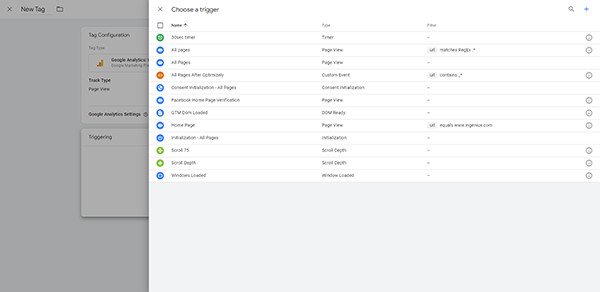
You can set up your triggers ahead of time by navigating to “Triggers” from the GTM dashboard’s left panel navigation and clicking “New”. Or you can create a new trigger as you create a tag by clicking the “+” in the upper right corner of the “Choose a Trigger” screen.
Considerations for Tag Creation and Management
Every tag you create should be part of a larger strategy. Meet with your team to identify goals and define a strategy for meeting them. Then, determine what you’ll need to track in order to measure the efficacy of your strategy. Map that back to the tags you need to create.
Similarly, before you start creating tags, make sure to take some time to define exactly which tags you want or need to create to avoid creating too many tags. There are no limits to the number of tags you can create in GTM, however Google advises keeping the number of tags you use to a minimum for best site performance.
It is also important to have a tag naming strategy in place. Because you’re likely to be using several tags on your site, you’ll want to avoid mixing them up. According to Google, the recommended tag naming convention is Tag Type – Detail – Location.
Summary
This is a very high-level introduction to Google Tag Manager and how to start using it in the context of your Ingeniux website.
We encourage you to continue to learn more about GTM and the strategy behind creating and using tags to measure performance.
Here are some resources we recommend:
For more information on setting up, installing, and working in Google Tag Manager read Google Tag Manager documentation on this topic and check out this helpful introduction to Google Tag Manager from SEO Moz.

There are no comments yet.