Moving RavenDB to Separate Server From CMS
Information on how to decouple the CMS from the RavenDB. Moving the RavenDB to its own server can minimize negative impacts on CMS performance.
Description
In some instances, you may want to decouple the CMS from the RavenDB (i.e., move the RavenDB Instance to a separate server). This is primarily done for larger CMS clients, where resource contention causes performance issues within the environment.
Moving the RavenDB to its own server allows the ContentStore to use memory available on the DB software server, which minimizes negative impacts on CMS performance.
Use one of two methods to decouple the CMS from the RavenDB:
- Method 1: Set up and connect a new CMS instance to the existing RavenDB.
- Method 2: Set up and connect a new RavenDB instance to the existing CMS.
Requirements
To decouple the CMS from RavenDB, you must have the following:
- Method 1 Only: A CMS instance without logged-in users. Schedule a content freeze to prevent users from logging in during this process.
Important: Ensure the content freeze covers the time needed to copy and paste the DSS_Preview and App_Data directory content from the CMS RavenDB site directory to their respective locations in the CMS Design Time site directory.
- Method 1 Only: A new CMS server.
- Method 2 Only: A new RavenDB server.
- Access to the original CMS server.
- HTTP/HTTPS access between servers. Keep the following in mind:
- We strongly recommend that the servers live within the same internal network.
- This configuration causes latency between the CMS and the RavenDB. However, in most instances, this delay is negligible compared to the long running tasks of some DB operations.
- Administrator access to the CMS RavenDB environment and the CMS Design Time environment.
- CMS user account access for validation.
Step-by-Step
To decouple the CMS from RavenDB, choose the method that best suits your needs:
For demonstration purposes, let's call the RavenDB environment "CMS-DB" and the CMS Design Time environment "CMS-DT".
Method 1: New CMS Instance
To set up and connect a new CMS instance to the existing RavenDB:
- Install the CMS site instance on the newly deployed CMS-DT server. Ensure the new instance installs with the same version as the original CMS-DB instance, and don't include a site export in the installation.
Note
Set up the site with the same file paths to avoid additional configuration.
- Navigate to Internet Information Services (IIS) Manager. Stop the CMS-DT instance's ContentStore, CMS, and DssPreview application pools and any additional virtual applications (search configuration, word output, etc.) hosted within the environment.
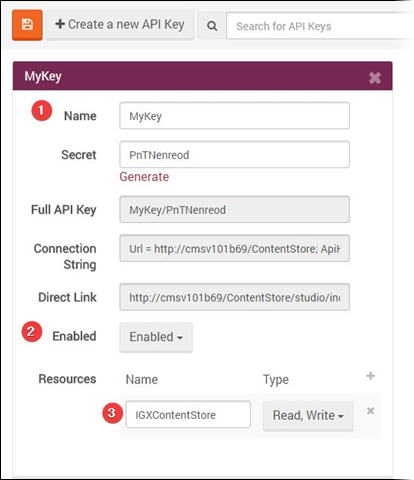
- Set up a new API key by completing the following steps.
-
- Log in to the CMS-DB instance ContentStore, and click Manage your Server. The API Keys view displays.
- Click Create a new API Key, and complete the following fields:
Field Description Name Enter API key friendly name. Enabled drop-down list Set API key to Enabled.
Resources Indicate permissioned database(s) for this API key. NoteThis field requires you to provide access to both the IGXContentStore and the "System" database.

- Copy the Full API Key value, as you will need this key later.
-
- Log in to the CMS-DT server.
- Rename the existing DSS_Preview and App_Data folders within the site directory (e.g., [Drive]:\[path-to-cms-dt-site-root-directory]).
- Copy and paste the App_Data and DSS_Preview folders from the CMS-DB site directory (e.g., [Drive]:\[path-to-cms-db-site-root-directory]) to their respective locations in the CMS-DT site directory.
- Navigate to Web.config in the CMS-DT instance's site directory (e.g., [Drive]:\[path-to-cms-dt-site-root-directory]). Complete the following steps.
- Open the file in a text editor, and locate the <CMSContentStoreSettings> element.
<CMSContentStoreSettings embeddedContentStore="false" contentStoreLocation="http://CMS-DT/ContentStore" secureTransport="false"> - Update the @contentStoreLocation attribute value to match your CMS-DB ContentStore location and API key. The value should look similar to the following code:
Caution
This code is an example. Ensure you enter the correct contentStoreLocation protocol before saving changes.
- Change this:
contentStoreLocation="http://CMS-DT/ContentStore" - To this:
contentStoreLocation="http://CMS-DB/ContentStore;ApiKey=CMS-DB/jXJX7BnEYMzFiaYz7D2OXI69uVU;Database=IGXContentStore"
- Change this:
- Save and close the site directory Web.config.
- Open the file in a text editor, and locate the <CMSContentStoreSettings> element.
- Navigate to Web.config within the DSS_Preview folder (e.g., [Drive]:\[path-to-cms-dt-site-root-directory]\DSS_Preview). Complete the following steps.
- Open the file in a text editor, and follow the same steps you used when making changes to [Drive]:\[path-to-cms-dt-site-root-directory]\Web.config.
- Save and close the DSS Preview Web.config.
- Navigate to IIS Manager. Start the CMS-DT CMS and DSSPreview application pools.
- Verify that you can log in the CMS-DT site instance UI.
- Navigate to the XML tab in the CMS-DT site instance UI. Verify the tab renders the unstyled page content XML as expected.
Method 2: New RavenDB Instance
To set up and connect a new RavenDB instance to the existing CMS:
- Install the CMS site instance on the newly deployed CMS-DB server. Ensure the new instance installs with the same version as the original CMS-DB instance, and don't include a site export in the installation.
Note
Set up the site with the same file paths to avoid additional configuration.
- Navigate to IIS Manager. Stop the CMS-DB instance's CMS and DssPreview application pools.
- Set up a new API key by completing the following steps.
- Log in to the CMS-DB instance ContentStore, and click Manage your Server. The API Keys view displays.
- Click Create a new API Key, and complete the following fields:
Field Description Name Enter the API key friendly name. Enabled drop-down list Set the API key to Enabled. Resources Indicate the permissioned database(s) for this API key. NoteThis field requires you to provide access to both the IGXContentStore and the "System" database.

-
Copy the Full API Key, as you will need this key later.
- Navigate to the CMS-DB ContentStore Database and File Systems view. Click the IGXContentStore gears icon, and select Delete. A confirmation dialog displays.

- Select Delete everything in the Delete options drop-down list, and click Yep, delete.
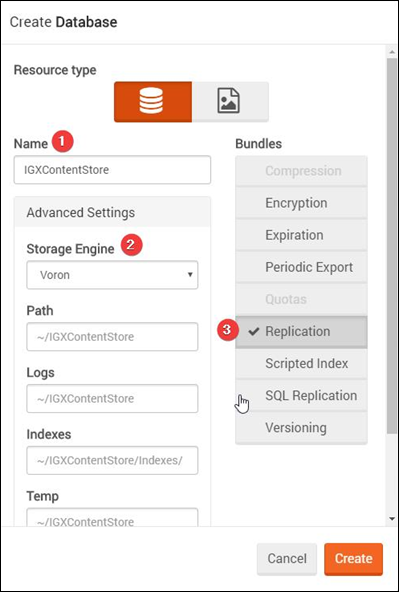
The database deletes, and the Create Database dialog displays.

- Complete the following steps to create the database:
- Retain the IGXContentStore name for new database in the Name field.
- Select Advanced Settings to expand the area, and select Voron in the Storage Engine drop-down list.
- Select Replication in the Bundles options list.
- Click Create. The new IGXContentStore database generates.
- Log in to the CMS-DT ContentStore.
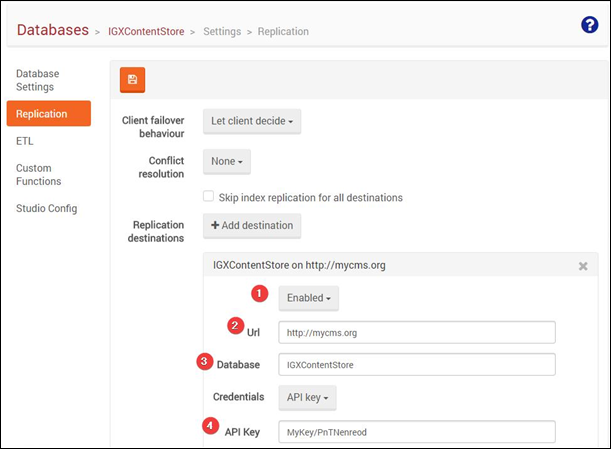
- Configure replication settings by completing the follow steps.
- Navigate to IGXContentStore > Settings > Replication.
The database replication settings display.

- Retain the Client failover behavior and Conflict resolution default field values.
- Click + Add destination. Complete the following fields to set up your replication target.
Field Description Enabled/Disabled drop-down list Enables or disables the replication target. We recommend selecting Disabled so that you can verify all replication settings. URL Indicates the secondary ContentStore URL. For example:
http://[cms-dt-instance-name]/ContentStoreDatabase Indicates the database to replicate. API Key Indicates the API key created when configuring the target server. - Click the Save button.
- Navigate to IGXContentStore > Settings > Replication.
- Monitor the replication status. Replication completes when the Document Count in the Source and Target Database match.
Note
There is an expected discrepancy of ~10 documents.
- Schedule a CMS content freeze after the replication completes. Activate the content freeze when connecting the CMS on the CMS-DT server to the RavenDB on the CMS-DB server.
- Navigate to IIS Manager. Stop the CMS-DT CMS, DSSPreview, and ContentStore application pools.
- Navigate to Web.config in the CMS-DT instance's site directory root folder (e.g., [Drive]:\[path-to-cms-dt-site-root-directory]). Complete the following steps.
- Open the file in a text editor, and locate the <CMSContentStoreSettings> element.
<CMSContentStoreSettings embeddedContentStore="false" contentStoreLocation="http://CMS-DT/ContentStore" secureTransport="false"> - Update the @contentStoreLocation attribute value to match your CMS-DB ContentStore location and API key. The value should look similar to the following code:
Caution
Caution: This code is an example. Ensure you enter the correct contentStoreLocation protocol before saving changes.
- Change this:
contentStoreLocation="http://CMS-DT/ContentStore" - To this:
contentStoreLocation="http://CMS-DB/ContentStore;ApiKey=CMS-DB/jXJX7BnEYMzFiaYz7D2OXI69uVU;Database=IGXContentStore"
- Change this:
- Save and close the site directory Web.config.
- Open the file in a text editor, and locate the <CMSContentStoreSettings> element.
- Navigate to Web.config within the DSS_Preview folder (e.g., [Drive]:\[path-to-cms-dt-site-root-directory]\DSS_Preview). Complete the following steps.
- Open the file in a text editor, and follow the same steps that you used when making changes to [Drive]:\[path-to-cms-dt-site-root-directory]\Web.config.
- Save and close the DSS Preview Web.config.
- Navigate to IIS Manager, and start the CMS-DT CMS and DSSPreview application pools.
- Verify that you can log in the CMS-DT site instance UI.
- Navigate to the DSS Preview and XML tabs in the CMS-DT site instance UI. Verify the tabs render the unstylized page content XML as expected.

There are no comments yet.