Installing CMS 10.6 Oxygen Desktop Plugin Without Web Launcher
Configure CMS 10.6 Connection Settings for the Oxygen Desktop Plugin. The system requires content contributors to configure these settings if they do not install web launcher.
Description
Use this guide to install the CMS 10.6 Oxygen Desktop Plugin without Web Launcher.
We recommend installing the Oxygen Desktop Plugin with Web Launcher.
The web launcher feature automatically configures the Ingeniux CMS Connection Settings and OAuth identity. If you choose to install the Oxygen Desktop Plugin with Web Launcher, see Windows: Installing CMS 10.6 Oxygen Desktop Plugin with Web Launcher or MacOS: Installing CMS 10.6 Oxygen Desktop Plugin with Web Launcher.
This installation guide includes the following:
- Install Oxygen Web Service (CMS system administrators only)
- Create OAuth Identity (CMS administrators only)
- Install Ingeniux CMS Connector
- Configure CMS 10.6 Connection Settings
Step-by-Step
1. Install Oxygen Web Service
The Oxygen Desktop Plugin requires Ingeniux CMS 10.6 system administrators to install the Oxygen Web Service in the CMS site instance file directory.
If the Oxygen Web Service is not installed, contact your CMS system administrator.
Prerequisites
- System administrators must install Ingeniux CMS 10.6 and have access to the CMS site instance file system.
- Administrators must navigate to Administration > DITA and provide the a/IDs of the DITA Root Folder and DTD Folder within the DITA Content Location area.
- System administrators must have access to the OxygenWebService.zip compatible with CMS 10.6.
- System administrators must install the latest version of the Oxygen Web Service .dll file for CMS 10.6. See Updating Oxygen Web Service for details.
- For users to access templates, CMS administrators must create a folder called Templates in the CMS Assets Manager, and then define the folder ID in the plugin's Web.config.
Note
Create the Templates folder directly under the Assets root node in the Assets Tree, or create the folder under the DITA root folder to display template resources directly in the Oxygen Desktop Plugin's Ingeniux CMS Browser tab. If you have custom template resources, upload them to this folder.
Steps
To install the OxygenWebService.zip package for CMS 10.6:
- Stop the CMS instance application pool by completing the following steps.
- Open Internet Information Services Manager (IIS), and navigate to the CMS instance application pool.
-
Right-click the application pool, and select Stop.
The CMS instance stops running.
- Access the CMS 10.6 OxygenWebService.zip package on your file system.
- Extract the contents from OxygenWebSevice.zip to the Custom folder within your Ingeniux CMS installation (e.g., [Drive:]\[path-to-cms-site-instance]\App_Data\xml\Custom\OxygenWebService\).
-
Configure Web.config via the following steps.
ImportantYou can skip configuring Web.config. However, if you plan to use customized Oxygen Desktop Plugin settings, then modify the applicable keys.
- In the OxygenWebService folder, open Web.config in a text editor.
- Provide the appropriate values for the following keys:
<?xml version="1.0" encoding="utf-8"?>
<configuration>
  <appSettings>
    <add key="webpages:Version" value="3.0.0.0" />
    <add key="webpages:Enabled" value="false" />
    <add key="ClientValidationEnabled" value="true" />
    <add key="UnobtrusiveJavaScriptEnabled" value="true" />
    <add key="key" value="ingeniux" />
    <add key="user" value="admin" />
    <add key="lockdown" value="false"/>
    <add key="rootFolderId" value="af/3" />
    <add key="ditaSchema" value="DITA Content" />
    <add key="templatesFolderId" value="af/4" />
    <add key="dtdRootId" value="af/5" />
    <add key="defaultTemplateDescription" value="Custom Template" />
    <add key="javaBinPath" value="C:\Program Files\Java\jdk-12.0.1\bin" />
    <add key="treeChildrenPageSize" value="40"/>
    <add key="allowDelete" value="false"/>
    <add key="contentTitleXpath" value=""/>
    <add key="pluginsFolderId" value="" />
    <add key="customTemplatesOnly" value="true|false"/>
    <add key="prodModeErrorReport" value="false"/>
  </appSettings>
  ...

</configuration>
Key Name Description user The user defined for this key will be a fallback account for operations related to the web service.
rootFolderId The a/ID of the CMS root folder where your DITA assets reside.
Instead of configuring this value here, configure the DITA Root Folder within Administration > DITA (see prerequisite).
The Oxygen Desktop Plugin automatically retrieves the folder information from the CMS UI.
NoteThis Web.config setting serves as a fallback configuration. If the setting is configured in both places, the system references the Administration > DITA setting.
templatesFolderId Enter the af/ID value. Provide the ID of the CMS root folder where your custom template assets reside (see prerequisite).
dtdRootId (optional) The a/ID of the DTD folder where your docyment type definitions (DTDs) will reside.
Instead of configuring this value here, configure the DTD Folder within Administration > DITA (see prerequisite).
The Oxygen Desktop Plugin automatically retrieves the folder information from the CMS UI.
NoteThis Web.config setting serves as a fallback configuration. If the setting is configured in both places, the system references the Administration > DITA setting.
defaultTemplateDescription Enter a brief text description for your custom templates.
javaBinPath If this filepath doesn't exist on your machine, then change the value to the appropriate filepath (e.g., C:\Program Files\Oxygen XML Editor 25\jre\bin).
treeChildrenPageSize Keep the 40 value as is or enter a new number value.
This key sets the maximum number of assets to display for any expanded node in the Ingeniux CMS Browser tab and Search Result tab of the Oxygen Desktop Plugin. If a node contains more assets than the maximum defined value, the system doesn't load the extra assets until the user clicks More... in the tree structure.
allowDelete Enter true or false.
If set to true, users can directly delete DITA assets via the Oxygen Desktop Plugin.
If set to false (default value), users can only delete DITA assets via the CMS Assets Manager UI.
contentTitleXpath Keep this setting as is or enter the following XPath expression: /*/title.
If set to /*/title, each DITA asset's title element value displays as the DITA asset's name in the Ingeniux CMS Browser tab tree structure.
TipTo view the DITA asset's file name, content contributors can hover over the DITA asset in the Ingeniux CMS Browser tab. The asset's tooltip displays the file name.
If set to no value (default), the DITA asset's file name displays in the Ingeniux CMS Browser tab tree structure.
customTemplatesOnly Enter true or false.
If set to true, users can only select custom templates when creating new document assets.
If set to false, users can select preconfigured Oxygen XML Editor templates or custom templates when creating new documents.
prodModeErrorReport Enter true or false.
If set to true, the system removes the stack trace from the CMS instance error report.
If set to false (default), the system keeps the stack trace in the CMS instance error report.
- Save and close Web.config.
- Start the CMS instance application pool by completing the following steps.
- Open Internet Information Services Manager (IIS), and navigate to the CMS instance's application pool.
-
Right-click the application pool, and click Start.
The CMS instance starts running.
2. Create OAuth Identity
Users require OAuth identity authentication credentials to access the Oxygen Desktop Plugin. Administrators can create and provide these credentials via CMS System Options.
Each OAuth identity provides a client ID and client secret for an individual user. When users configure the Ingeniux CMS Connection Settings for the Oxygen Desktop Plugin, the system will require this information.
Prerequisites
Users must have administrator permissions.
Steps
To create an OAuth Identity for the Oxygen Desktop Plugin:
-
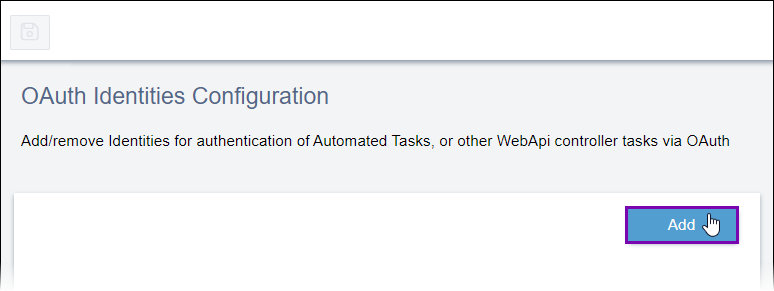
Navigate to Administration > System Options > CMS > OAuth Identities.
-
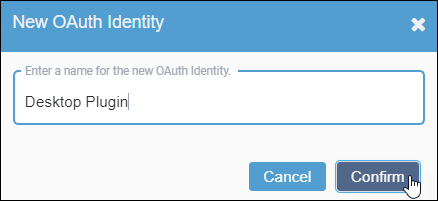
Select Add in the OAuth Identities Configuration area to create a new OAuth identity.
The New OAuth Identity dialog displays.
-
Complete the following fields.
Field Description Name Enter an arbitrary name for the OAuth identity in the field.
Notes Provide notes that help you to remember your purpose for creating the OAuth identity.
NoteYou can change these field values at any time.
The identity displays in the OAuth Identities Configuration area.
-
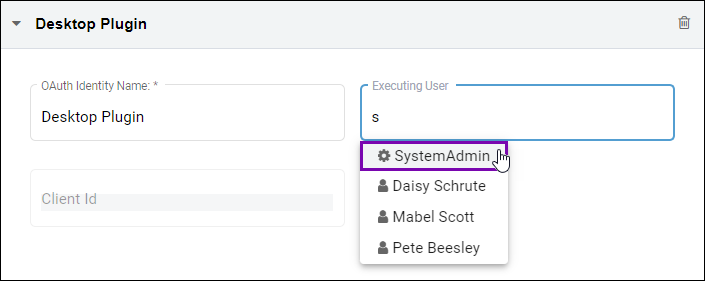
Enter the name of the user to associate with the identity in the Executing User field, and select the user from the drop-down list that displays.
NoteThe system prevents you from changing the Executing User field value after you click Save.
-
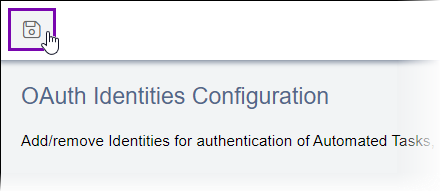
Select Save to generate the OAuth identity.
The Alert dialog displays the client ID and client secret associated with the new identity.
-
Select the Copy button to copy the Client Secret value to your clipboard, and use or store the secret as needed.
CautionIf you plan to use the client secret more than once or want to reference the secret in the future, then store the Client Secret value in a safe place, as the client secret only displays once. While you can view the client ID at any time in the OAuth identity details, the system prevents administrators from viewing the client secret after closing this Alert dialog.
If you forget the Client Secret value, then select the identity's Reset Client Secret button.
- Select Dismiss to close the dialog.
-
Select the Copy button to copy the Client Id value in the OAuth identity details area, and use the Id as needed.
You can view and copy the Client Id value at any time. Unlike the Client Secret, the system never hides the Client Id value.

4. Configure Ingeniux CMS Connection Settings
The Oxygen Desktop Plugin requires each CMS content contributor who will use the plugin to configure in their Oxygen XML Editor 23.1+ application. After installation, users can check for and install subsequent updates to the Ingeniux CMS Connector plugin.
Steps
To install the Ingeniux CMS Connector add-on for the Oxygen Desktop Plugin:
- Open the Oxygen XML Editor application.
-
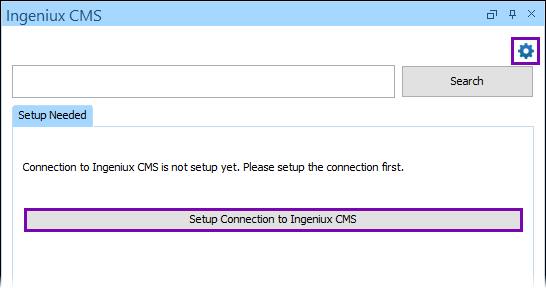
Select the Settings (gear) icon, or select Setup Connection to Ingeniux CMS in the Ingeniux CMS Browser tab.
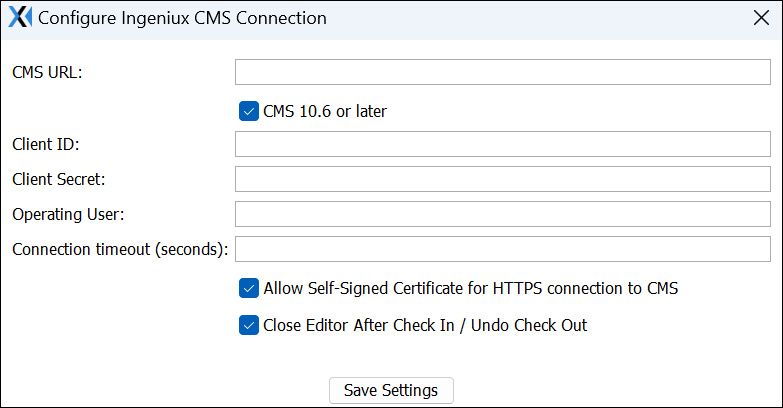
The Configure Ingeniux CMS Connection dialog displays.
-
Enter values in the following fields.
Field Description CMS URL Enter the URL of the Ingeniux CMS instance containing the DITA assets (e.g., https://cms-site.com).
ImportantDo not include a trailing slash in the CMS URL.
CMS 10.6 or later checkbox Select this checkbox to configure CMS 10.6 connection settings.
When you select this checkbox, the Client ID and Client Secret fields display.
Client ID Per Part 3: OAuth Identity Creation, enter the appropriate OAuth client ID.
TroubleshootingIf you don't know your client ID, contact your CMS administrator.
Client Secret Per Part 3: OAuth Identity Creation, enter the client secret associated with your OAuth client ID.
TroubleshootingIf you don't know your client secret, contact your CMS administrator.
API Key Version Notes: CMS 10.3–10.5This field only applies to CMS 10.3–10.5. Be sure to select the CMS 10.6 or later checkbox.
Operating User Enter the CMS user ID that you will use to access the CMS in the Oxygen Desktop Plugin.
Connection timeout (seconds) Enter the maximum duration the system will wait (in seconds) to connect before timing out.
If no response initiates after this specified timeout period, the connection process terminates.
Allow Self-Signed Certificate for HTTPS Connection to CMS checkbox Select or clear the checkbox.
If selected, Oxygen Desktop Plugin allows users to connect to the CMS via an HTTPS self-signed certificate.
If cleared (default), the Oxygen Desktop Plugin doesn't allow HTTPS self-signed certificates.
This setting is based on the CMS instance setup. Contact your CMS system administrator for details.
ImportantSelf-signed certificates only work for Transport Layer Security (TLS) 1.2+.
Close Editor After Check In / Undo Check Out checkbox Select or clear the checkbox.
If selected (default), Oxygen Desktop Plugin closes DITA assets after users execute the Check In or Undo Check Out action.
If cleared, the DITA assets remain open in the editor after executing these actions.
-
Select Save Settings.
ImportantAfter saving any value change in the Configure Ingeniux CMS Connection dialog, exit from Oxygen XML Editor to ensure your changes take effect when reopening the application.
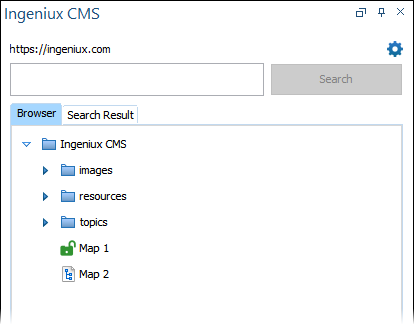
The Configure Ingeniux CMS Connection dialog closes, and the structure of your CMS DITA assets displays in the Ingeniux CMS Browser tab.
The plugin is now ready for you to connect Oxygen XML Editor to DITA assets in Ingeniux CMS.

There are no comments yet.