Windows: Installing CMS 10.6 Oxygen Desktop Plugin with Web Launcher
Set up the CMS 10.6 Oxygen Web Launcher for Windows machines. Web Launcher automatically configures OAuth identities and CMS connection settings for users.
Description
Install the CMS 10.6 Oxygen Desktop Plugin with Windows 10+ Web Launcher. Users can access the web launcher feature to directly open DITA content in the Oxygen Desktop Plugin from the CMS.
This installation guide includes the following:
- Install Oxygen Web Service (CMS system administrators only)
- Install Ingeniux CMS Connector
- Install Oxygen Desktop Plugin Web Launcher for Windows
- Open Oxygen Desktop Plugin via Web Launcher
If users have MacOS machines, see MacOS: Installing Oxygen Desktop Plugin with Web Launcher for details.
Step-by-Step
1. Install Oxygen Web Service
The Oxygen Desktop Plugin requires Ingeniux CMS 10.6 system administrators to install the Oxygen Web Service in the CMS site instance file directory.
If the Oxygen Web Service is not installed, contact your CMS system administrator.
Prerequisites
- System administrators must install Ingeniux CMS 10.6 and have access to the CMS site instance file system.
- Administrators must navigate to Administration > DITA and provide the a/IDs of the DITA Root Folder and DTD Folder within the DITA Content Location area.
- System administrators must have access to the OxygenWebService.zip compatible with CMS 10.6.
- System administrators must install the latest version of the Oxygen Web Service .dll file for CMS 10.6. See Updating Oxygen Web Service for details.
-
For users to access templates, CMS administrators must create a folder called Templates in the CMS Assets Manager, and then define the folder ID in the plugin's Web.config.
Create the Templates folder directly under the Assets root node in the Assets Tree, or create the folder under the DITA root folder to display template resources directly in the Oxygen Desktop Plugin's Ingeniux CMS Browser tab. If you have custom template resources, upload them to this folder.
Steps
To install the OxygenWebService.zip package for CMS 10.6:
- Stop the CMS instance application pool by completing the following steps.
- Open Internet Information Services Manager (IIS), and navigate to the CMS instance application pool.
-
Right-click the application pool, and click Stop.
The CMS instance stops running.
- Access the CMS 10.6 OxygenWebService.zip package on your file system.
- Extract the contents from OxygenWebSevice.zip to the Custom folder within your Ingeniux CMS installation (e.g., [Drive:]\[path-to-cms-site-instance]\App_Data\xml\Custom\OxygenWebService\).
-
Configure Web.config via the following steps.
ImportantYou can skip configuring Web.config. However, if you plan to use customized Oxygen Desktop Plugin settings, then modify the applicable keys.
- In the OxygenWebService folder, open Web.config in a text editor.
- Provide the appropriate values for the following keys:
<?xml version="1.0" encoding="utf-8"?>
<configuration>
  <appSettings>
    <add key="webpages:Version" value="3.0.0.0" />
    <add key="webpages:Enabled" value="false" />
    <add key="ClientValidationEnabled" value="true" />
    <add key="UnobtrusiveJavaScriptEnabled" value="true" />
    <add key="key" value="ingeniux" />
    <add key="user" value="admin" />
    <add key="lockdown" value="false"/>
    <add key="rootFolderId" value="af/3" />
    <add key="ditaSchema" value="DITA Content" />
    <add key="templatesFolderId" value="af/4" />
    <add key="dtdRootId" value="af/5" />
    <add key="defaultTemplateDescription" value="Custom Template" />
    <add key="javaBinPath" value="C:\Program Files\Java\jdk-12.0.1\bin" />
    <add key="treeChildrenPageSize" value="40"/>
    <add key="allowDelete" value="false"/>
    <add key="contentTitleXpath" value=""/>
    <add key="pluginsFolderId" value="" />
    <add key="customTemplatesOnly" value="true|false"/>
    <add key="prodModeErrorReport" value="false"/>
  </appSettings>
  ...

</configuration>
Key Name Description user The user defined for this key will be a fallback account for operations related to the web service.
rootFolderId The a/ID of the CMS root folder where your DITA assets reside.
Instead of configuring this value here, configure the DITA Root Folder within Administration > DITA (see prerequisite).
Web Launcher automatically retrieves the folder information from the CMS UI.
templatesFolderId Enter the af/ID value. Provide the ID of the CMS root folder where your custom template assets reside (see prerequisite).
dtdRootId (optional) The a/ID of the DTD folder where your document type definitions (DTDs) will reside.
Instead of configuring this value here, configure the DTD Folder within Administration > DITA (see prerequisite).
Web Launcher automatically retrieves the folder information from the CMS UI.
defaultTemplateDescription Enter a brief text description for your custom templates.
javaBinPath If this filepath doesn't exist on your machine, then change the value to the appropriate filepath (e.g., C:\Program Files\Oxygen XML Editor 25\jre\bin).
treeChildrenPageSize Keep the 40 value as is or enter a new number value.
This key sets the maximum number of assets to display for any expanded node in the Ingeniux CMS Browser tab and Search Result tab of the Oxygen Desktop Plugin. If a node contains more assets than the maximum defined value, the system doesn't load the extra assets until the user clicks More... in the tree structure.
allowDelete Enter true or false.
If set to true, users can directly delete DITA assets via the Oxygen Desktop Plugin.
If set to false (default value), users can only delete DITA assets via the CMS Assets Manager UI.
contentTitleXpath Keep this setting as is or enter the following XPath expression: /*/title.
If set to /*/title, each DITA asset's title element value displays as the DITA asset's name in the Ingeniux CMS Browser tab tree structure.
TipTo view the DITA asset's file name, content contributors can hover over the DITA asset in the Ingeniux CMS Browser tab. The asset's tooltip displays the file name.
If set to no value (default), the DITA asset's file name displays in the Ingeniux CMS Browser tab tree structure.
customTemplatesOnly Enter true or false.
If set to true, users can only select custom templates when creating new document assets.
If set to false, users can select preconfigured Oxygen XML Editor templates or custom templates when creating new documents.
prodModeErrorReport Enter true or false.
If set to true, the system removes the stack trace from the CMS instance error report.
If set to false (default), the system keeps the stack trace in the CMS instance error report.
- Save and close Web.config.
- Start the CMS instance application pool by completing the following steps.
- Open Internet Information Services Manager (IIS), and navigate to the CMS instance's application pool.
-
Right-click the application pool, and click Start.
The CMS instance starts running.
2. Install Ingeniux CMS Connector 1.5.50+
The Oxygen Desktop Plugin requires each CMS content contributor who will use the plugin to install the Ingeniux CMS Connector add-on in their Oxygen XML Editor 23.1+ application. After installation, users can check for and install subsequent updates to the Ingeniux CMS Connector plugin.
If the Ingeniux CMS Connector is already installed, see Installing Add-on Updates for details to update the Ingeniux CMS Connector to the latest version.
Prerequisites
CMS content contributors must install Oxygen XML Editor 23.1+ on their authoring client(s). See the Oxygen XML Editor website for details.
Steps
To install the Ingeniux CMS Connector add-on for the Oxygen Desktop Plugin:
- Open the Oxygen XML Web Editor application.
-
Navigate to Help > Install new add-ons... in the Oxygen XML Editor toolbar.
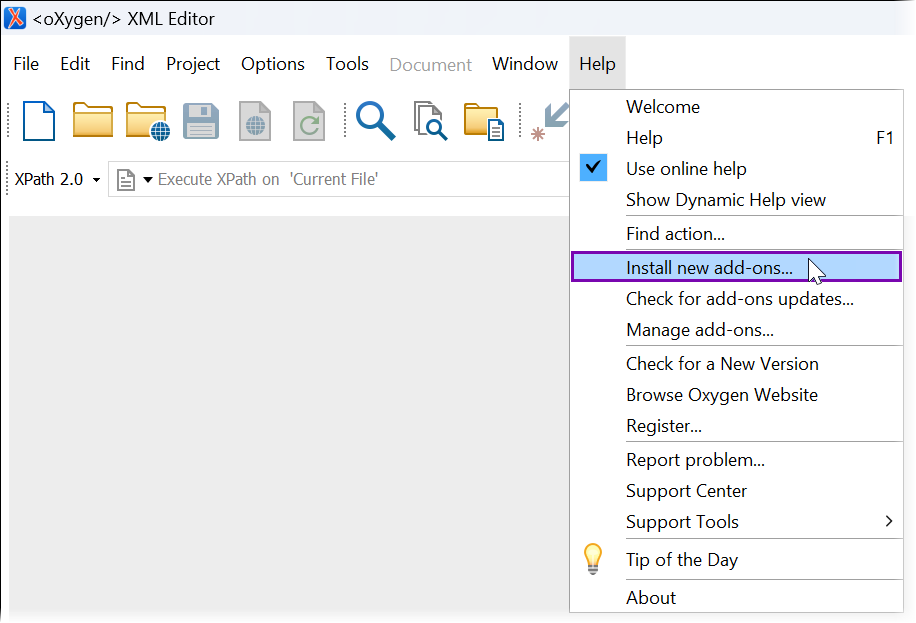
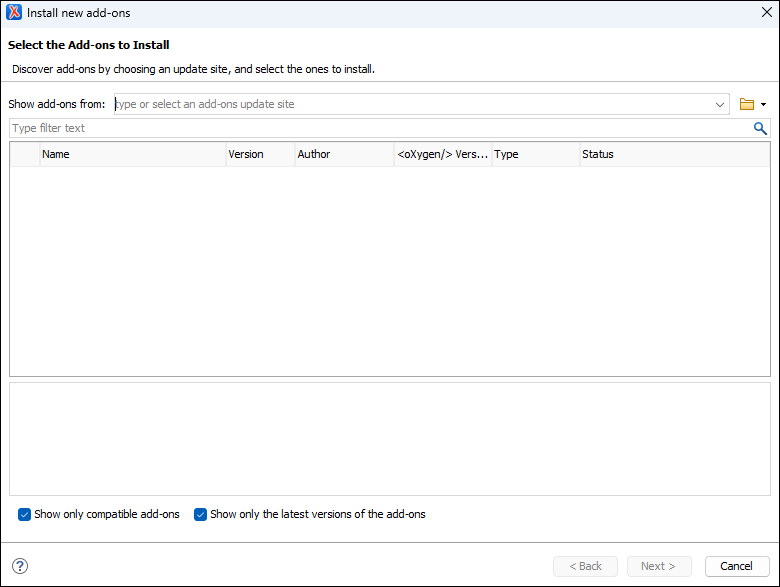
The Install new add-ons dialog displays.
-
Copy and paste the following URL in the Show add-ons from field:
https://oxygenplugindev.ingeniux.com/plugins/pluginfeed.xml
The Ingeniux CMS Connector add-on displays in the list.
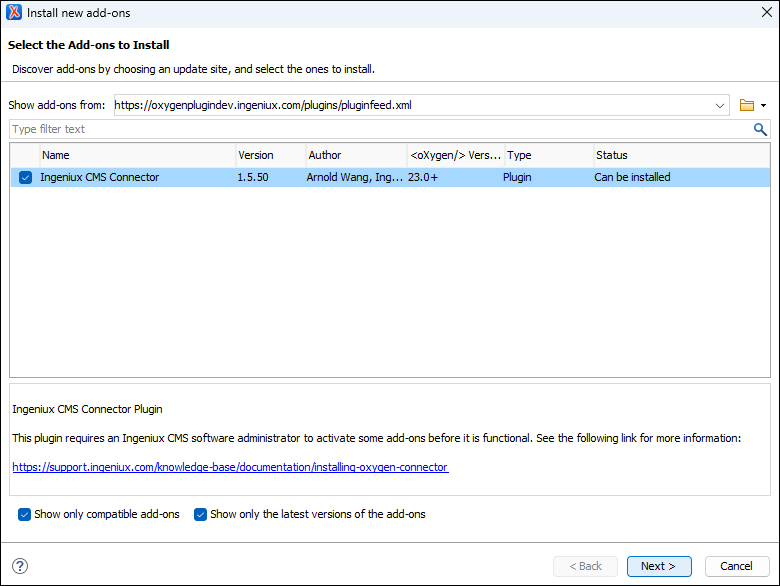
- Select the Ingeniux CMS Connector add-on, and select Next.
-
If a Security confirmation message displays, select Allow or Allow and remember to grant the system permission to connect with the host URL.
TipWe recommend selecting Allow and remember. This way, you only have to grant permissions once and not for each subsequent version update.
-
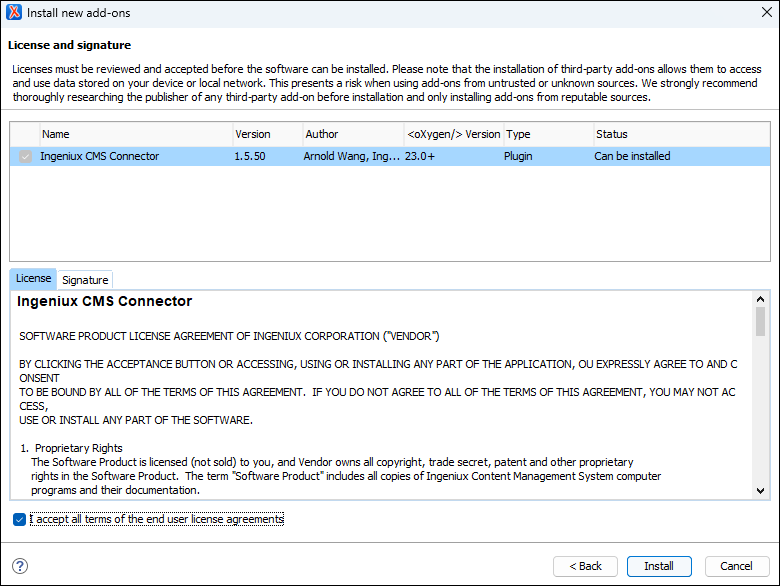
Accept the license agreements in the License and Signature tabs by selecting the I accept all terms of the end user license agreements checkbox.
-
Select Install.
The add-on installs to your system, and the Add-ons dialog displays.
-
Select OK, and restart the Oxygen XML Editor application to apply the add-on install changes.
The UI now displays the following:
-
new options (i.e., the Check Out, Check In, and Insert Topic Reference buttons) in the application's toolbar.

- the Ingeniux CMS pane.
- the Ingeniux DITA References pane.
-
Do not configure Ingeniux CMS connection settings. Web Launcher automatically configures the Ingeniux CMS Connection settings for the Oxygen Desktop Plugin.
3. Install Oxygen Desktop Plugin Web Launcher for Windows
Set up the Windows Web Launcher tool to streamline the process of accessing and editing DITA in the Oxygen Desktop Plugin. After setup, the Edit in Oxygen button becomes available in the CMS. Users can select this button to directly open DITA content in the Oxygen Desktop Plugin from the CMS.
Prerequisites
-
Users must have a Windows 10 or Windows 11 machine.
-
Users with DITA configuration permissions must enable the web launcher feature for content contributors. Navigate to Administration > DITA > Setup, and select the Allow invoking Oxygen Desktop XML Author for DITA editing checkbox in the DITA Advanced Options area.
NoteWhen this setting is selected, the CMS generates an OAuth Identity named _oxygen_exclusive_admin in Administration > System Options > CMS > OAuth Identities.
The system uses the OAuth identity credentials to connect users to the Oxygen Desktop Plugin when they execute Web Launcher.
Steps
To install CMS 10.6 Oxygen Desktop Plugin Web Launcher for Windows:
- Complete the following steps to download OxygenWebLauncherInstall.exe.
- Navigate to Assets > Assets Tree.
- Select any DITA item in the tree to display the item's Overview tab.
-
Select the gear icon on the Edit in Oxygen button, and select the Download Installer icon that displays.
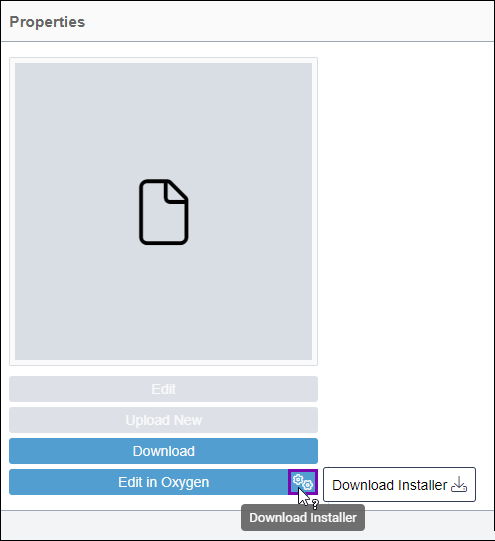
OxygenWebLauncherInstall_Windows.zip downloads to your machine.
-
Extract the contents from the .zip, and store them in your file system.
WarningDo not delete OxygenWebLauncherInstall.exe. Without this file, the system will not maintain your Web Launcher registration settings. If you delete the file, then repeat the Web Launcher installation steps again.
-
Run the OxygenWebLaunch.exe in File Explorer.
The Oxygen Web Launcher Registration application displays in administrator mode.
-
Complete the following fields.
Field Description Select Oxygen Installation Select the Oxygen XML Editor installation from the drop-down list. This setting determines where the web launcher will execute. Select Running Mode Select one of the following running modes from the drop-down list. This setting determines the mode that the web launcher will use. - Author. When web launcher executes, the system opens the DITA content in the Oxygen XML Author desktop application.
- Developer. When web launcher executes, the system opens the DITA content in the Oxygen XML Developer desktop application.
- Editor. When web launcher executes, the system opens the DITA content in the Oxygen XML Editor desktop application.

-
Select Register Oxygen Web Launcher.
A message displays to confirm completion of the web launcher registration.
-
Select OK.
The Oxygen Web Launcher Registration application and confirmation message close.
- Restart the Oxygen XML Editor twice to ensure the system copied the Web Launcher application to the correct location.
4. Connect CMS 10.6 via Oxygen Desktop Plugin Web Launcher
Web Launcher automatically configures the Ingeniux CMS Connection settings for the Oxygen Desktop Plugin. When users run Web Launcher, the system immediately applies the _oxygen_exclusive_admin OAuth identity credentials to connect CMS 10.6 to the Oxygen Desktop Plugin.
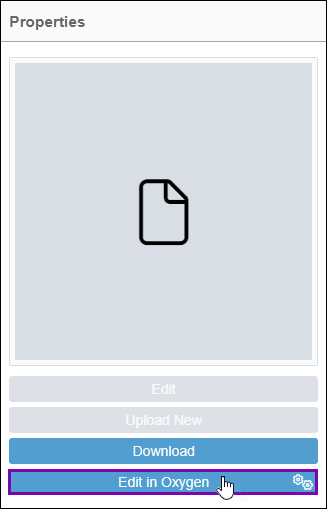
Access the web launcher feature to directly open DITA content in the Oxygen Desktop Plugin from the CMS. Execute the web launcher by selecting the Edit in Oxygen button in the DITA asset's Overview tab. Users can then edit this DITA content within the Oxygen XML Editor application interface.
Steps
To execute the Oxygen Desktop Plugin Web Launcher:
- Navigate to Assets > Assets Tree.
- Select the DITA content you want to open in the Oxygen Desktop Plugin.
-
Select the asset's Overview tab, and select Edit in Oxygen.
-
Confirm the web launcher execution in the confirmation dialog that displays.
The DITA content loads within Oxygen XML Editor desktop application.

There are no comments yet.