Configuring Windows Server 2025
Before installing Ingeniux CMS, ensure the following roles and features are configured for Windows Server 2025:
- .NET Framework 4.8.x
- .NET Framework 4.8 Features
- ASP.NET 3.5
- ASP.NET 4.8
- Version Notes: CMS 10.1+For Ingeniux CMS 10.1+, install Microsoft .NET Framework 4.7.2.
- Windows Authentication
Install Windows Server 2025 and configure its roles and features.
To configure Windows Server 2025 roles and features:
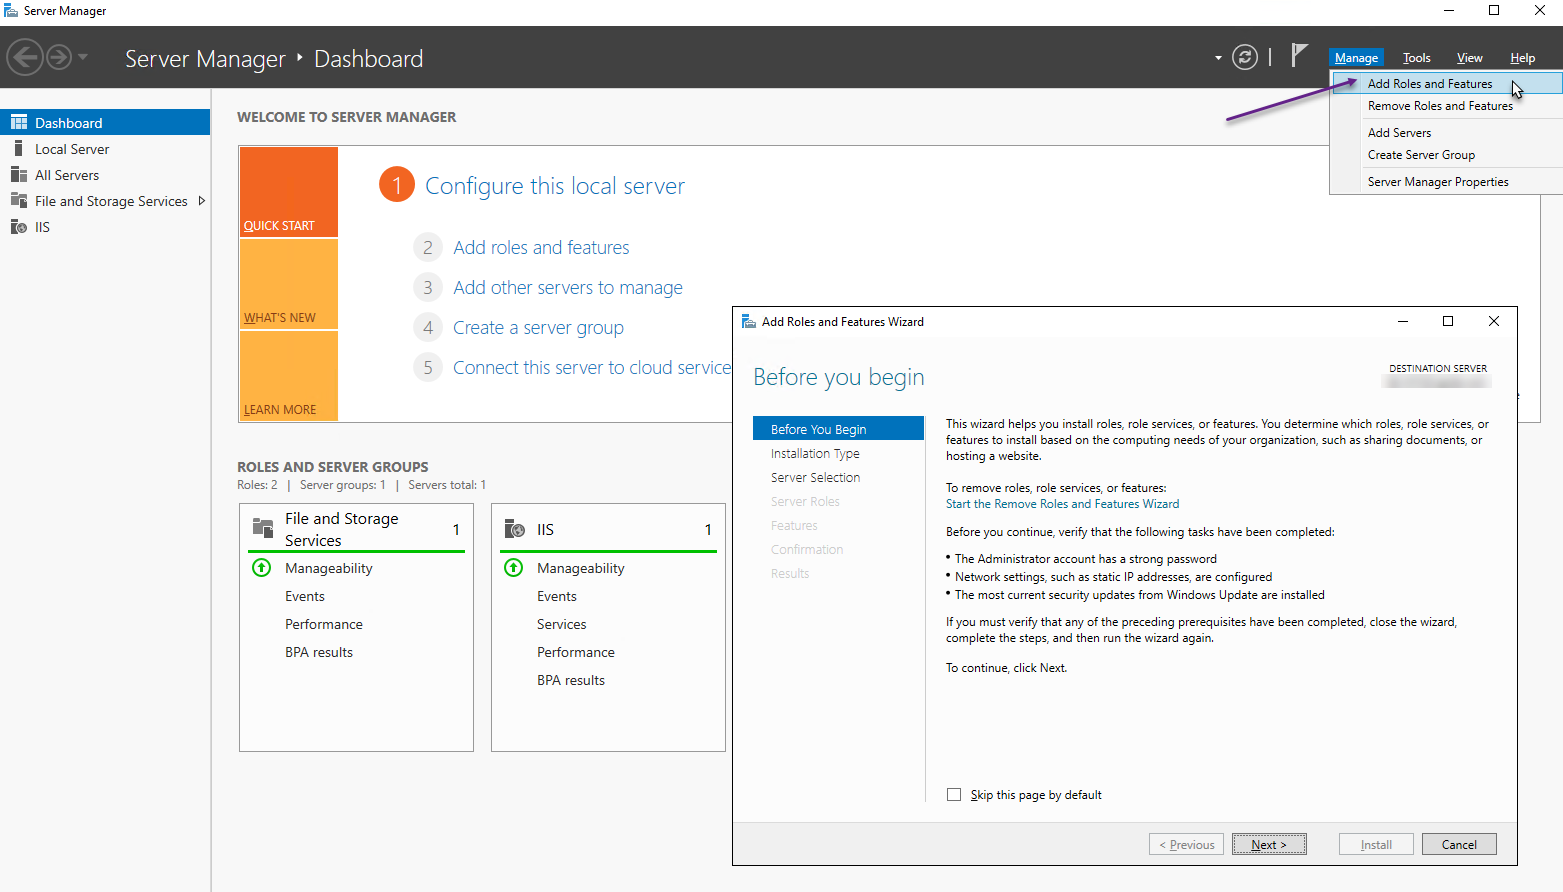
- Log in to your server as an administrator, then open Server Manager.
Server Manager typically opens automatically when administrators log on to a Windows Server-based operating system.
- In the Server Manager Dashboard, click
Manage > Add Roles and Features.
The Add Roles and Features Wizard displays. - In the Before you Begin view, review the configuration
prerequisites, then click Next.The Installation Type view displays.
- Select Role-based or feature-based installation, then
click Next.The Server Selection view displays.
- Ensure the Select a server from the server pool option is enabled, then select the your target server for installing roles and features from the Server Pool area.
- Click Next.The Server Roles view displays with default selections.
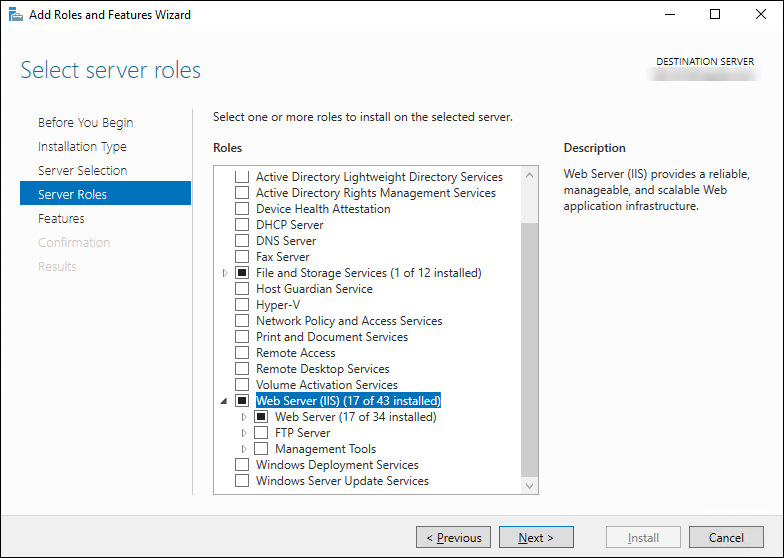
- In the Server Roles configuration view,
select the roles marked with an X below, or ensure they are enabled by
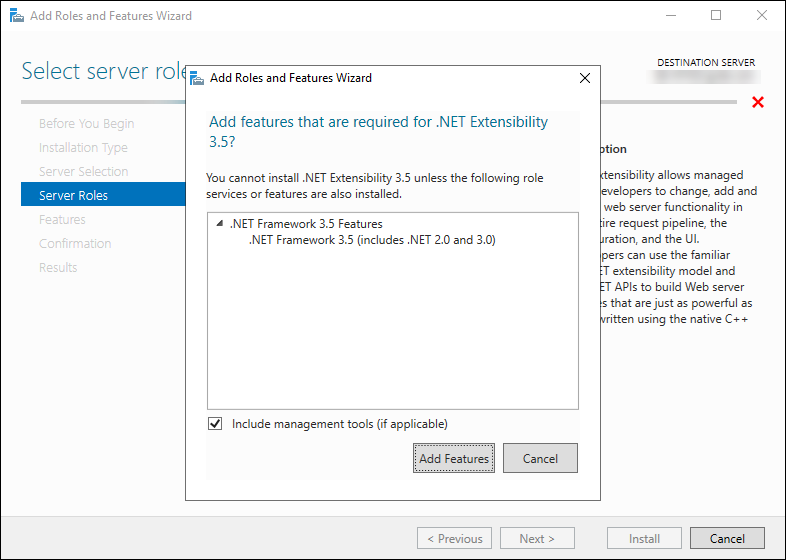
default.NoteWhen you attempt to enable the .NET Extensibility 3.5 role, the Add Role and Features Wizard dialog displays. Accept the .NET Framework 3.5feature before the wizard enables the .NET Extensibility 3.5 role.
[X] Web Server (IIS) [X] Web Server [X] Common HTTP Features [X] Default Document [X] Directory Browsing [X] HTTP Errors [X] Static Content [X] HTTP Redirection [ ] WebDAV Publishing [X] Health and Diagnostics [X] HTTP Logging [X] Custom Logging [X] Logging Tools [X] ODBC Logging [X] Request Monitor [X] Tracing [X] Performance [X] Static Content Compression [X] Dynamic Content Compression [X] Security [X] Request Filtering [X] Basic Authentication [ ] Centralized SSL Certificate Support [ ] Client Certificate Mapping Authentic... [ ] Digest Authentication [ ] IIS Client Certificate Mapping Authe... [ ] IP and Domain Restrictions [ ] URL Authorization [X] Application Development [X] .NET Extensibility 3.5 [X] .NET Extensibility 4.8 [ ] Application Initialization [ ] ASP [X] ASP.NET 3.5 [X] ASP.NET 4.8 [ ] CGI [X] ISAPI Extensions [X] ISAPI Filters [ ] Server Side Includes [X] WebSocket Protocol [X] Management Tools [X] IIS Management Console [ ] IIS 6 Management Compatibility [ ] IIS 6 Metabase Compatibility [ ] IIS 6 Management Console [ ] IIS 6 Scripting Tools [ ] IIS 6 WMI Compatibility [X] IIS Management Scripts and Tools [X] Management Service - Click Add Features when the wizard
prompts you to add the .NET Extensibility 3.5
feature after enabling the .NET Extensibility 3.5
role.
- Enable any remaining roles, then click Next.The Features configuration view displays.
- In the Features configuration view,
select the features marked with an X below, or ensure they are enabled by
default.
[X] .NET Framework 3.5 Features [X] .NET Framework 3.5 (includes .NET 2.0 and 3.0) [ ] HTTP Activation [ ] Non-HTTP Activation [X] .NET Framework 4.8 Features [X] .NET Framework 4.8 [X] ASP.NET 4.8 [X] WCF Services [ ] HTTP Activation [ ] Message Queuing (MSMQ) Activation [ ] Named Pipe Activation [ ] TCP Activation [X] TCP Port Sharing - Click Next.The Confirmation view displays.
- Optional: To restart the sever automatically after installation completes, enable the Restart the destination server automatically if required option.
- Click Install.
- When the installation completes, verify that IIS installed by entering the
following URL a web browser:
http://localhost
The default IIS Welcome page displays.
Next Steps:
- If you're installing CMS 10.5–10.6, see Installing the Ingeniux CMS 10.5–10.6 Software Platform.
- If you're installing CMS 10.0–10.3, see Installing the Ingeniux CMS 10.0–10.3 Software Platform.