Creating a Custom Tab Application
Custom tab applications are applications that are brought into the CMS via custom tabs configuration.
A custom tab application always maintains the context of current publishing target for the CMS. Also, depending on whether the tab is attached to pages or located in the Apps pane, it could be the currently selected page's information.
Like all plug-in applications, a custom tab always has references to the _Common and _CurrentUser objects.
This article uses the "SampleApp" project from the SDK as an example:
Creating the Application
This is the project to develop the plug-in application. Please don't directly run this project to test, since the project itself doesn't reflect the environment context.
First, create a new MVC web application located at App_Data/xml/custom. It must be the same MVC version as CMS application.
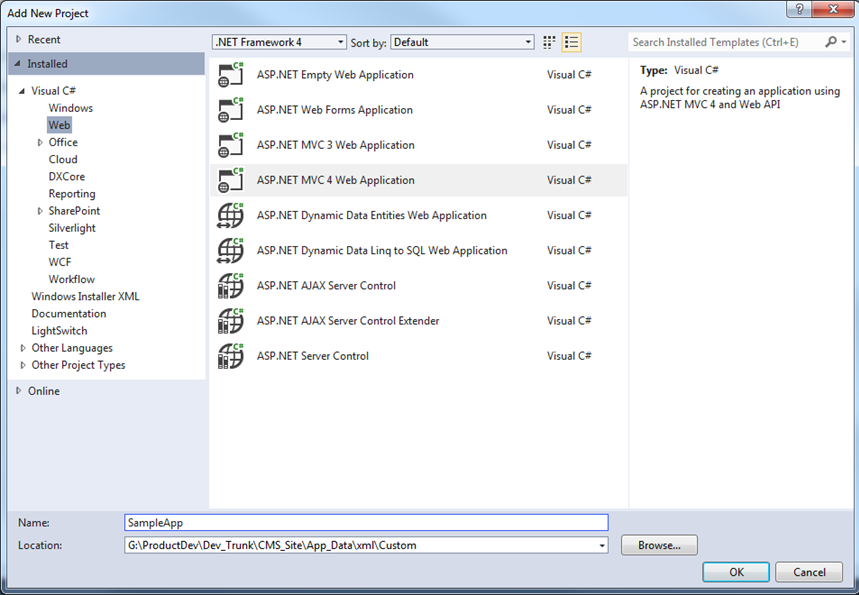
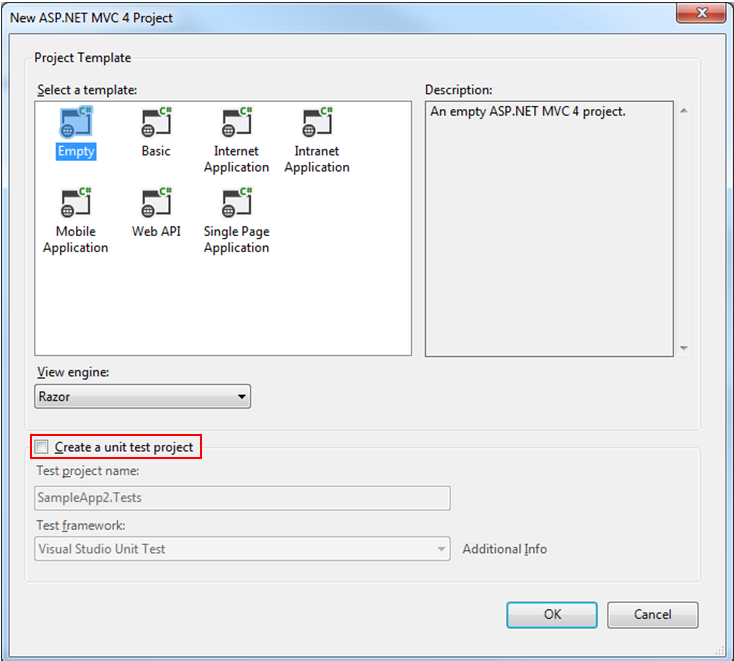
This MVC web application project can be based on an empty template. If unit tests are needed, check Create a unit test project.
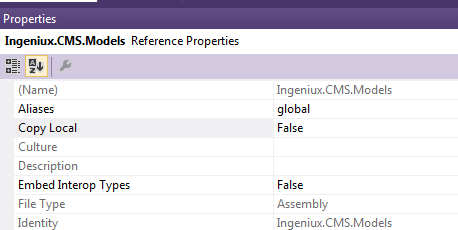
Add the following references to this project, all of which are located the CMS site's bin folder:
Ingeniux.CMS.Common.dll
Ingeniux.CMS.CSAPI.dll
Ingeniux.CMS.Models.dll
Raven.Client.Lightweight.dll
For all four references, ensure that the Copy Local property is set to False.
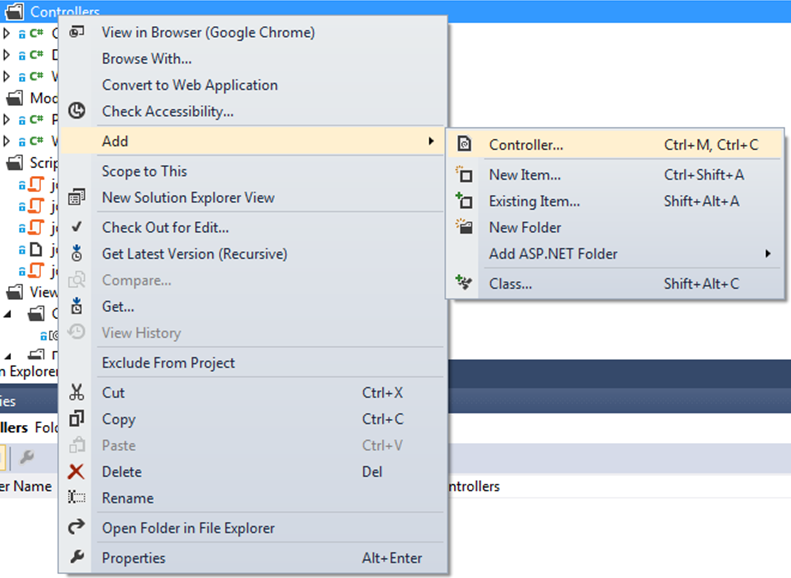
Add a New Custom Tab Controller
Right click the Controllers folder and select Add > Controller from the context menu.
The following is sample controller code; note all the controller's attributes. (See "Creating Controllers" for more information.)
[ExportMetadata("controller", "CustomTabController")] line must duplicate the controller class name as the value of the attribute.
using System;
using System.Collections.Generic;
using System.ComponentModel.Composition;
using System.Linq;
using System.Web;
using System.Web.Mvc;
using Ingeniux.CMS;
using Ingeniux.CMS.Applications;

namespace Ingeniux.CMS.Controller.Custom
{
	[Export(typeof(CMSControllerBase))]
	[ExportMetadata("controller", "CustomTabController")]
	[PartCreationPolicy(System.ComponentModel.Composition.CreationPolicy.NonShared)]
    public class CustomTabController : CustomTabApplicationController
    {
        public ActionResult Index()
        {
			using (var session = OpenReadSession())
			{
				PageContext model = new PageContext
				{
					Page = CMSContext.GetPage(session),
					CurrentPublishingTarget =
						CMSContext.GetCurrentPublishingTarget(session),
					CurrentUser = CMSContext.GetCurrentUser(session),
					ServerUrl = _Common.ServerUrl,
					AppBaseUrl = CMSContext.BaseUrl,
					AppAssetBaseUrl = CMSContext.AssetBaseUrl
				};

				return View(model);
			}
        }
    }
}
Add a View for the 'Index' Action
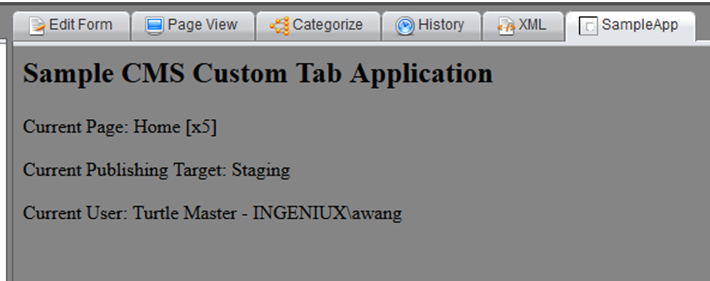
The next step is to add a view for the index action. For easy development, this is a strong-typed view that renders the current page, publishing target, and user information.
@model Ingeniux.CMS.Applications.PageContext
@using Ingeniux.CMS;

@{
	ViewBag.Title = "Sample CMS Custom Tab Application";
	IPage page = Model.Page;
	string pageLabel = page.ToNullHelper()
		.Propagate(
			p => string.Format("{0} [{1}]", p.Name, p.Id))
		.Return("No Page Specified");

	IPublishingTarget pubTarget = Model.CurrentPublishingTarget;
	string pubTargetLabel = pubTarget.ToNullHelper()
		.Propagate(
			p => p.Name)
		.Return("No Publishing Target Specified");

	IUser user = Model.CurrentUser;
	string userLabel = user.ToNullHelper()
		.Propagate(
			u => string.Format("{0} - {1}", u.Name, u.UserId))
		.Return("No User Specified");
}
Current Title: @ViewBag.Title
Current Page: @pageLabel
Current Publishing Target: @pubTargetLabel
Current User: @userLabel
Build the project. Before testing, make sure to comment out the first line of code:
@*@model Ingeniux.CMS.Applications.PageContext*@Test the Custom Tab Action in the CMS
Create a new custom tab entry in System Options (Administration > System Options > CMS > Custom Tabs).
The URL of the custom tab follows the format below:
Apps/[app folder name]/[app controller name]/[app action name]
The "app action name" section defaults to "index" if not specified. Therefore, the URLfor the test custom tab app will be Apps/SampleApp/CustomTab
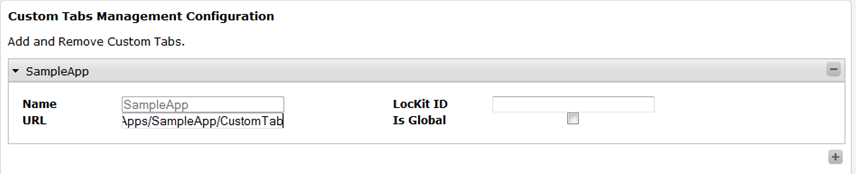
Next, set the app's icon. If the icon is in the custom folder, use the relative path to the custom folder. For example, "SampleApp/sampleAppIcon.png" tries to locate the icon at "[sitepath]/App_Data/xml/custom/SampleApp/sampleAppIcon.png".
If you are trying to use a shipped icon from CMS site instance, it will need to start with "images/". For example, "images/icons/default/edit16.png" will try to locate the icon at "[sitepath]/ images/icons/default/edit16.png". (Existing entries don't need to type in "images/" anymore.)
After setting the tab in System Options, go to any page and select the SampleApp tab:
The tab should look similar to the following: