Creating a Custom Edit Form for a Dynamic Execute Element
Building a custom user interface for a Dynamic Execute element uses the same project as a custom tab application. Once built, the UI displays a custom edit form for the element.
Adding a Dynamic Execute UI Controller
Create a new controller based on DynamicExecuteUIController class.
using System;
using System.Collections.Generic;
using System.ComponentModel.Composition;
using System.Linq;
using System.Web;
using System.Web.Mvc;
using Ingeniux.CMS.Models;

namespace Ingeniux.CMS.Controller.Custom
{
	[Export(typeof(CMSControllerBase))]
	[ExportMetadata("controller", "DynamicExecuteUIController")]
	[PartCreationPolicy(System.ComponentModel.Composition.CreationPolicy.NonShared)]
    public class DynamicExecuteUIController : DynamicExecuteInterfaceApplicationController
    {
        public ActionResult Index()
        {
			return View(ElementData);
        }
    }
}
Note: This sample DynamicExecuteUIController class file is located at [path-to-cms-site-instance]/App_Data/xml/Custom/SampleApp/Controllers.
The Dynamic Execute UI only concerns one element, and passing the ElementData object directly into view is good enough. Because this model is from the CMS application, it's possible to work directly with the strong-typed view.
Click the link to download the sample view.
This view contains some Javascript references from the current application. Make sure to put @Html.Raw(Model.AssetBaseUrl) in front of the asset references. For example:
<script type="text/javascript" src="@Html.Raw(Model.AssetBaseUrl)Scripts/jquery-2.1.0.min.js"></script>The above example uses JQuery and JQuery JSON to set the updated element model on window.name. This is how the custom edit form sends the updated element model back to the CMS.
Testing the Custom Edit Form
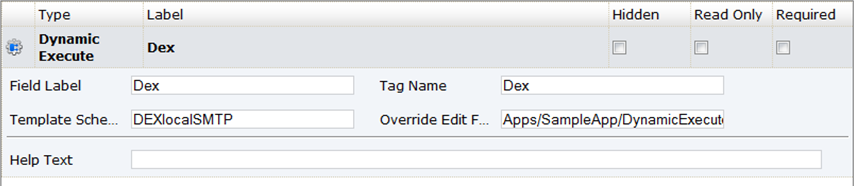
Create a copy of DEX - SMTP Emailer Component, fill in a few hard-coded default values in fields, save it as the DEXlocalSMTP schema.
Open Schema Designer and add a new Dynamic Execute element to a schema. The Template Schema field should be set to DEXlocalSMTP. Override Edit Form should be set to Apps/SampleApp/DynamicExecuteUI.
The custom edit form's URL is formatted as follows: Apps/[app folder name]/[app controller name]/[app action name]
Where "app action name" is defaults to "index" when not specified.
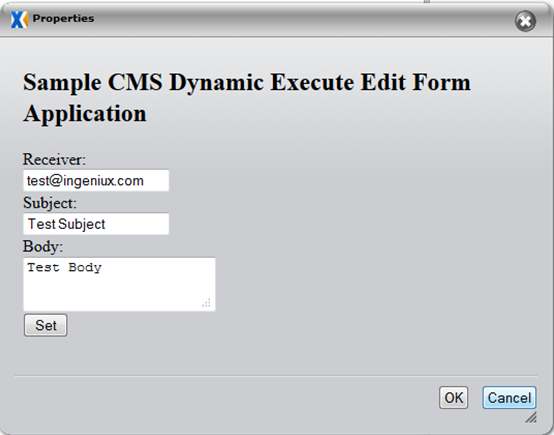
Save the schema, and create a page from it. You will see the following field:

Clicking Properties invokes the custom UI.