Managing Pages in the Site Tree
The site administrator can give user groups permission to move pages in the site tree. If you're part of a group with this permission, you can drag and drop pages in the tree, and the site navigations automatically update to reflect the new site hierarchy. Just remember that reordering pages, changes all site navigations that link to those pages.
Moving a Page in the Site Tree
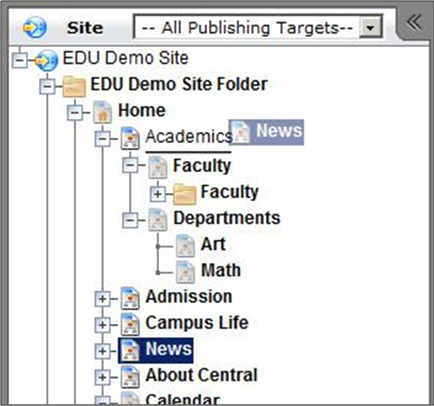
Pay attention to the shape and location of the mouse selection indicator when you move a page. It shows where a page is placed in the site hierarchy.

In the example above, the selection indicator shows a box around Academics. When dropped with this indicator, the moving page (News) becomes the last child under Academics.
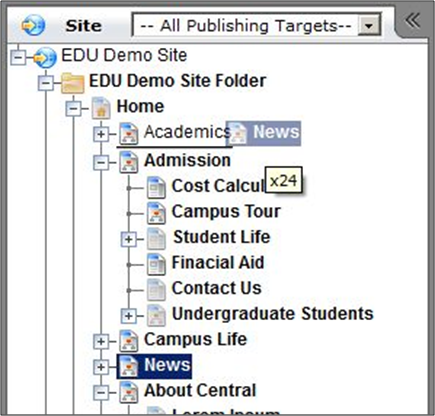
In this second example, the selection indicator shows a line under the name "Academics" but not under the page icon to its left. When dropped with this indicator, the moving page (News) becomes the first child under Academics.
In this last example, the selection indicator shows a line extending all the way under the icon next to Academics. When dropped with this indicator, the moving page is inserted between Academics and Admissions as their sibling.
To move a page:
- Select a page in the site tree.
- Drag the page to the desired location.
Copying a Page in the Site Tree
Using the Ctrl key while dragging and dropping a page changes the move action into a copy action. Pages can also be moved by copying the page and pasting it into the desired location.
To copy a page:
- Select the page in the site tree.
- Right-click the page and select Copy.
- Right-click a node in the site tree and select Paste. The copied page is a child of this node.
Alternately, you can select a page in the site tree and drag the page icon from Page Properties to the desired location in the tree.

When a copy of a page is made, all aspects of the page will be the same with two exceptions. First, the new page will not be marked for publish, even if the original is. This ensures that the new page will not be prematurely published. Second, the xID for the new page will be different from that of the original. The new page needs a unique identifier to distinguish it from the original, since the pages have the same name.
Renaming a Page in the Site Tree
The name of a page is used in various ways throughout a site, and the specific uses depend on the design of the site. In some cases, the name is included in the browser bar title; in other situations, it is used when creating breadcrumb navigation. Within the CMS, the page name is used to label content in the site tree and to identify internal links.
You can rename a page at any time, provided that the page is assigned to you. Keep in mind that if a site uses structured URLs, renaming the page will change its URL. This could affect external links to the page.
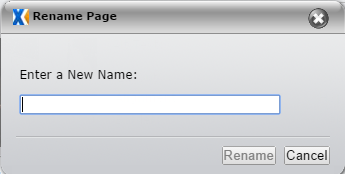
To Rename a Page:
- Select a page and ensure that the page is assigned to you. (If not, you'll need to check it out, provided you have permission to do so.)
- Right-click the page and select Rename. Pressing Ctrl+Shift+R also opens the Rename Page dialog.
- Enter a new name for the page and click Rename.