Adding Views to Visual Studio Project
To add a view in Visual Studio:
- Navigate to the DSS_Preview folder within the Ingeniux CMS installation (e.g., [Drive]:\[path-to-cms-site-instance]\DSS_Preview).
- Double-click the file named
Dynamic_Site_Server_Instance.csproj in
DSS_Preview.The sample project displays in the Solution Explorer.
- In the Views folder, right-click the
CMSPageDefault subfolder, which will contain the new
view.NoteIn addition to CMSPageDefault, the Views folder contains the Shared subfolder. Shared is reserved for partial view files, which are referenced by the main views contained in the CMSPageDefault folder.
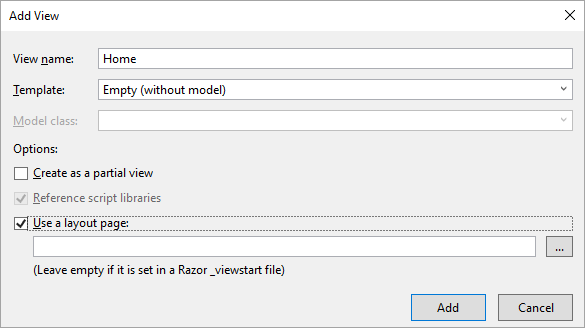
- Select Add > View.The Add View dialog displays.

- Enter the name of the associated schema type in the View
name field. Do not include the file extension in this field, as Visual
Studio will automatically add the value.ImportantThe system requires the name of the view file to match the name of the schema used to generate the view XML. For example, if you have a schema named Home, the associated view file name will be Home.cshtml. Ensure the case of names for your views match their associated schemas.
- In the Template drop-down list, you can automatically "scaffold" default view content. If you only want to create a view stub without content, then select Empty (without model).
- In the Options area, select Use a layout
page.
Layouts, Models, and Namespaces provides instructions about how to add the _viewstart file.
- Click Add.The .cshtml file displays in the Solution Explorer pane beneath the CMSPageDefault folder. Now, the view is ready for further development.
Next Steps:
- Develop an MVC solution by example.
