Creating and Configuring Workflow Transitions
A transition describes the movement of a page from one workstate to another. Examples of transitions are "send for approval" and "send back for fact checking." A transition defines what workstate a page enters once a user's tasks have been completed and the user advances the page. Transitions define what system actions occur prior to moving to the next workstate.
To create or edit transitions between workstates, click the New or Edit button, respectively.

The transition dialog opens.
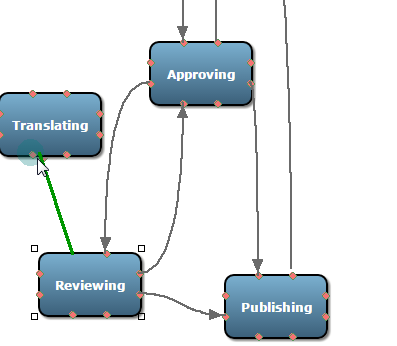
Alternately, you can create a new transition by dragging the cursor between the orange nodes that appear when you point to a workstate. To redirect a transition, click it and then drag the green nodes between workstates. (Note: When you create new transitions by dragging between workstates, the transitions are given default names [for example, "Transition 1"]. You can rename the transitions later by editing them in the right pane.)

A transition has the following properties:
Name: Labels the transition.
Description [Optional]: Describes the transition.
Current Workstate: Defines the starting (or current) workstate for the page. The CMS uses the workstate ID assigned to determine the workstate.
Next Workstate: Defines the workstate to which the page is moved after the transition concludes. The CMS uses the workstate ID to determine the next workstate.
Is Default: If enabled, the current transition is the default transition for a given workstate. Note that a workstate can use multiple transitions.
Next Group: Defines the group to which the page is assigned after the transition has completed. Groups must be created prior to creating a transition. When a page is assigned to a group, all users in the group see the page on their assignment lists. A user can claim the page using the Assign to Me button on the edit form. The page is then assigned to that user and not to the entire group.
Default User: Defines the user to whom the page is assigned after the transition has completed. The list of users in the drop-down menu is filtered by the group selected in the Next Group field. Users must be created prior to creating a transition.
Allow Next Group to Advance: Permits the members of the next group to advance the page to the next workstate. Otherwise, an administrator with sufficient permissions must advance the page.
When you're finished configuring the transition, click Save and Close. You can also click the Actions tab to add workflow actions to the transition.
