Creating a Custom Workflow External Client Application
A workflow external client action application is custom functionality that occurs when a workflow action takes place. There are two ways to implement this feature: as view-only, or as a full plug-in application.
As the name suggests, the view-only approach requires only a view. The external client's URL is specified in the format of xml/custom/views/externalAction/{viewName}. The benefit of this approach is easy development, but it requires all application logic to take place in the view. Therefore, this method isn't an ideal development environment.
This article details the plug-in approach. It uses the same plug-in application framework as other custom Ingeniux CMS applications and provides a complete development environment.
Creating the Controller
Create a controller based on WorkflowClientApplicationController class, making sure to apply all MEF attributes.
using System;
using System.Collections.Generic;
using System.ComponentModel.Composition;
using System.Linq;
using System.Web;
using System.Web.Mvc;
using Ingeniux.CMS.Applications;

namespace Ingeniux.CMS.Controller.Custom
{

	[Export(typeof(CMSControllerBase))]
	[ExportMetadata("controller", "WorkflowClientController")]
	[PartCreationPolicy(System.ComponentModel.Composition.CreationPolicy.NonShared)]
	public class WorkflowClientController : WorkflowClientApplicationController
	{
		public ActionResult Index()
		{
			using (var session = OpenReadSession())
			{
				WorkflowContext model = new WorkflowContext
				{
					Page = TransitionContext.GetPage(session),
					Transition = TransitionContext.GetTransition(session),
					CurrentPublishingTarget =
						TransitionContext.GetCurrentPublishingTarget(session),
					CurrentUser = TransitionContext.GetCurrentUser(session),
					ServerUrl = _Common.ServerUrl,
					AppBaseUrl = TransitionContext.BaseUrl,
					AppAssetBaseUrl = TransitionContext.AssetBaseUrl
				};

				return View(model);
			}
		}
	}
}
Adding the Index View
Start with a strong-typed view, then comment out the @Model line before testing and deployment. Click the link to download an example view.
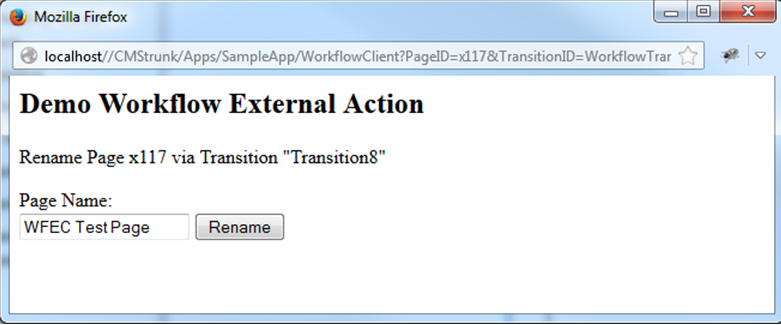
This example works the same as the view-only approach. It allows the page name to be changed by using the REST API from the main CMS application to perform the rename. (See the REST API documentation for more details.) If a user closes the dialog that appears without renaming the page, the page doesn't advance in workflow.
Testing the Application
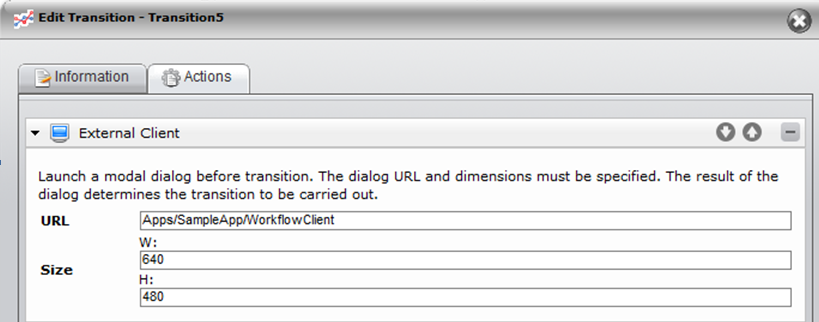
Go to Administration > Workflows, and select the workflow to which you want to add the custom action. Select a transition from the Transitions pane. On the Actions tab, add an "External Client" action. In the URL field, enter the path to the application. This path follows the format Apps/[app folder name]/[app controller name]/[action action name]. The "app action name" section defaults to "index" when not specified.
Add a page to this workflow, advance the page through the transition with the custom action. The application appears as a pop-up dialog: