Use pre-built or custom row layouts to create the grid structure within your presentation.
The accordion menu Design option's Row Layouts
section contains a selection of page layouts organized by columns and sidebars. Use column
and row properties to modify the additional CSS classes, padding, etc. Each layout consists
of only one row. Users choose the number of columns to add to the row layout.
Note
Added row layouts contain no content. The content units will contain the content. Each
column within the row can contain one content unit (unless child layouts exist).
To add a row layout to a Page Builder presentation:
- Expand the Design accordion menu option in the
Design tab.
The Row Layouts section displays.
- Choose the row layout to add to the presentation. Options include:
| Row Layout | Description |
|---|
| Single Column | A single row layout with one column. |
| Two Columns | A single row layout with two columns of equal width. |
| Right Sidebar | A single row layout with two columns. The right column serves as the
sidebar. |
| Left Sidebar | A single row layout with two columns. The left column serves as the
sidebar. |
| Custom Layout | A single row layout with a custom column count. After you add the Custom
Layout, Page Builder immediately prompts you to enter the number of
columns to add to the row layout. Each row layout allows a maximum count of 12 columns. |
Note
After adding the layout, you can modify the column count and other settings within
Row Properties. You can modify the column count, no matter if
you add a pre-built row layout or a
Custom Layout. See
CMS 10.6 Setting Row Properties for details.
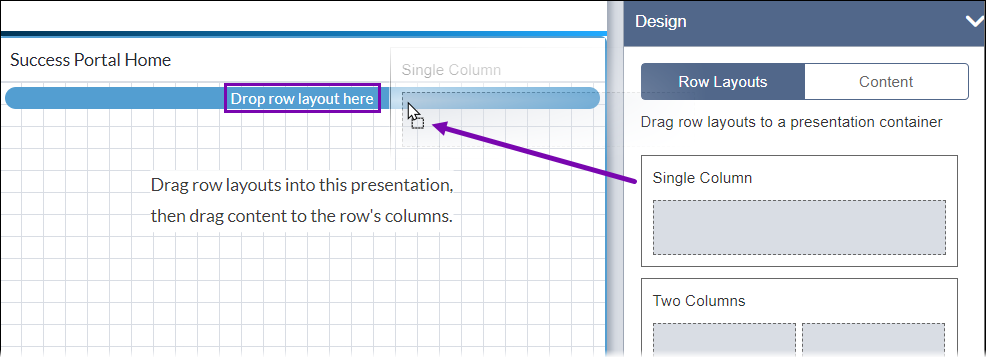
- Press and drag the row layout from the Row Layouts section to the
presentation canvas grid within the Design tab workspace.
A bar (blue) displays to indicate where you can drop the row layout in the
canvas grid.
Note
If the canvas grid holds existing row layouts, then more
than one bar displays. Bars display directly in the canvas grid and in columns of
existing row layouts. You can move row layouts to make them siblings of other row
layouts, or you can nest row layouts within columns as child layouts. See
CMS 10.6 Adding Child Layouts to Forms for
details.
- Drag and hover the row layout over the bar in the canvas grid, and drop the row layout
when the bar displays the following text.
Drop row layout here

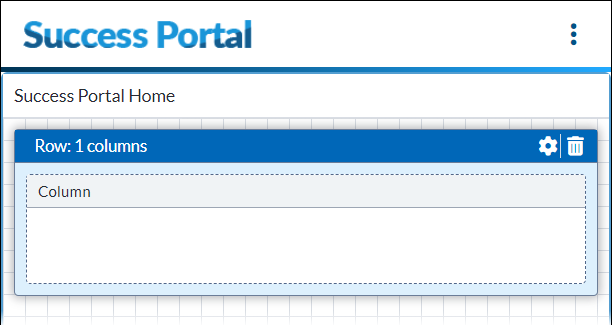
If you dropped a prebuilt layout, then the row layout displays in the canvas
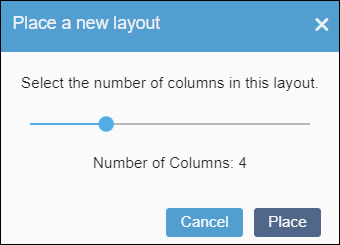
grid. If you dropped a Custom Layout, then the Place a
new layout dialog displays.
- If you dropped a Custom Layout, then complete the following
steps.
- Use the slider to select the number of columns that the custom row layout will
hold.
- Select Place to confirm the column number and close the
dialog.
- Optional: Presentations can hold multiple row layouts. Repeat the steps to add row layouts as
needed.
- Optional: If the presentation holds multiple layouts, you can reorder them. See CMS 10.6 Moving Row Layouts for details.
- Optional: You can edit the properties of columns and rows to add additional CSS classes, padding,
columns, and more. See CMS 10.6 Setting Row Properties and CMS 10.6 Setting Column Properties for details.
- Save changes when you finish by selecting Save in the
Design tab toolbar.
Warning
Always save after making Page Builder presentation changes.
Otherwise, the system will not preserve your new changes.
Page Builder displays row layout(s) added to the presentation canvas grid in the
Design tab workspace. The Row heading lists the
total columns contained within the individual row layout, and the Column
heading displays on each column within the row.

Next Steps: CMS 10.6 Adding Content Units to insert and edit field
or component units in row layout columns.


