Creating Workflow Transitions


Prerequisites:

Create transitions to advance content items from one workstate to another. Examples of transitions include send for approval and send back for fact checking.

Note
Workstates can associate with multiple transitions. Transitions can't use the same Current and Next workstates as another transition.
To create transitions between workstates:
  1. Navigate to Administration > Workflows Designer.
  2. Select the appropriate workflow from the list.
  3. Click Edit.
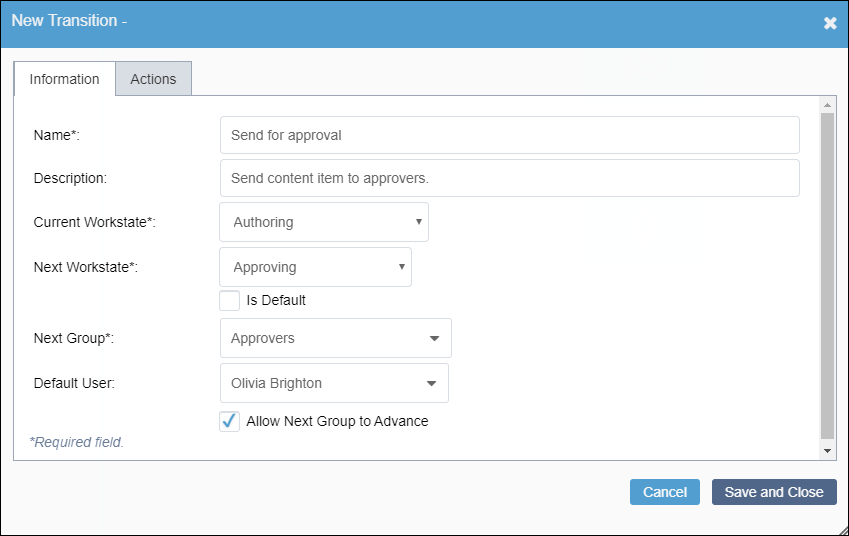
  4. Click New in the Workflow Transitions area of the workspace view. The New Transition dialog displays.

    New Transition

  5. Complete the following fields in the Information tab.

    New Transition Dialog

    FieldDescription
    NameFriendly name of the transition.
    Description (optional)Details about the transition.
    Current WorkstateStarting (i.e., current) workstate of the content item. The CMS uses the workstate ID to determine the workstate.
    Next WorkstateWorkstate to which the content item moves after the transition concludes. The CMS uses the workstate ID to determine the next workstate.
    Is Default If selected, the current transition saves as the default transition for the workstate.
    Next Group

    to which the content item is assigned after the transition completes.

    Tip
    To view which transitions associate with each user group, see Workflow Transitions Assigned to Groups for details.
    Default User (optional)

    The user to whom the page is assigned after the transition completes. The group selected in the Next Group drop-down list filters the available users in the Default User drop-down list. Choose -- No Default User -- to assign content item to the group and not an individual user.

    Additional Information
    Members can select Assign to Me in the Edit form to claim the content item. Assign to Me assigns the content item to that member and not the entire group.
    Note
    If the content item moves to an active workstate and is assigned to a group with or without a default user selected, the content item displays in Assignments.
    Allow Next Group to AdvanceIf selected, permits the members of the next group to advance the content item to the next workstate. Otherwise, only users with sufficient permissions may advance the content item.
    Note
    Workstates can associate with multiple transitions. Transitions can't use the same Current and Next workstates as another transition.
  6. Optional: Add actions to initiate before or during workflow transitions.
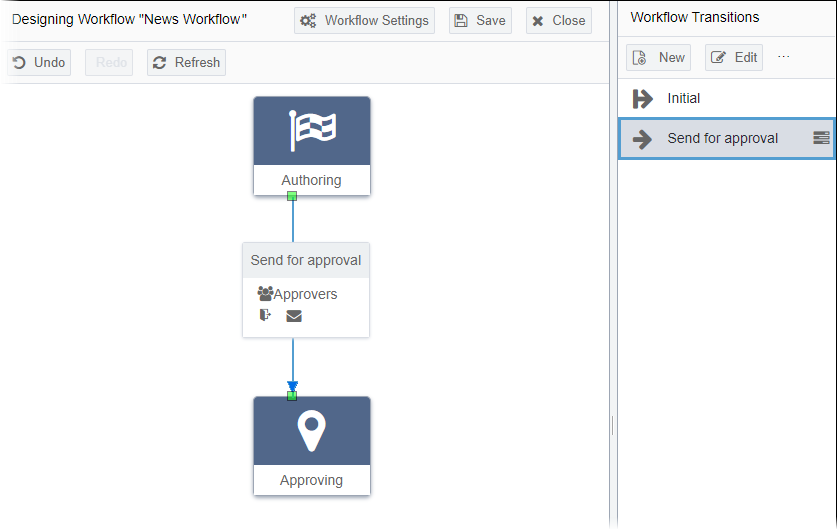
  7. Click Save and Close. The dialog closes, and the new transition displays in the Designing Workflow and Workflow Transitions areas.

    New Transition in Workflow

  8. Click Save in the top menu of the Designing Workflow area when finished making changes in the workflow. Ingeniux CMS saves the workflow in Workflows Designer. This workflow is available for content items in the Site Tree and Assets Tree.
    Important
    If the workflow has multiple workstates, all workstates require cohesive transitions before saving.
 

This section includes: