Generating Page and Component Content via Taxonomy Navigations


Prerequisites:

Pages and components can use navigations to pull content from other CMS sources to use in your organization's website. Taxonomy navigations return selective results. Users can apply taxonomy to generate these navigations.

For example, an index page or component generates its list of items by returning the names of pages in the site. If a university creates an index page for its employees, they can use taxonomy navigations to pull categorized, employee-related content.

To complete a taxonomy navigation element:
  1. Navigate to Site > Site Tree.
  2. Check out the page or component that contains the taxonomy navigation element.
  3. Select the Edit tab, and expand the taxonomy navigation element.

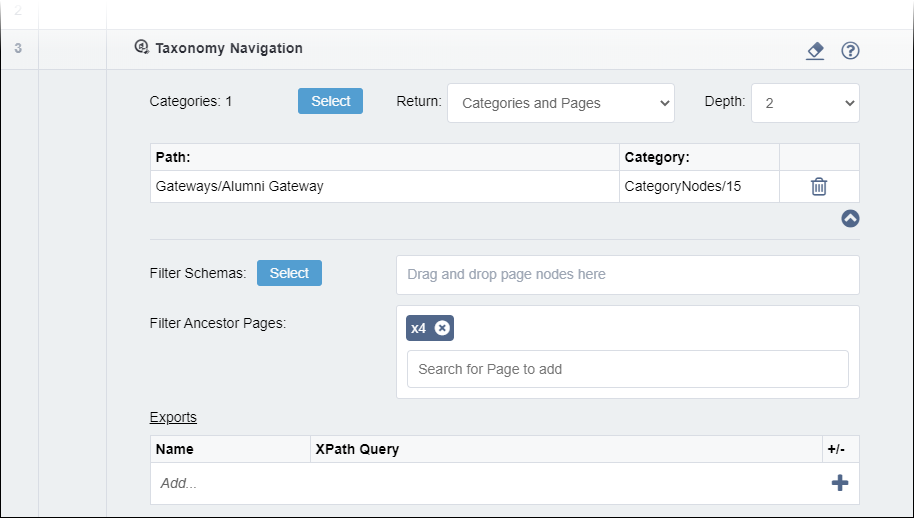
    Taxonomy Navigation

  4. Click Select in the Categories area.
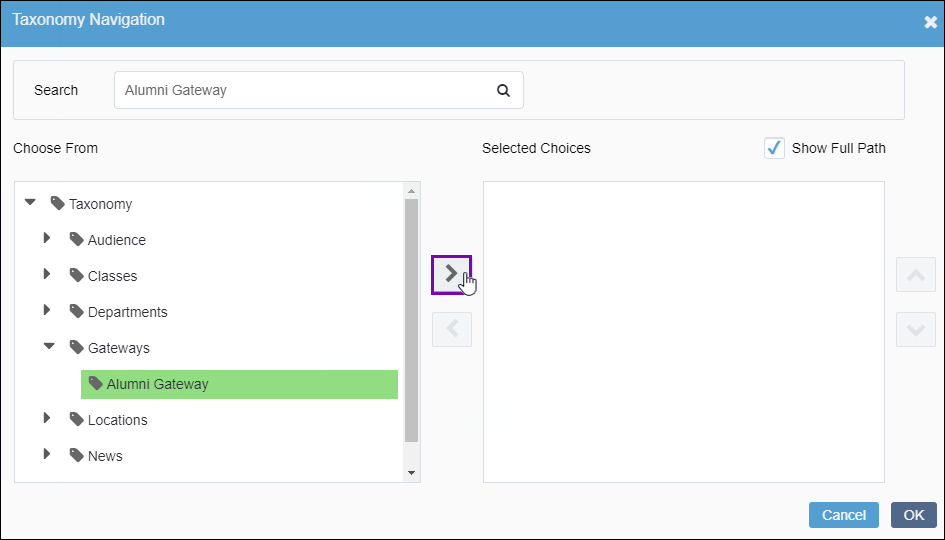
    The categories dialog displays.

    Add Categories to Taxonomy Navigation Element

    Additional Information

    A category with a checkmark in the Choose From area indicates that the content items has been tagged with a category term.

  5. Choose one of the following steps.
    • Enter the first few letters or the synonym of the category in the Search field. Click the category in the drop-down list.
    • Locate and click the category to associate in Choose From. Use Ctrl+click to multi-select categories.
  6. Click the right arrow.
    The category displays in Selected Choices.
    Tip
    You can clear categories from the taxonomy navigation. Click the category to remove in Selected Choices. Click the left arrow. The CMS removes the category from Selected Choices.
  7. Optional: Use the up and down arrows on the rightmost side of the dialog to change the Selected Choices category order.
  8. Click OK.
  9. Choose one of the following options in the Return drop-down list.
    OptionDescription
    Categories and PagesReturns categories and links to their associated pages and components.
    Categories OnlyReturns categories without their associated pages and components.
  10. Choose one of the following options in the Depth drop-down list.
    OptionDescription
    AllReturns all descendant categories (or categories, pages, and components).
    SelfReturns only category (or categories, pages, and components) without descendants.
    Numbers between 1 and 20Sets the depth of the returned hierarchy.
  11. Optional: Click the down arrow to expand advanced settings.

    Expand Advanced Settings in Taxonomy Navigation Element

  12. Optional: Configure the following settings.
    • Filter Schemas. You can configure navigation to pull categories only from individual schemas.
      1. Click Select.
      2. Select the schema from the Choose From list. Use Ctrl+click to multi-select schemas.
      3. Click the right arrow. The selected schemas display in the Selected Choices list.
      4. Click OK. The content item schema(s) display as selected.
      Tip
      Alternatively, you can drag the page(s) or component(s) from the Site Tree to the Filter Schemas field.
    • Filter Ancestor Pages. You can configure navigation to pull categories from individual content items in the Site Tree.
      1. Enter the xID of the page in the Filter Ancestor Pages field.
      2. Press Enter on your keyboard. The xID(s) display as selected.
      Tip
      Alternatively, you can drag the page(s) or component(s) from the Site Tree to the Filter Ancestor Pages field.
    • Exports. You can configure navigation to pull categories based on XPath queries.
      1. Click the Add plus (+) button to add the XPath expression.
      2. Enter the name of the expression and the XPath Query in the fields provided.
      Note
      Click the Delete minus (-) button to remove the XPath expression.

    Taxonomy Navigation Element Advanced Settings

  13. Click Save.