Installing Oxygen XML Web Author
- System administrators must have Ingeniux CMS 10.6 installed and have access to the CMS site instance file system. Check your site version using CMS Statistics.
- System administrators must verify the system meets requirements for Oxygen XML Web Author 24 or 25. Review the Requirements section on the Download Oxygen XML Web Author page.
- System administrators must obtain the these files from Ingeniux
Support:
- Ingeniux REST Plugin for OAuth (not the standard Oxygen Web Author REST
Plugin from Syncrosoft):
CMS 10.6 requires 2024-12-12-web-author-rest-plugin-oauth-24.1.0.0-plugin.jar.
- Oxygen XML Web Author custom application package:
CMS 10.6.492 requires 2.1.0-OxygenWebAuthorApp.zip.
CMS 10.6.378 requires OxygenWebAuthorApp-10.6.378.zip.
CMS 10.6.342 requires OxygenWebAuthorApp-10_6_342.zip.
CMS 10.6.308 requires OxygenWebAuthorApp-10_6_308.zip.
- Ingeniux REST Plugin for OAuth (not the standard Oxygen Web Author REST
Plugin from Syncrosoft):
- At least one DITA collection must be uploaded to the DITA root folder for testing to ensure Oxygen XML Web Author functions properly as a CMS custom tab application.
Oxygen XML Web Author provides a web-based alternative to the desktop Oxygen XML Editor. This integration enables seamless DITA content editing directly within the CMS interface, making the editor particularly useful for organizations that produce DITA documentation and other structured content.. Users can access and edit CMS DITA content through the integrated Oxygen XML Editor custom tab within the CMS interface or from the standalone web application.
System administrators must complete the configuration steps to integrate Oxygen XML Web Author as a custom tab before users can access the editor.
After completing installation, you can update Oxygen XML Web Author when new versions become available. See the Upgrade section for update steps.
Install Oxygen XML Web Author
System administrators must verify the system meets requirements for Oxygen XML Web Author 24 or 25. Review the Requirements section on the Download Oxygen XML Web Author page.
Download, install, and configure licensing for the Oxygen XML Web Author application.
Install REST Plugin
System administrators must have the Ingeniux REST Plugin for OAuth (not the standard Oxygen Web Author REST Plugin from Syncrosoft). Contact Ingeniux Support to obtain the required 2024-12-12-web-author-rest-plugin-oauth-24.1.0.0-plugin.jar file.
Install the REST Plugin in the Oxygen XML Web Author application to enable access to CMS assets through OAuth authentication.
Configure REST Plugin
Administrators must create a CMS OAuth identity before configuring the REST plugin:
- Navigate to in your CMS.
- Create and save a new OAuth identity.
- Copy the Client ID and Client Secret values to a secure location for the REST plugin configuration steps.
See Configuring OAuth Identities for detailed OAuth identity creation steps.
Configure the REST plugin with OAuth credentials to enable CMS asset access in the Oxygen XML Web Author application.
Optional: Configure Security
Identify your CMS base URL or domain name.
If you plan to set up trusted hosts or have already done so for Oxygen XML Web Author, configure trusted hosts to restrict Oxygen XML Web Author connections to approved domains. Add your CMS base URL to the trusted hosts list for secure communication.
See Oxygen Web Author 25.1: Configuring Security Settings for detailed security information.
Install Custom App
System administrators must obtain the Oxygen XML Web Author custom application package compatible with your CMS version from Ingeniux Support.
- CMS 10.6.492 requires 2.1.0-OxygenWebAuthorApp.zip.
- CMS 10.6.378 requires OxygenWebAuthorApp-10.6.378.zip.
- CMS 10.6.342 requires OxygenWebAuthorApp-10_6_342.zip.
- CMS 10.6.308 requires OxygenWebAuthorApp-10_6_308.zip.
Extract and install the Oxygen XML Web Author custom application package in your CMS directory.
Configure CMS local-appsettings.config
Update local-appsettings.config to enable CMS communication to the Oxygen XML Web Author.
Configure Custom App Web.config
Configure the Oxygen XML Web Author Web.config as part of custom tab application setup.
Create Custom Tab
Create a custom tab in the CMS to provide access to Oxygen XML Web Author for asset editing.
- Click Save
 in the top-left corner of Custom Tabs Management
Configuration.The custom tab is now available for DITA asset editing
in the top-left corner of Custom Tabs Management
Configuration.The custom tab is now available for DITA asset editing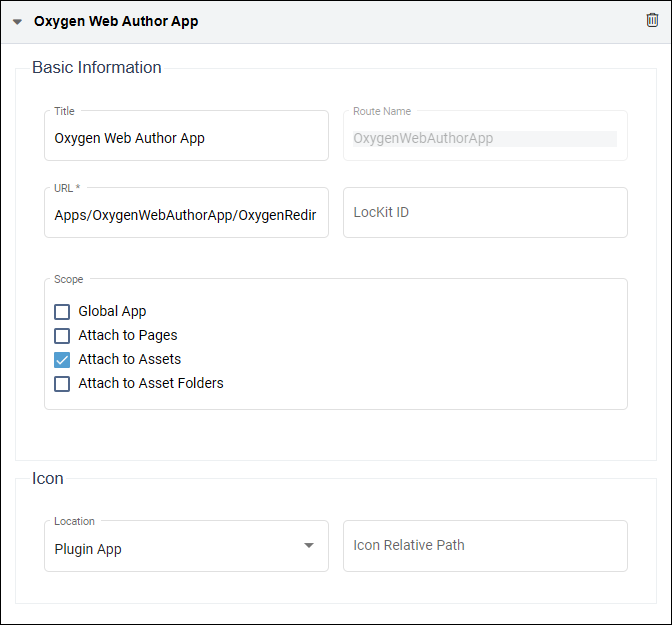
Test Oxygen XML Web Author
Test Oxygen XML Web Author custom tab to verify the editor functions properly.
- Verify the checked-out DITA asset loads and can be edited within the
custom tab.TroubleshootingIf the custom tab fails to load, review all installation steps for completeness. For persistent issues, contact Ingeniux Support.

Oxygen XML Web Author is now successfully integrated with your CMS.
Next Steps:
- System administrators can configure additional customization settings in the Oxygen Web Author installation options.xml file. See Oxygen XML Web Author 25.1: Configuring Options for details.
- Edit DITA content using the integrated tools within Oxygen XML Web Author. See Oxygen XML Web Author 25.1 Reviewing and Editing Documents for details.
Upgrade
- System administrators must have Ingeniux CMS 10.6 installed and have access to the CMS site instance file system. Check your site version using CMS Statistics.
- System administrators must meet system requirements for Oxygen XML Web Author 24 or 25. See the Requirements section on the Download Oxygen XML Web Author page.
- System administrators must obtain these files from Ingeniux
Support:
- The Ingeniux REST Plugin for OAuth instead of the general Oxygen Web
Author REST Plugin from Syncrosoft.
CMS 10.6 requires 2024-12-12-web-author-rest-plugin-oauth-24.1.0.0-plugin.jar.
- The Oxygen XML Web Author custom application package.
CMS 10.6.492 requires 2.1.0-OxygenWebAuthorApp.zip.
CMS 10.6.378 requires OxygenWebAuthorApp-10.6.378.zip.
CMS 10.6.342 requires OxygenWebAuthorApp-10_6_342.zip.
CMS 10.6.308 requires OxygenWebAuthorApp-10_6_308.zip.
- The Ingeniux REST Plugin for OAuth instead of the general Oxygen Web
Author REST Plugin from Syncrosoft.
Oxygen XML Web Author updates become available over time. Update Oxygen XML Web Author by replacing the existing OxygenWebAuthorApp folder contents with new package files while preserving your Web.config settings.