Generate Content at AI Module 2 Field-Level


Prerequisites: You must have permissions and meet the usage requirements to use Ingeniux AI Generation to generate content. See AI Module 1 Usage Requirements for details.

Integrate generative AI into your editing process directly at the field level within pages, components, and assets. Field-level Ingeniux AI Generation version 2 provides the convenience of focusing on generating content for one field at a time instead of juggling multiple fields simultaneously. Leverage this module to generate content for text-based fields using customized prompts and existing field values. You can additionally access your prompt history to draw inspiration and further develop your content based on previous prompts.

Within individual fields, access Ingeniux AI Generation by clicking the Generate or Enhance content AI button in the field heading Generate or Enhance Content with AI Icon. This button is available in any edit mode.

To generate content directly in a field with Ingeniux AI Generation:
  1. Navigate to Site > Site Tree.
  2. Check out the content item then navigate to the page's Edit tab.
  3. Go to the plain text or XHTML editor element where you want to create or modify content with generative AI.
  4. Click the Generate or Enhance content AI button Generate or Enhance Content with AI Icon in the top-right corner of the element.
    Troubleshooting
    The button only displays for plain text and XHTML editor elements. If the button does not display, click Refresh in the Edit tab toolbar and then re-expand the element where you want to access the AI button.

    In the Form view edit mode, place your cursor in the field to display the Generate or Enhance content AI button Generate or Enhance Content with AI Icon.

    Generate AI for Text-Based Element

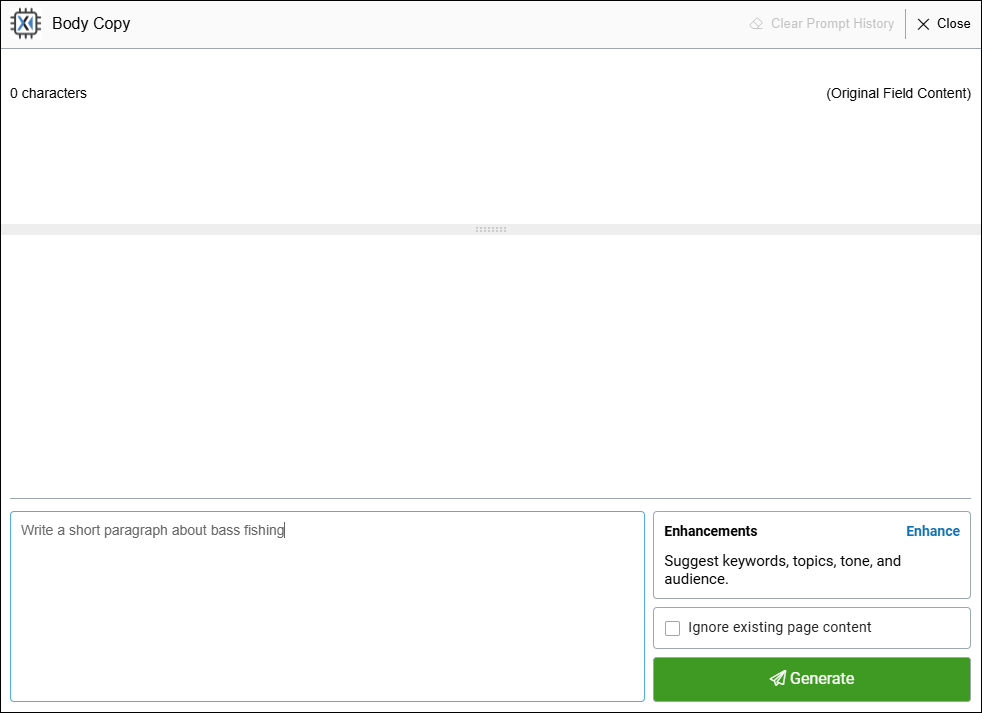
    The Ingeniux AI Generation module displays for the individual field.
  5. Enter your instructions for content generation in the Prompt the AI field.

    You can enter a prompt to generate new content for an empty field, to replace the existing field content, or to modify the existing field content. If you want to apply only enhancements to the existing field content without providing a prompt, you can skip this step.

    Note
    Be specific about the content you want the AI to generate. For example: "Write a product description highlighting the key features and benefits."

    See Prompt Engineering for AI Content Generation for details about prompt engineering.

    Field Level Ingeniux AI Generation

  6. Optional: Add supplemental instructions to enhance your prompt or existing field content by completing the following steps:
    Tip
    The Enhance feature helps you to provide supplementary keyword, topic, audience, and tone details that can further refine your instructions. The AI will consider these details during the generation process.
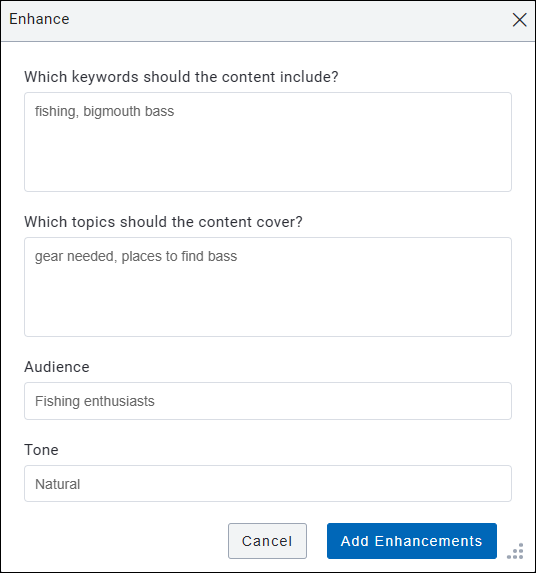
    1. Click Enhance in the bottom-right corner of the module to add enhancement entries.
    2. Complete the following fields in the dialog:
      FieldDescription
      Keywords

      Indicate key terms or phrases for the AI to incorporate into the generated content to help enhance SEO and ensure the inclusion of relevant keywords. This will improve search rankings and ensure the content aligns with targeted search queries.

      For example, consider entering relevant product names, glossary terms, frequently used phrases, etc.

      Topics

      Specify the main topics, subjects, and themes you want the AI to address. This will help ensure the generated content is focused, consistent, and in line with the topics you have identified.

      AudienceProvide information about the page's primary audience. This will help to ensure the generated content is both relevant and engaging for them.
      ToneSpecify the tone and writing style you want the AI to apply to the generated content.

      Enhance Dialog

    3. Click Add Enhancements.
      The dialog closes, and the Enhancements area lists the types of enhancements you added (e,g, keyword, topic).
      Note
      • Click Edit to further modify your enhancements. To remove an enhancement, delete the value from the field in the dialog, then click Add Enhancements to confirm your change.
      • You can click Clear to remove all your enhancement entries at any time.
  7. Select or clear the Ignore existing page content checkbox. In order for the AI to consider existing page content during the generation process, ensure the checkbox is cleared.
  8. Click Generate to start the AI content generation process.
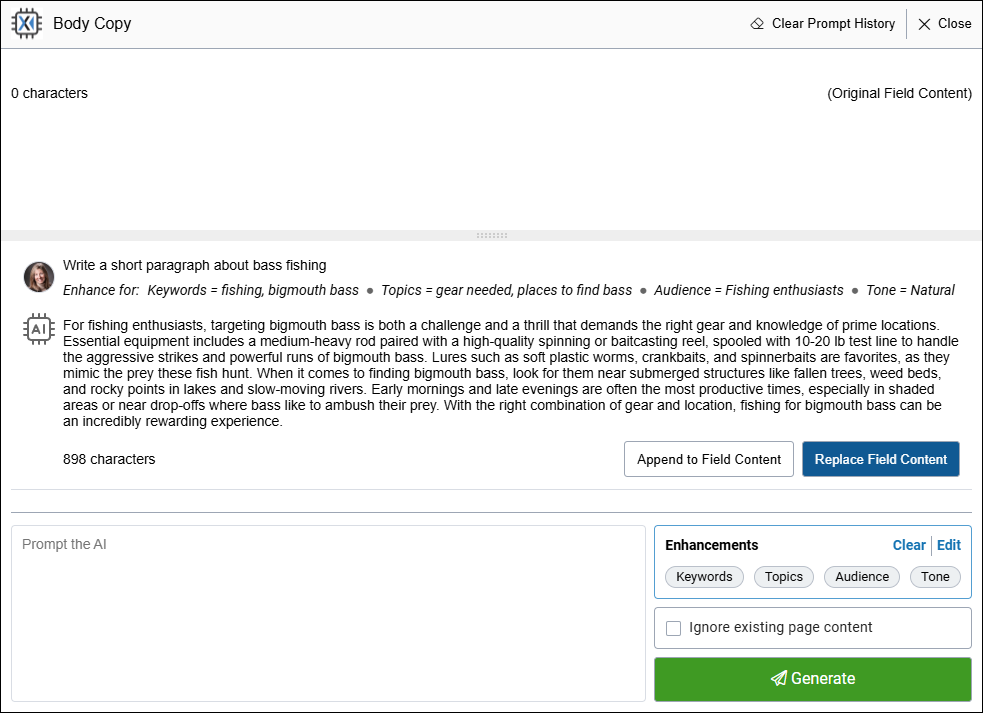
    The Ingeniux AI System processes your request, generating content for the field and indicating the character count of the new content.
    Note
    To halt the AI metadata generation process, click Cancel Generation. You can still apply any metadata the AI generated before the process was halted.

    AI-Generated Content

  9. Review the content generated by the AI. To run the AI content generation process again, repeat the AI field generation steps as needed.
    Field-level Ingeniux AI Generation saves the prompts you submit along with the corresponding generated content. The prompt history provides a scrollable list of previous prompts and AI responses within the session. You can access and review this prompt history list at any time, even if you close and later revisit the AI module. Submitted prompts display next to your profile photo with the corresponding AI-generated content displaying next to the AI icon.
    Note
    To clear the prompt history list, click Clear Prompt History in the top-right corner of the module, then confirm the removal in the confirmation dialog.

    Once removed, the prompt history list is deleted from the field and cannot be recovered.

  10. Choose one of the following steps:
    • To replace the field content with AI-generated content, click the Replace Field Content button corresponding with the content you want to add from the prompt history list.
    • To append the AI-generated content to the end of the existing field content, click the Append to Field Content button corresponding with the content you want to add from the prompt history list.
    • If you do not want to add the AI-generated content to the field, click Close in the top-right corner of the module. Alternatively, you can repeat the AI content generation steps to create more content options for the field.

Next Steps:

  • Review any changes you've applied to the content with AI generation. Check the content for accuracy and make any necessary adjustments. During your review, keep the following in mind:
    • When you finish with AI content generation, click Close in the top-right corner of the inline Ingeniux AI Generation field app.
    • To manually modify field values without AI, edit [ plain text and XHTML editor directly within the content item's Edit tab.
    • To undo changes you've applied with AI along with any other changes you've made to the checked-out content, right-click the content item in the Site Tree and click Undo Check Out.
  • Optional: Generate metadata values with AI using the Metadata tab.
  • Optional: Categorize your content item with AI-suggested taxonomy categories using the Taxonomy tab.
  • Save and check in the content item when you finish.