Building Custom Objects
Prerequisites: Users require site administrator permissions
to complete this task.
To create code (SQL, C#, etc.) that can be integrated with your Cartella site, generate custom objects with the Custom Object Builder tool fields. Use the fields to define your custom object.
Important
The Custom Object Builder only builds the files and scripts needed for creating
a new module. A developer must install the module before changes take effect.
To build custom objects:
- Log in to Cartella.
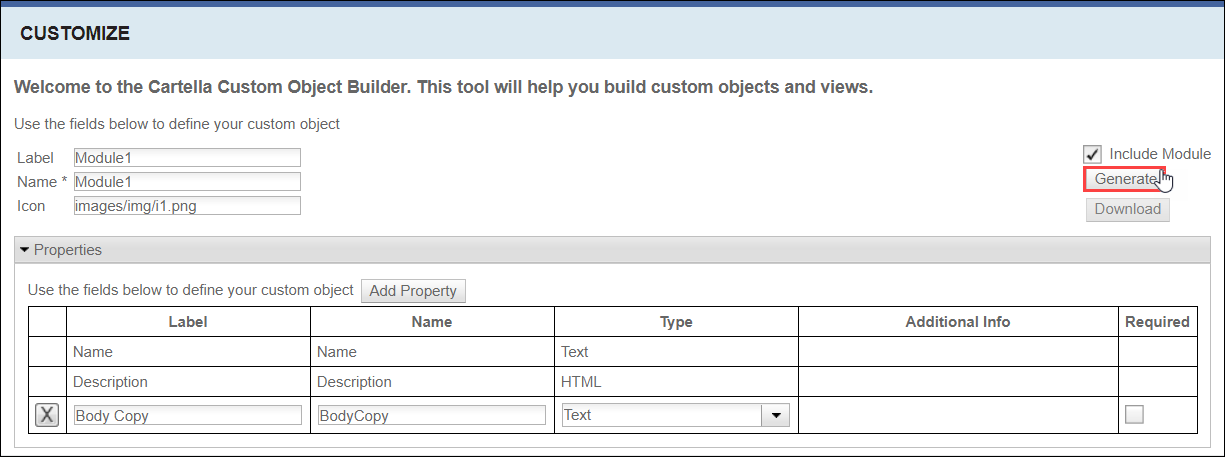
- Navigate to Settings > Customize > Object Builder.FastpathClicking Customize opens Object Builder by default.
- Enter values for the following fields.

Field Description Label Label of the custom object that displays in the form. The label allows spaces. RestrictionLabels don't allow special characters and cannot use same name as other Cartella objects (e.g., blog post).Name Property name of the custom object. Icon Filepath to the thumbnail icon that represents the custom object. Example: images/img/i1.png
NoteThe absolute path for the example icon is similar to [Site_Root]\Images\img. - Enter the following fields for each row the Properties
table.NoteThe first two rows for Name and Description populate by default and cannot be removed. Cartella includes these fields automatically.
Column Field Description Label Label of the custom object property. The label allows spaces. RestrictionLabels don't allow special characters and cannot use same name as other properties for the object.Name Name of the custom object property. Type Type of content the custom object property contains. Select the type from the drop-down list. NoteThe options don't include Link List. However, this option can be configured outside of the Cartella user interface.CautionSelecting the Drop Down option isn't recommended.Additional Info Sub-Type of content the custom object property contains. Select the sub-type from the drop-down list. NoteAdditional Info is only available for the following Type values:- Drop-down. Click Add Choice to create choice(s) to include in the drop-down property list. Enter a Display name and parameter Name for each choice. Click X remove choices.
- Asset. Select Image or Document from the drop-down list to identify the type of asset.
- Asset List. Select Image or Document from the drop-down list to identify the type of assets.
- Entity. Select an entity type from the drop-down list to identify the type of module content.
- Entity List. Select an entity type from the drop-down list to identify the type of module content.
Required Select or clear the checkbox to make the property required or optional. - Optional: Click Add Property to add properties.NoteClick X in a property's table row to remove the property.
- Select or clear the Include Module checkbox.ImportantSelecting this checkbox includes the module code in the generated object files. In general, select this checkbox. Clear this checkbox only in special cases.
- Click Generate to generate the custom object.The following message displays:
Your files were successfully generated.
NoteNavigate to [Site_Root]\App_Data\ObjectBuilder to view custom object files.NoteClick Download to download the custom object zip file.TipUse Download only if you don't have access to your server. If you download the files, move the zip file to [Site_Root]\App_Data\ObjectBuilder when you have access to your server. - Click OK.
- Configure the custom object to use in Cartella. See Setting Up Generated Custom Objects for details.
Related Topics
