Advanced Replication Settings
You can apply Advanced Settings to replication targets to minimize network address translation (NAT) and firewall wall issues, exclude or include files for replication, configure custom commands, and more.
Advanced settings among replication target types vary. Review the advanced settings relevant to your replication type.
- For CMS 10.6: Access Advanced Settings by selecting the Advanced tab.
- For 10.0–10.5: Select the Advanced Settings area to expand the settings.
Additional Locations
All replication targets have Additional Locations settings. Additional locations identify folders to be replicated from outside the pub target folder. The folders exist outside the standard CMS directory structure and are only a supplement to replication.
For instance, if the site stores media files outside the standard media folder, administrators may want to include the external media folder as an additional location.
These settings apply to the following replication types:
Click the Add a New Additional Location plus (+) button to add an entry to Additional Locations.
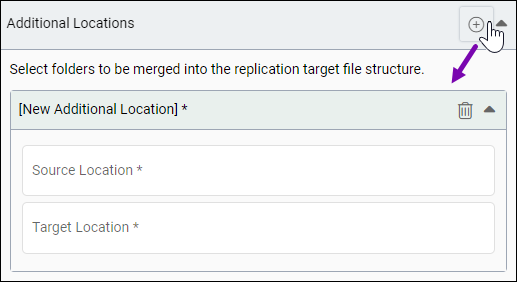
Settings include:
| Field | Description |
|---|---|
| Source Location | Enter the hard drive path or UNC
path. Important This location
must exist before you enter it here. The CMS doesn't generate the path. |
| Target Location | Enter the absolute path to the
folder where the additional files will replicate. Keep in mind that the CMS replicates the source location into the target location. The CMS also excludes the folder, which corresponds to the target location in the publishing target, from replication. Example For example, if the source location is c:\media and the target location is /media/, the CMS doesn't replicate media from the publishing target. The CMS replicates c:\media into a new target location called media. No file merging occurs in the process. |
Cleanup Exclusions
All replication targets have Cleanup Exclusions settings. During full publishes, replication cleanup deletes all content from the replication target before replicating published content. Cleanup exclusions identify items to exclude from deletion. Commonly excluded files include Web.config and favicon.ico.
These settings apply to the following replication types:
Click the Add a New Cleanup Exclusion plus (+) button to add an entry to Cleanup Exclusions.
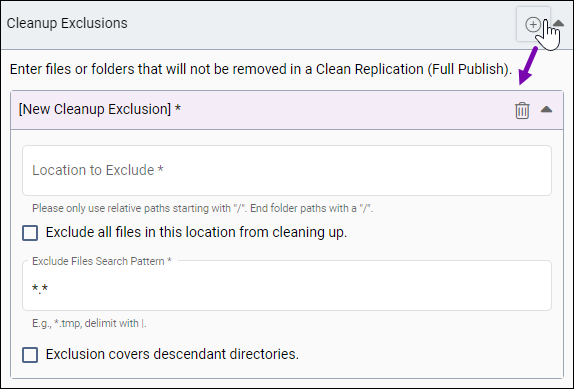
Complete the following fields for the new cleanup exclusion entry:
| Field | Description |
|---|---|
| Location to Exclude | Provide the path to the location to
exclude from cleanup. Note Provide only the
relative folder path, starting and ending with a forward slash (/). |
| Exclude all files in this location from cleaning up checkbox | If selected, the replication
excludes all content from replication cleanup in the specified location. If cleared, the replication excludes only defined search patterns or descendents or descendants in the chosen location from cleanup. Use the following settings to define the search patterns or descendants excluded from cleanup:
|
Custom Commands
All replication targets have Custom Command settings. System administrators can use custom commands to customize the replication process. For example, you can use a custom command to send an email pertaining to the replication process.
Custom commands can use any file type executable under Windows Shell (for example, .exe). In most cases, custom commands point to batch files. Enabling this setting opens additional configuration options.
These settings apply to the following replication types:
Requirements
In standard CMS installations, the application pool runs under the Network Service account on the CMS server.
This common scenario includes the following requirements:
- You may want to write a batch script. Store
this script in a new folder called scripts within [Drive]:\igxsites folder.
For example: C:\igxsites\scripts\myscript.bat
- Executables and scripts configured to run as before- or after-replication commands require access to the Network Service account.
When the scripts folder has access rights to the Network Service account, the system can call scripts from the CMS site. If needed, you can configure the script file to allow a different user account to run commands.
Test Script
Use the following scenario information as a general outline for creating test scripts to run as pre- or post-replication commands. You can run this test script in your CMS.
To create a test script, you can copy and paste the following code in a new file within a text editor:
REM This is a simple test batch file, which just updates a *.txt file with current timestamp. for /F "tokens=2" %%i in ('date /t') do set mydate=%%i set mytime=%time%
REM Appends datetime to designated file path. File location needs to grant rights to NETWORK SERVICE account. ECHO This script executed at %mydate%:%mytime% >> [Drive]:\[path-to]\ReplicationCommands.txt exitName the test script test.bat, and save the file to your scripts folder within [Drive]:\igxsites.
After the getting the test script in place, set configure the Custom Commands in your replication target's Advanced Settings.
Fields
Select the Use Custom Commands checkbox to enable customization for the replication target.
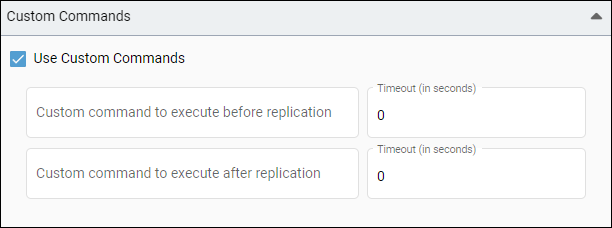
- If you want to experiment with your test script, enter the absolute path to the script (e.g., C:\igxsites\scripts\test.bat) in one of the Custom Command fields.
- After completing configuration, you can run a full publish with replication to test the custom command. If you run a full publish, ensure that ReplicationCommands.txt contains current date and time values in the Publishing Monitor logs to verify that the script executed properly.
Settings include:
| Field | Description |
|---|---|
| Custom command to execute before replication | Filepath to the custom command
(i.e., script/executable
file) that executes prior to performing replication. Important This field only accepts the
filepath and does not support passing parameters at this time. |
| Timeout (before) | Time to wait (in seconds) prior to the before-replication command times out. Some replication tasks take a while. If no response initiates after this specified timeout period, the command process terminates. |
| Custom command to execute after replication | Filepath to the custom command
(i.e., script/executable file) that executes post performing replication. Important This field only accepts the filepath and does not support passing parameters at this time. |
| Timeout (after) | Time to wait (in seconds) prior to the after-replication command times out. Some replication tasks take a while. If no response initiates after this specified timeout period, the command process terminates. |
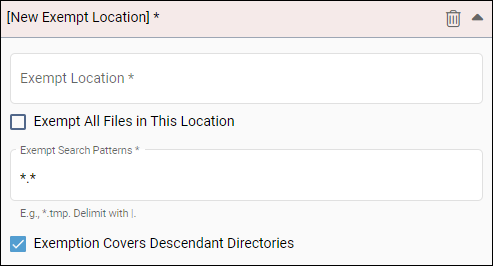
Exempt Locations
All replication targets have Exempt Locations settings. Exempt Locations identify folders excluded from replicating to the deployment location. Use these settings to exclude files by folders and file extensions.
These settings apply to the following replication types:
Click the Add a New Exempt Location plus (+) button to add an entry to Exempt Locations.
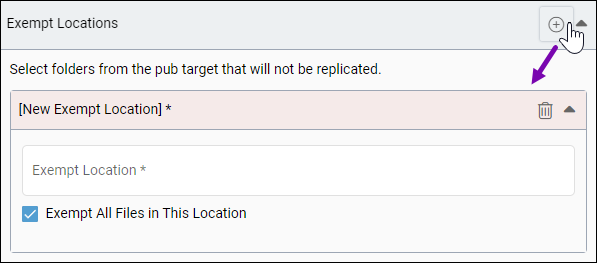
Complete the following fields for the new cleanup exclusion entry:
| Field | Description |
|---|---|
| Exempt Location | Provide the path to the exempt location. |
| Exempt All Files in this Location checkbox | If selected, the replication
excludes all content in the exempt location. If cleared, the replication excludes
defined extensions or descendants in the exempt location. Use the following settings to define the excluded extensions or descendants:
|
FTP Options
You can use FTP options to minimize NAT device and firewall issues and compress data during transfers.
These settings apply to the following replication types:
Settings include:
| Field | Description |
|---|---|
| Passive Mode | Only applicable to FTP and
FTP/SSL. If selected, enables a passive FTP connection. You can use the passive connection to avoid issues with NAT devices and firewalls, if the FTP server employs these technologies. |
| Compressed Transfer | If selected, enables on-the-fly
data stream compression. Data is then decompressed on the FTP server. Warning Compressed transfer can cause
bottleneck. Use this option with caution. Turning on compressed transfer can speed up file transfer in some cases. For example, some text and image files may transfer faster. However, for .jpg, .zip, and large video files, the process won't be noticeably faster. |

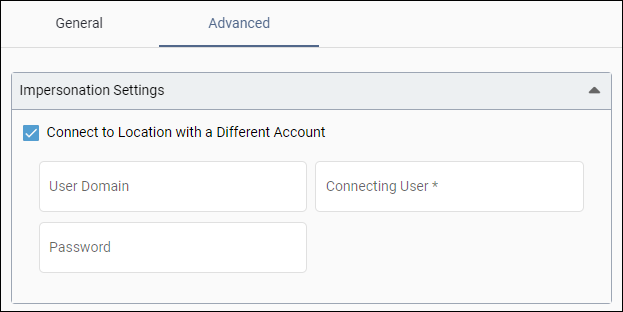
Impersonation Settings
You can use Impersonation Settings to connect to the universal naming convention (UNC) path with a different user account.
These settings apply to the following replication types:
Settings include:
| Field | Description |
|---|---|
| Connecting User | The user with access to the UNC path. |
| User Domain | The domain name (e.g., "Ingeniux"). |
| Password | The user's password (encrypted). |
SMB Settings
You can use Server Message Block (SMB) protocol settings to enable UseWriteThrough functionality for SMB file replication. In some scenarios and environments, enabling UseWriteThrough can increase replication reliability. However, keep in mind this functionality also lowers replication performance.
These settings apply to the following replication types:
Select the Use Writethrough for SMB Replication checkbox to enable UseWriteThrough functionality.
