Prerequisites: Users must have permissions to check in and out assets in the CMS Assets Manager. See
Creating
Groups for details to set permissions.
After completing edits, users can check in DITA and other XML content to the CMS Assets
Manager. The Check In action creates a new version of the content that
includes the changes made during the check-out session.
To check in a CMS DITA content via the Oxygen Desktop Plugin:
- Open the Oxygen XML Editor application.
- Navigate to a checked-out item within the Ingeniux CMS Browser tab
tree structure.
Note
An unlock icon displays next to checked-out items assigned to you in the
Ingeniux CMS Browser tab. If you hover over a checked-out item,
the tooltip text displays Checked Out and assigned to
[name-of-operating-cms-user].
- To check in the item, choose one of the following steps.
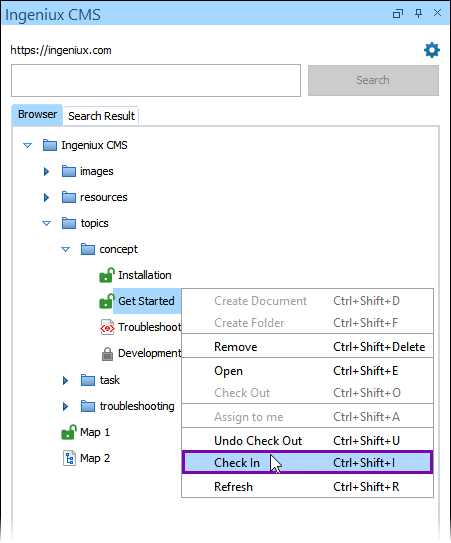
- Right-click the item in the Ingeniux CMS Browser tab, and
select Check In (or press
CTRL+Shift+I).

- Double-click the item in the Ingeniux CMS Browser tab to
display the item in the main pane Editor. Select Check
In in the toolbar (or press
CTRL+Alt+I).

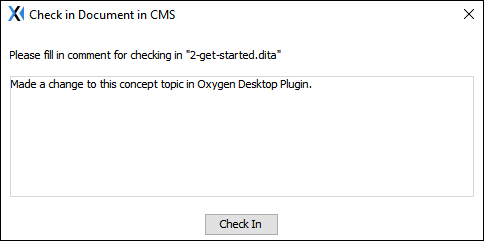
The Check In dialog displays.
- Optional: Enter comments about the item in the text field.
The CMS Assets Manager UI displays these comments in the
Notes field of the document asset's
Overview
tab.

- Select Check In.
The system checks in the new content version to the CMS, and, depending on the
Close Editor After Check In / Undo Check Out checkbox setting,
the content remains open or closes in Oxygen XML Editor's main pane.
The item's checked-out (unlock) icon
switches to the checked-in (page) icon in the Ingeniux CMS Browser
tab.
When operating users open a checked-in item in the Oxygen Desktop Plugin, the item
displays in read-only mode.


