Fonto Installation


Prerequisites:

Fonto integrates seamlessly with the Ingeniux CMS platform, displaying directly within the CMS Assets Manager as an integrated tab for DITA assets.

Before using Fonto, the application requires installation and setup. This includes installing the application on the CMS server and creating a custom tab within the CMS.

Once Fonto is successfully installed and configured, this streamlined integration will enable users to edit DITA content within the CMS without having to switch between different applications. Users can leverage the editor to create, edit, and manage DITA content within the CMS platform.

Install Application

To install the IGXFontoEditor:
  1. Extract the IGXFontoEditor folder from the Fonto package .zip file to the App_Data\xml\Custom folder in your CMS instance installation.

    For example:

    [Drive:]\[path-to-cms-site-instance]\App_Data\xml\Custom\IGXFontoEditor

  2. Navigate to the Internet Information Services (IIS) Manager, then locate your CMS site instance in the Sites list.
  3. Complete the following steps to add an IGXFontoEditor application:
    1. Right-click your CMS site, then click Add Application.
      The Add Application dialog displays.
    2. Enter IGXFontoEditor in the Alias field.
    3. In the Physical Path field, provide the path to the IGXFontoEditor folder you deployed. Click the ... button to browse for the folder.
    4. Click OK.
      IIS creates an application for IGXFontoEditor.
  4. Complete the following steps to add the FontoSpellChecker application:
    1. Directly under the CMS site, expand the new IGXFontoEditor application.
    2. Right-click the FontoSpellChecker folder, then click Convert to Application.
    3. Accept all the defaults by clicking OK in the dialog that displays.
      IIS creates an application for FontoSpellChecker.
  5. Recycle the CMS instance application pool.

Create Custom Tab

To create the Fonto custom tab in the CMS:
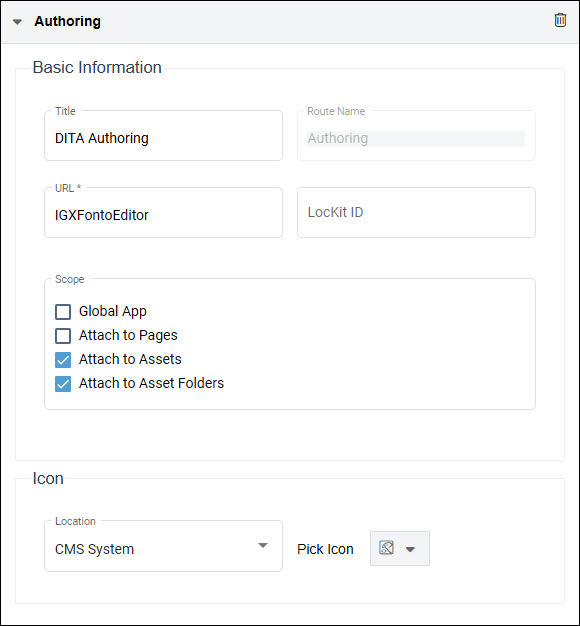
  1. Navigate to Administration > System Options > CMS > Custom Tabs > Management in your CMS site instance.
  2. Click Add to create the custom tab.
  3. Enter the following Name for the new custom tab in the dialog:

    DITA Authoring

  4. Enter the following path in the URL field:

    IGXFontoEditor

  5. Select the Attach to Assets and Attach to Asset Folderscheckboxes, and clear the Global App checkbox in the Scope area.
  6. Click SaveSave Button in the top-left corner of Custom Tabs Management Configuration.
    The CMS saves your custom tab configurations.

    Fonto Custom Tab Setup

Upgrade

Prerequisites:

System administrator must have access to the CMS server and must have access to the latest Fonto installation package. Contact Ingeniux Support for the package .zip file.


To upgrade Fonto to the latest version:
  1. Stop the CMS instance application pool by completing the following steps:
    1. Open Internet Information Services Manager (IIS), and navigate to the CMS instance application pool.
    2. Right-click the application pool, and click Stop.
      The CMS instance stops running.
  2. Navigate [Drive:]\[path-to-cms-site-instance]\App_Data\xml\Custom, then delete the entire IGXFontoEditor folder.
  3. Extract the new IGXFontoEditor folder from the latest Fonto package .zip file to the App_Data\xml\Custom folder.
  4. Start the CMS instance application pool by completing the following steps.
    1. Open Internet Information Services Manager (IIS), and navigate to the CMS instance's application pool.
    2. Right-click the application pool, and click Start.
      The CMS instance starts running.

Next Steps:

Provide your licensing key information to grant your users access to create/edit DITA assets with Fonto.

Additionally, based on your users' needs and preferences, consider setting up the following: