Installing Oxygen XML Web Author as a Custom App


Prerequisites:
  • CMS 10.6 must be installed. See CMS Statistics to check your site version.
  • You must meet the system requirements for Oxygen XML Web Author 24 or 25. See the Requirements section on the Download Oxygen XML Web Author page.
  • You must have the following files:
    • The Ingeniux REST Plugin for OAuth instead of the general Oxygen Web Author REST Plugin from Syncrosoft.
    • The Oxygen XML Web Author custom application package.

    Contact Ingeniux Support to obtain them.

  • At least one DITA collection must be uploaded to the DITA root folder. You will use this collection to test that Oxygen XML Web Author is functioning properly as a CMS custom tab application.

Oxygen XML Web Author is a lightweight alternative to Oxygen XML Editor, a desktop application. Both editors can access CMS assets; however, Oxygen XML Web Author is seamlessly integrated into the Ingeniux CMS UI. This web application may be particularly useful for organizations that produce DITA documentation and other structured content. With Oxygen XML Web Author, CMS users can create and edit DITA resources stored in the CMS Assets Manager.

Before using Oxygen XML Web Author, administrators must configure the application. Once integrated in the CMS, Oxygen XML Web Author will display within a custom tab in Assets Manager.

To install Oxygen XML Web Author as a custom app within Ingeniux CMS, follow these steps:
  1. Install Oxygen XML Web Author
  2. Install REST Plugin
  3. Configure REST Plugin
  4. Install Custom App
  5. Create Custom Tab
  6. Configure Custom App Web.config
  7. Test Oxygen XML Web Author

Install Oxygen XML Web Author

Prerequisites: You must meet the system requirements for Oxygen XML Web Author. See the Requirements section on the Download Oxygen XML Web Author page.

Install the Oxygen XML Web Author application and configure Oxygen XML licensing.

To install Oxygen XML Web Author:
  1. Download Oxygen XML Web Author 25 or 24 from the Oxygen XML website.
    Important
    • Oxygen XML Web Author Version 26 is incompatible with Ingeniux CMS. Install version 24 or 25.
    • Oxygen XML Web Author is a proprietary authoring tool that requires a license purchase. Contact Ingeniux Support for details.
  2. Install the executable, oxygenxml-web-author-64bit.exe, and complete the installation process in the Oxygen XML Web Author setup dialog.
    Important
    • In most cases, you will install the Oxygen XML Web Author on the server where the CMS resides. However, once security credentials are in place, the CMS can connect to Oxygen XML Web Author from any accessible web server.
    • Remember the Server Port you provide during the installation process. You will use this port as you continue to install Oxygen XML Web Author.

    When the installation completes, the Oxygen XML Web Author License Configuration page opens in a web browser. The page URL will be similar to the following example URL, depending on your server and server port number:

    http://localhost:8080/config/

  3. Select your preferred licensing option, and follow the instructions provided within the Oxygen XML Web Author application to activate the license key.
    For licensing configuration steps and additional information, see Oxygen XML Web Author Installation.
  4. After license activation, keep the Oxygen XML Web Author application open to install the REST plugin. Within the application, you can navigate to the Dashboard.

Install REST Plugin

Prerequisites: You must use the Ingeniux REST Plugin for OAuth instead of the general Oxygen XML Web Author REST plugin from Syncrosoft. Contact Ingeniux Support to obtain the REST plugin .jar file.

Install the REST Plugin within the Oxygen XML Web Author application. This plugin allows Oxygen XML Web Author to access CMS assets through OAuth identities.

To install the REST Plugin:
  1. Return to the Oxygen XML Web Author web application you installed.
    Tip
    For example, the URL to your Oxygen Web Author application will look similar to the following, depending on your server and server port number:

    http://localhost:8080/oxygen-xml-web-author/app/oxygen.html

  2. Click the Administration Page in the top-right corner of the Oxygen XML Web Author application.
  3. Navigate to Settings > Plugins.
  4. Click the Upload Plugin button.
  5. In File Explorer, browse for and select the REST plugin you obtained from Ingeniux Support.
    The newly uploaded REST Connector - Ingeniux OAuth plugin displays as highlighted at the top of the list and is enabled.
  6. Restart Oxygen XML Web Author in order for the application to recognize the new plugin by completing the following steps:
    1. Navigate to the Oxygen XML Web Author installation directory on your server file system.
    2. Launch the Manage Web Author application.
    3. Navigate to the General tab.
    4. Click Stop, then click Start.
      This will restart the Oxygen XML Web Author application.
    5. Click OK.
  7. Refresh the Oxygen XML Web Author application in your web browser.
    The new REST plugin is now fully loaded in the application.

Configure REST Plugin

Prerequisites: To configure the REST plugin, you must supply the plugin with CMS OAuth identity credentials. Follow these steps to create a CMS OAuth identity for the REST plugin:
  1. Navigate to Administration > System Options > CMS > OAuth Identities in your host CMS site.
  2. Create then save an OAuth identity.
  3. Copy the Client ID and Client Secret values to a secure location as you will need them to configure the REST plugin.

See Configuring OAuth Identities for more details about OAuth identity creation.


Configure the REST plugin to allow Oxygen XML Web Author to access CMS assets.

To configure the REST plugin:
  1. Return to Settings > Plugins within the Administration Page of your Oxygen XML Web Author application.
  2. Navigate to the new REST Connector - Ingeniux OAuth, and click Configure...
  3. Provide values for the following fields in the Plugin configuration dialog that displays:
    FieldDescription
    REST Server URLProvide the URL to your host CMS, appending /automated/OxygenApi/ to the end of the URL.

    For example, use the following format:

    http://[cms-site-name]/automated/OxygenApi/

    REST Client ID

    Provide the Client ID value associated with the CMS OAuth identity you created, as per the prerequisite.

    REST Client_Sec

    Provide the Client Secret value associated with the CMS OAuth identity you created, as per the prerequisite.

    use_invisible_login checkbox Select the use_invisible_login checkbox.
  4. Click Apply.
  5. Restart the Oxygen XML Web Author application in order for your new plugin configurations to take effect.

Install Custom App

Prerequisites: You must have access to the Oxygen XML Web Author custom application package. Contact Ingeniux Support to obtain this package.

Install the Oxygen XML Web Author custom application in your host CMS site.

To install the Oxygen XML Web Author custom application in the CMS:
  1. Navigate the custom app, OxygenWebAuthorApp.zip, you obtained from Ingeniux Support.
  2. Extract the OxygenWebAuthorApp.zip files to the ..\site\ App_Data\xml\Custom folder path of your CMS installation.

Create Custom Tab

The Oxygen XML Web Author application will display as an embedded instance in a custom tab for assets.

To create the Oxygen XML Web Author custom tab in the CMS:
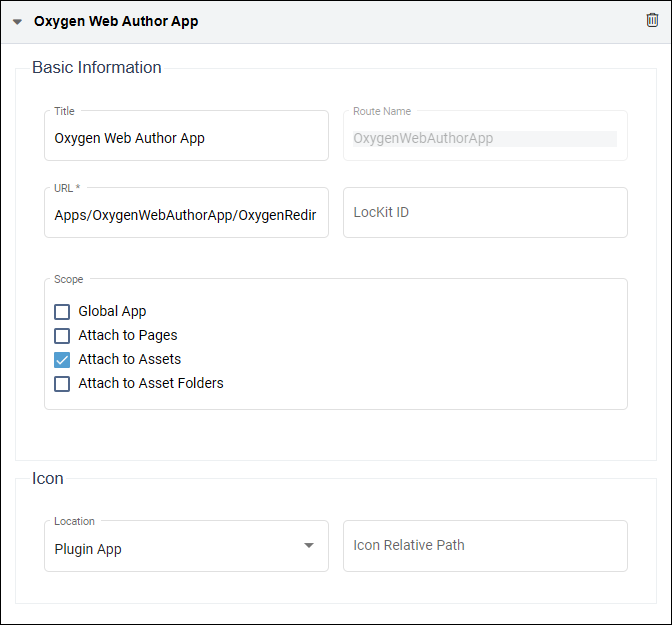
  1. Navigate to Administration > System Options > CMS > Custom Tabs > Management in your host CMS site.
  2. Click Add to create the custom tab.
  3. Enter a Name for the new custom tab in the dialog (e.g., Oxygen XML Web Author)
  4. Enter the following path in the URL field:

    Apps/OxygenWebAuthorApp/OxygenRedir

  5. Select the Attach to Assets checkbox, and clear the Global App checkbox in the Scope area.
  6. Select the Plugin App option from the Location drop-down list.
  7. Click SaveSave Button in the top-left corner of Custom Tabs Management Configuration.
    The CMS saves your custom tab configurations.

Configure Custom App Web.config

The Oxygen XML Web Author Web.config file requires configuration in order to complete the custom tab application setup.

To configure Web.config in the Oxygen XML Web Author custom application:
  1. Navigate to [Drive:]\[path-to-cms-site-instance]\App_Data\xml\Custom\OxygenWebAuthorApp, and open the Oxygen XML Web Author custom application Web.config in a text editor.
  2. Configure the <add> element with the @key="OxygenAuthorBaseURL" attribute. In the @value attribute, reference the Oxygen XML Web Author application URL, and append the string ?author={0}&amp;url=rest%3A%2F%2F{1} to the end of the URL.For example, your code will look similar to the following:

    OxygenAuthorBaseUrl setting
    <add key="OxygenAuthorBaseUrl" value="http://localhost:8089/oxygen-xml-web-author/app/oxygen.html?author={0}&amp;url=rest%3A%2F%2F{1}" />

  3. Configure the <add> element with the @key="OxygenRootFolder" attribute. In the @value attribute, reference the a/ID of the DITA root folder that contains all your DITA assets in the CMS Assets Manager.For example, your code will look similar to the following:

    OxygenRootFolder setting
    <add key="OxygenRootFolder" value="af/4"/>

  4. Save and close Web.config.
  5. Recycle the CMS instance application pool by completing the following steps:
    1. Open Internet Information Services Manager (IIS), and navigate to the CMS instance's application pool.
    2. Right-click the application pool, and click Recycle.

Test Oxygen XML Web Author

To test Oxygen XML Web Author application in the CMS Assets Manager:
  1. Log in to the CMS where Oxygen XML Web Author is now configured.
  2. Navigate to Assets > Asset Tree.
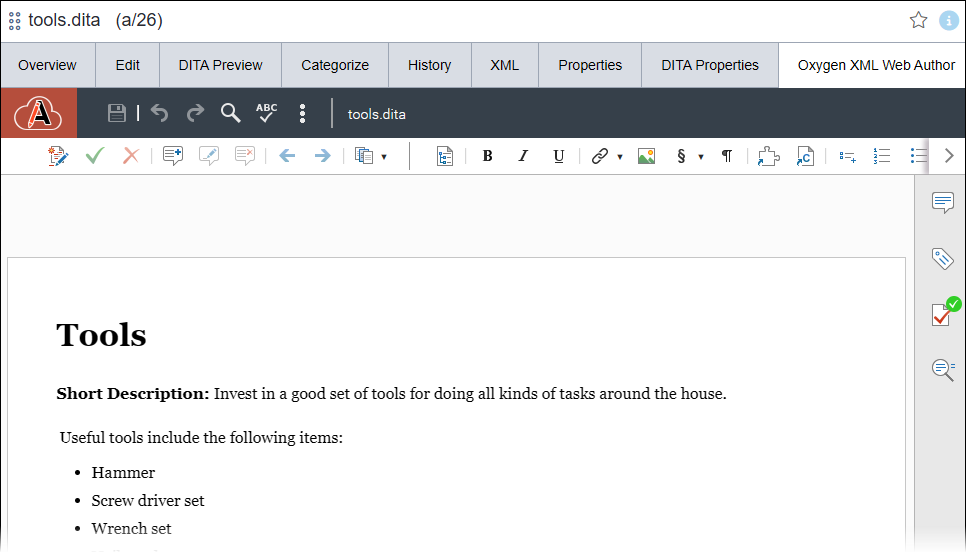
  3. Check out a DITA asset, then select the Oxygen XML Web Author custom tab.
  4. Verify the checked-out DITA can be viewed and edited in the new custom tab hosting Oxygen XML Web Author.

    Oxygen XML Web Author Custom Tab in CMS

    Troubleshooting
    If the Oxygen XML Web Author tab fails to load, revisit the installation process and ensure that you have completed all steps correctly. If you still encounter difficulties while loading the Oxygen XML Web Author custom tab in the CMS, contact Ingeniux Support.

Next Steps: Use the editing tools to modify CMS DITA content within the Oxygen XML Web Author custom tab. See Oxygen XML Web Author 24.1 Reviewing and Editing Documents for details.