Configuring the DITA Publishing Dialog
The Configure DITA Publishing dialog helps you define essential input parameters for the DITA Open Toolkit, namely:
DITA map(s), which serve as a manifest of all content items bound for publishing such as DITA topics, reltables, etc.
Output types that the current process will render.
- DITAVAL files (if any) for conditional profiling.
This dialog provides administrators with a high degree of configurability because each selected map can be customized to generate its own output format types and/or DITAVAL associations.
To configure the DITA publishing dialog:
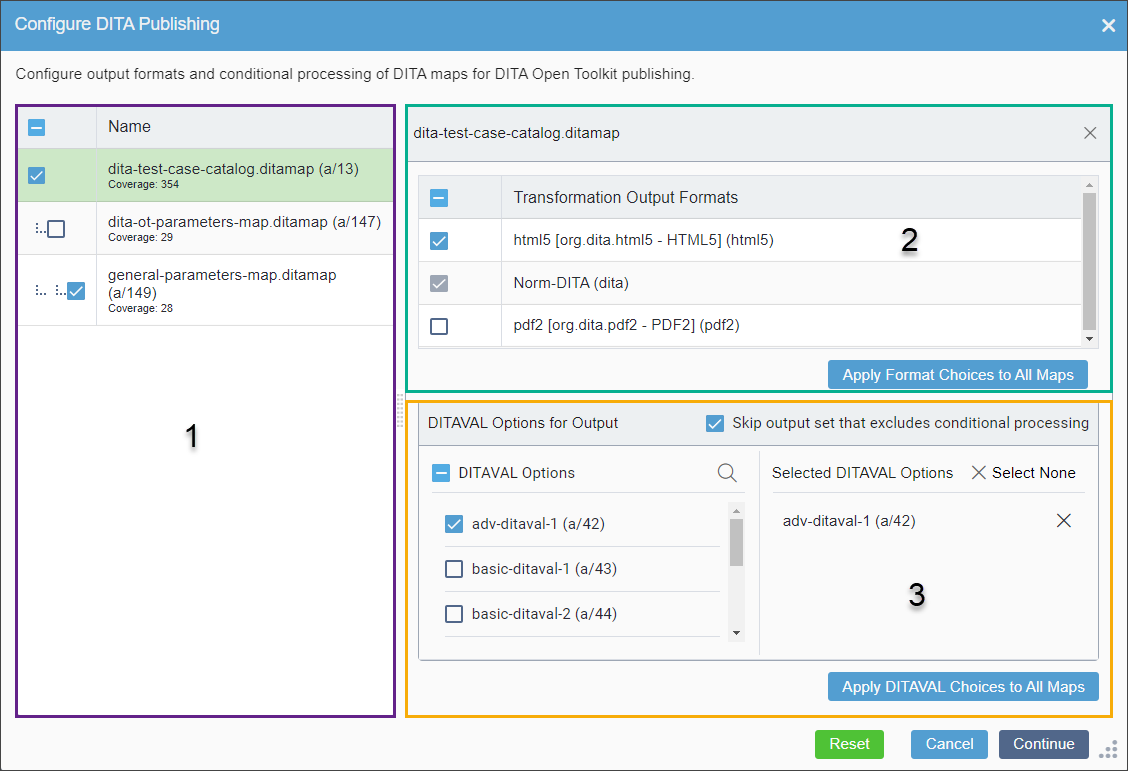
- In the leftmost configuration area (Area 1 in the image above), select the DITA map name(s) that will be used as input for DITA-OT processing.
Keep in mind that, even if the current map has parent maps, administrators usually select just the current map as input for the DITA publishing process, so your output format and DITAVAL file selection applies exclusively to the current map without the need for further "map-by-map" refinement of any of its parent maps. If you only want the current map to move forward in the publish process, select it and exclude all parent maps (i.e., clear their check boxes) from the current publishing operation.
For those special cases when ancestor maps are present and require some custom combination of output formats and DITAVALs—or if you would rather publish a parent map(s) and not the current one—enable all of the appropriate DITA maps in the parent hierarchy.
TipAs you include and exclude parent DITA maps in the hierarchy view, the dialog hides the configuration area for output formats and for DITAVAL options. You must click on each individual DITA map that you have selected to view its available output formats and DITAVAL options and to make modifications if necessary. In this way, you can always be certain as to which map is under configuration at any given time. - In Area 2, select the output format(s) you want to publish for the selected DITA map(s).
If you have selected more than one map from the DITA map parent hierarchy and you want to apply the same output formats to all of these maps, click Apply formats choices to all maps.
- Optional: In the left DITAVAL Options column of the
DITAVAL Options for Output area (Area 3), choose the DITAVALs you
want to apply to the DITA map, which will then display in the right Selected
DITAVAL Options column.Only DITAVALs marked to the publishing target will display as available options. However, if your DITA map contains references to particular DITAVALs (i.e., using
<ditavalref>), those DITAVALs will be selected automatically in this dialog, regardless of their publish marking.If you are selecting more than one map within the parent map hierarchy and you want to apply the same DITAVAL options to all of them, click Apply DITAVAL choices to all maps.
If any DITAVAL files have been selected, the Skip output set that excludes conditional processing option is enabled by default. If the publish proceeded with this option disabled (i.e., cleared checkbox), then the CMS generates rendition where no conditional processing has been applied. This means that if the DITA source bound for publishing contained conditional profiling attributes, then the CMS will render all conditionalized content (and all content that is not conditional) to the publishing target. If you choose to skip this output (i.e., by enabling checkbox), then the rendition that would otherwise contain all conditionalized content will not be output for the current publish.
While your conditional profiling strategy is very much dependent on the specific needs of your organization, generally speaking, you will not publish out all conditional permutations of content other than for internal, editorial purposes; therefore, you will enable the Skip output set that excludes conditional processing option when the current publishing operation runs with DITAVAL files.
Of course, if the current DITA source you wish to publish does not contain conditional processing attributes, there is no need to apply DITAVAL files because conditional processing would have no material effect on the rendered content. Therefore, when no DITAVAL files are selected, the CMS dims the Skip output set that excludes conditional processing option and outputs the rendition without conditional-processing.
NoteThe DITA publishing pipeline generates a separate conditionally processed output for each DITAVAL option you select. - Click Continue.The Published Submitted dialog displays.Troubleshooting
If an error displays indicating unmarked dependencies for publish, then mark the dependencies to the publishing target that are listed in the in the error message (or remove the dependencies from the dependency structure). The publish will not initiate until all map dependencies are marked for publish.
See DITA Publish Unmarked Dependency Error for details.
- Optional: Click Monitor Publish in the Published Submitted dialog to follow the publish operation in real time. See Accessing DITA Publish and Preview Logs for details about monitoring your DITA publish.
Task Troubleshooting: If all prerequisites are in place and you are having trouble with publishing DITA
assets, see Troubleshooting DITA Collections for solutions to your DITA
publishing issue.