SAML Setup with Okta as Identity Provider (IdP)


Prerequisites: Your organization must have an account with Okta.

Ingeniux CMS customers who use Okta to implement SAML must create a new application within the Okta website that handles SAML authentication. To complete this configuration, your organization's CMS system administrator or developer can complete this setup via the Developer's Console view or Classic UI wizard view on the Okta website. As Ingeniux provides Okta with an "under-the-covers" template that contains pre-populated setup values for the wizard, you may want to use the wizard instead of the Developer's Console view.

Important Update: The following on- and off-premise instructions can also be found on the Okta website. The instructions on the Okta site require an update to the On-Premise section (How to Configure SAML 2.0 for Ingeniux CMS > Configuration Steps > On-Premise > Step #2) : For customers who maintain Ingeniux CMS on-premise, when configuring saml.config, be sure to match the name value of ServiceProvider to the Base URL value that you provided in the General Settings page of the Classic UI wizard.

Configuration for Ingeniux Customers with Off-Premise CMS Servers

To set up the authentication application via Okta's Classic UI wizard view:
  1. Log in to the Okta website.
  2. Select the Classic UI view from the drop-down list in the leftmost corner of the site.

    Classic UI in Okta

  3. Click the Add Application button.
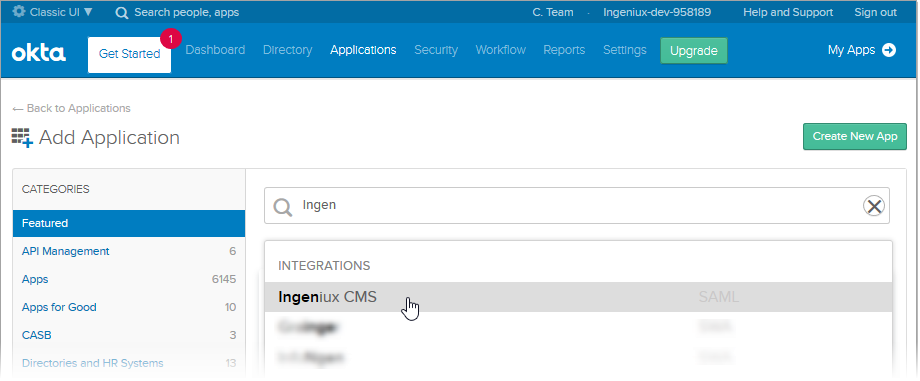
  4. Enter Ingeniux in the search field, then click the search icon. The search returns the Ingeniux application profile.

    Add Application in Okta

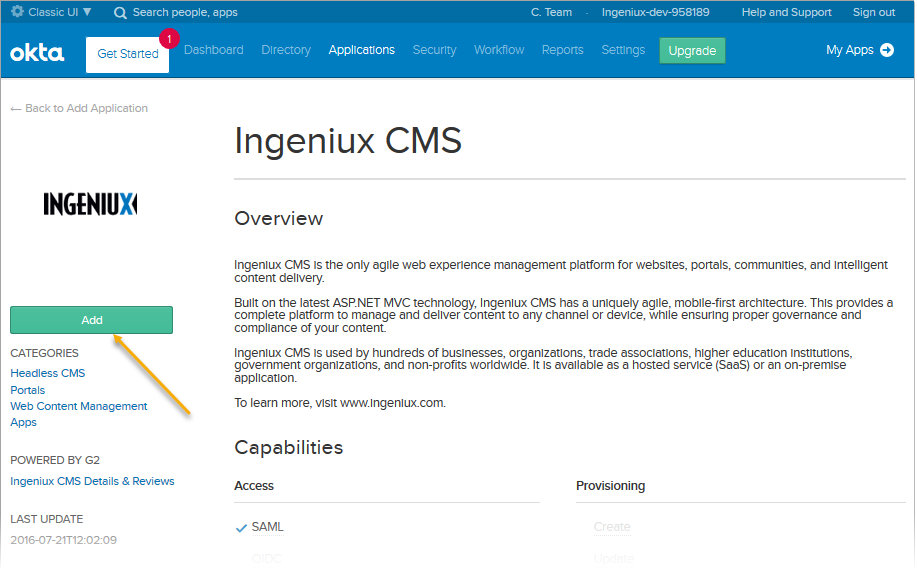
  5. Click Add. The General Settings page displays.

    Add Button in Okta

  6. Provide values for the following fields:
    FieldDescription
    Application LabelDisplays under the app in your Okta homepage. You can retain or customize the default value.
    Base URLContains a fully qualified URL.
    Caution
    Do not add a forward slash (/) at the end of the URL (e.g., correct sample URL: https://yourcompany.com).
    Application Visibility (optional)See Okta Documentation for option descriptions.
  7. Click Done when you finish populating the General Settings fields. All views within the application configuration display, including the pre-populated values that Ingeniux provides.
    Note
    At this point, you can edit the entire configuration process-including the General Settings field values you provide.
  8. Copy and save the following x.509 Certificate as idp.cer in your file system.
    
                  -----BEGIN CERTIFICATE-----
    MIIGezCCBWOgAwIBAgIQGGpdb2uGGBPi9/qC+0+yjTANBgkqhkiG9w0BAQsFADBC
    MQswCQYDVQQGEwJVUzEWMBQGA1UEChMNR2VvVHJ1c3QgSW5jLjEbMBkGA1UEAxMS
    UmFwaWRTU0wgU0hBMjU2IENBMB4XDTE2MTAyNTAwMDAwMFoXDTE5MTExOTIzNTk1
    OVowITEfMB0GA1UEAwwWKi5pbmdlbml1eG9uZGVtYW5kLmNvbTCCASIwDQYJKoZI
    hvcNAQEBBQADggEPADCCAQoCggEBAMXNiL3mYBkBdjAb+VGOX6nWSy/HyhH7hFll
    zMP+X077Z+0M2P2UkIFNbh4GigmqBUeENXuEMTm5zC9qkolB2kke6dVqw/J9EWV0
    AMvX0iYKQfDBRUIPs8cau0uVPTxhW+J5q7a/A5kxC8v93f5mPlsLikfRmCyj5aY3
    STbWzoNW53nuJMXEDflyTP6jtED1zpm/1sgwnHxI39um6ZEdWsDdy1MMsVDu5nuP
    bCmyAZat+MMvG9Ra1EQEPwpFeHgMFokPgHZKs/qT4qWKlLBEEnd50lTQLZAb5Lgq
    bwOpEIosRJdMOp6DlrQUYbpHZydA5kt5mNBTeCvjDSTJOpXgH3UCAwEAAaOCA4ww
    ggOIMDcGA1UdEQQwMC6CFiouaW5nZW5pdXhvbmRlbWFuZC5jb22CFGluZ2VuaXV4
    b25kZW1hbmQuY29tMAkGA1UdEwQCMAAwKwYDVR0fBCQwIjAgoB6gHIYaaHR0cDov
    L2dwLnN5bWNiLmNvbS9ncC5jcmwwbwYDVR0gBGgwZjBkBgZngQwBAgEwWjAqBggr
    BgEFBQcCARYeaHR0cHM6Ly93d3cucmFwaWRzc2wuY29tL2xlZ2FsMCwGCCsGAQUF
    BwICMCAMHmh0dHBzOi8vd3d3LnJhcGlkc3NsLmNvbS9sZWdhbDAfBgNVHSMEGDAW
    gBSXwidQnsLJ7AyIMsh8reKmAU/abzAOBgNVHQ8BAf8EBAMCBaAwHQYDVR0lBBYw
    FAYIKwYBBQUHAwEGCCsGAQUFBwMCMFcGCCsGAQUFBwEBBEswSTAfBggrBgEFBQcw
    AYYTaHR0cDovL2dwLnN5bWNkLmNvbTAmBggrBgEFBQcwAoYaaHR0cDovL2dwLnN5
    bWNiLmNvbS9ncC5jcnQwggH5BgorBgEEAdZ5AgQCBIIB6QSCAeUB4wB3AN3rHSt6
    DU+mIIuBrYFocH4ujp0B1VyIjT0RxM227L7MAAABV/zEzIIAAAQDAEgwRgIhAK2E
    9Exc6zEheYVmdORtLhwG9AXBO7Veqok9B/DrWu6LAiEAwXq69E/buEacd4Iu1Le9
    WFQexINhHQTdQcjsuBpox1UAdwBo9pj4H2SCvjqM7rkoHUz8cVFdZ5PURNEKZ6y7
    T0/7xAAAAVf8xMylAAAEAwBIMEYCIQD+lNHtPBBCrjJIWTuIv08a/SXRbH7qgjLv
    RxKwYLcCFAIhAKJcMD93lL22t3FOHoF6F15RWGfyBwGq0r7b2EIxLOPXAHYA7ku9
    t3XOYLrhQmkfq+GeZqMPfl+wctiDAMR7iXqo/csAAAFX/MTM2AAABAMARzBFAiBx
    js99murFgPBxBaaMbW+IkbI31YBQR2WaauQCiCYQtAIhAN+Cm/bjRiidna11n0Sc
    jpJGvZv3+x+Yaksh5UK0mjAKAHcAvHjh38X2PGhGSTNNoQ+hXwl5aSAJwIG08/aR
    fz7ZuKUAAAFX/MTNawAABAMASDBGAiEApLJxWRR9uBsOoebMng5KkN+/9dHSbgt1
    u+pWMxCFYlgCIQDByopV8QWylGXWZxD0sthbdBl1NyQyR0yIJJd2xjOqjjANBgkq
    hkiG9w0BAQsFAAOCAQEAHw8/VBhvta4i77S8msVADL/Qu5Dcrs/O6emNmrEhszEu
    OCgPLBfm66ta2fIbCD+F5QUT5nGhZKxjhGfcndtGv3JNmBLNh1Nh+FbJp9pD+bB9
    sUxBYkjJu/JxIQZuFgiqH5frD10NcWMsd8wTUuYj0Whdu2AlWOMrLhKdVHQLDKxX
    ipQFY/qJEObPG6Pvs4r+HyNGxCFISCSW7PQIYWJfBRNmf2/JY5OSnIC9S76fna6M
    BsOWdtbKaFlutFabm4uWQPIAhEgE842JCO3PgKDGGlXT8pyTBsD3cFoFv0oBy08A
    Nvl2hOkf03AR0Khq/My9qd+x2rtURR+vFckbI12vMg==
    -----END CERTIFICATE-----
                
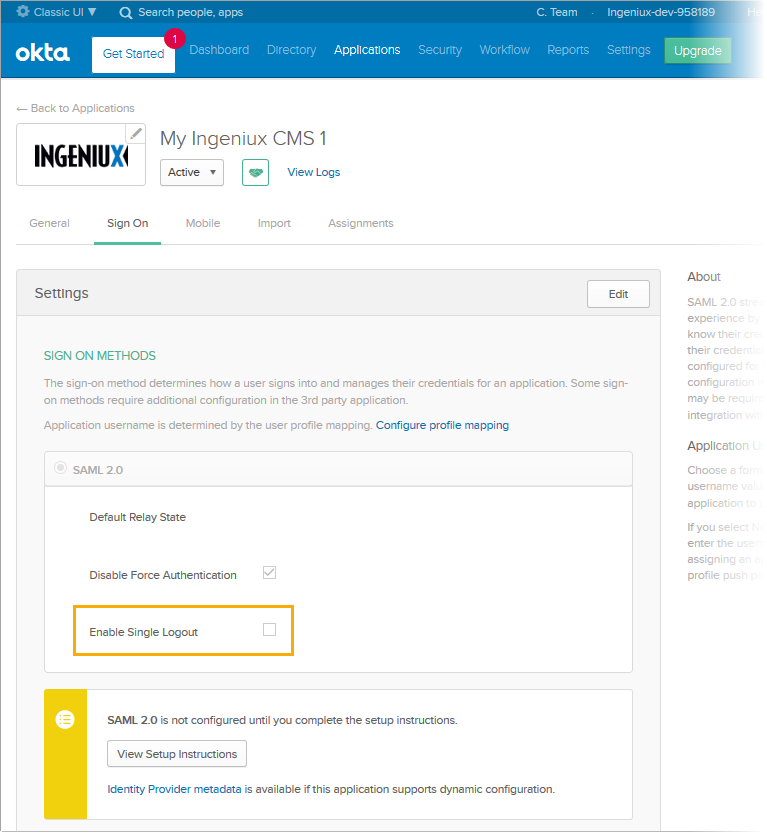
  9. In Okta, select the Sign On view for the Ingeniux application, then click Edit.
  10. Select the Enable Single Logout checkbox. The Signature Certificate field and its Browse... button and Upload buttons display.

    Enable Single Logout

  11. Browse to locate the saved x.509 certificate on your file system, and upload the certificate file to the Okta site.
  12. Click Save.

Configuration for Ingeniux Customers with On-Premise CMS Servers

Set up the following configuration files found in the Ingeniux CMS installation:
  • Configure saml.config for SAML authentication with Okta as the IdP.
    Important
    When configuring saml.config, be sure to match the name value of ServiceProvider to the Base URL value that you provided in the General Setting page of the Classic UI wizard view.
  • Configure local-membership.config for SAML authentication with Okta as the IdP.