Testing SampleApp Custom Tab


CMS administrators and developers can configure the custom tab application sample, SampleApp, and then test the sample in the Apps tab.
Important
The steps below use the SampleApp project from the Custom Application Development Solution provided by Ingeniux. Keep in mind that SampleApp, like other projects in this solution, is only an example and should not be modified or deployed. SampleApp resides in your Ingeniux CMS installation at [path-to-cms-site-instance]/site/App_Data/xml/custom.

The Custom Tabs UI differs depending on your CMS site version. Follow the steps that correspond with your version.

CMS 10.6 Test SampleApp Custom Tab

Add custom tabs to provide access to extended functionalities of CMS 10.6. Users can scope asset items and asset folders to custom tabs in addition to pages in CMS 10.6.
To add a custom tab:
  1. Navigate to Administration > System Options > CMS > Custom Tabs > Management.
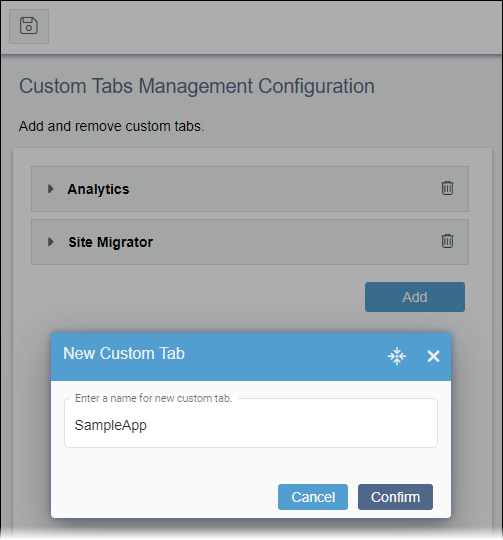
  2. Click the Add button to create a custom tab entry.
    The New Custom Tab dialog displays.

    Adding App in Custom Tabs

  3. Enter a name (e.g., SampleApp) for your new custom tab in the field provided.
  4. Click Confirm.
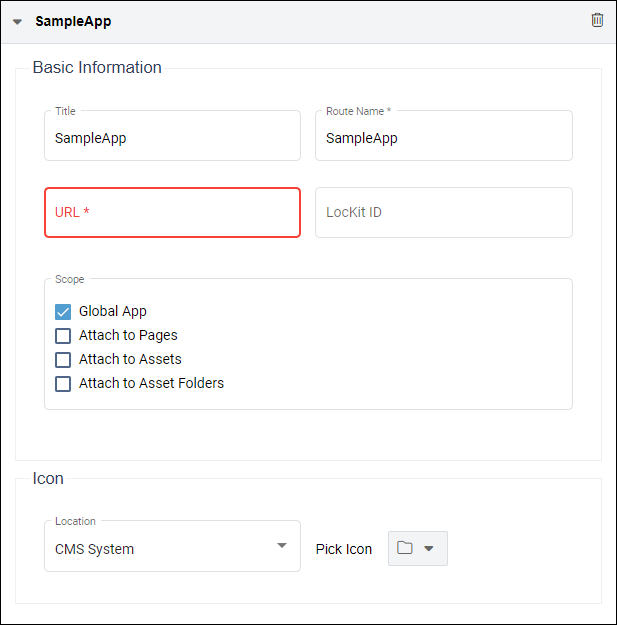
    The Basic Information and Icon settings for the new application display.

    Managing Custom Tabs

  5. Configure your new application by completing the Basic Information and Icon fields.
    Field
    TitleThe Title value displays the in custom tabs management area after you save your configuration. The name also displays in the custom apps list via the navigation pane for global applications or displays as the friendly name in the custom tab for pages.
    Route Name (required)

    By default, the CMS populates the Route Name value with the custom tab name you provided. The Route Name value displays in the URL path structure for the custom app and displays in the custom apps list within the navigation pane.

    The system provides you with an opportunity to change the Route Name prior to saving your configuration for the first time. After saving, you cannot change the Route Name unless you remove the current app and create a new one.

    Note
    The CMS validates this field value against other existing route names before you save your configuration settings. Validation is not case-sensitive. If this value is invalid, the CMS displays the Route Name field title in red text, and prevents you from saving your configuration settings.
    URL (required)

    The URL of the custom tab follows this path format:

    Apps/[app folder name]/[app controller name]/[app action name]

    If not specified, the "app action name" section defaults to "index".

    For example, the test custom tab app (SampleApp) will use the following URL:

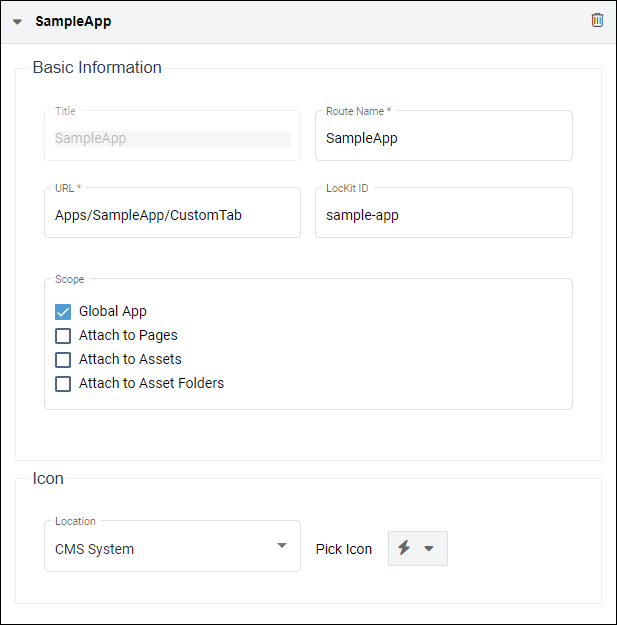
    Apps/SampleApp/CustomTab

    LocKit IDThe tab's localization Kit ID.
    Scope checkboxes

    Select or clear the following checkbox options:

    Global App
    Displays the custom tab as global application in Apps.
    Attach to Pages
    Displays the custom tab when users select pages in Site.
    Attach to Assets
    Displays the custom tab when users select assets in Assets.
    Attach to Asset Folders
    Displays the custom tab when users select asset folders in Assets.
    (Icon)Location drop-down list

    This drop-down list field sets the application's icon that displays in the Apps list. From the Location drop-down list, choose one of the following list options, and then provide the associated icon within the correlating field.

    CMS System
    Select from a set of icons provided by Ingeniux CMS.
    Plugin App
    If the icon resides in a custom folder of a plugin app, provide the icon's relative path. For example, SampleApp/sampleAppIcon.png locates the icon at [sitepath]/App_Data/xml/custom/SampleApp/sampleAppIcon.png.
    Remote
    If the icon resides on a remote site, provide the absolute path to the icon.
    For example, SampleApp—as a global application—could be configured as follows:

    Example Custom Tab Configuration

  6. Click Save in the upper left corner of Custom Tabs Management Configuration to save your changes.
  7. Before testing the SampleApp custom tab, build its project in Visual Studio.
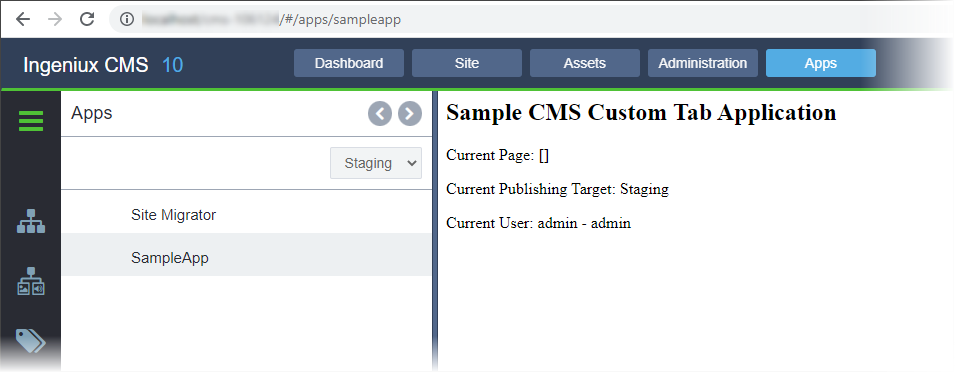
  8. Navigate to Apps > SampleApp from the list of applications in the Apps navigation pane.
    Note
    SampleApp displays as a global application, which you can access via Apps in the CMS main navigation.

    Sample App Displays

Troubleshooting
To re-enter the Route Name or to remove a custom tab configuration for any other reason, click the Remove (trash can) icon corresponding to custom tab you want to remove, and follow the confirmation dialog to complete the removal in Administration > System Options > CMS > Custom Tabs > Management.

CMS 10.0–10.5 Test SampleApp Custom Tab

Add custom tabs to provide access to extended functionalities of CMS 10.0–10.5.
To add a custom tab:
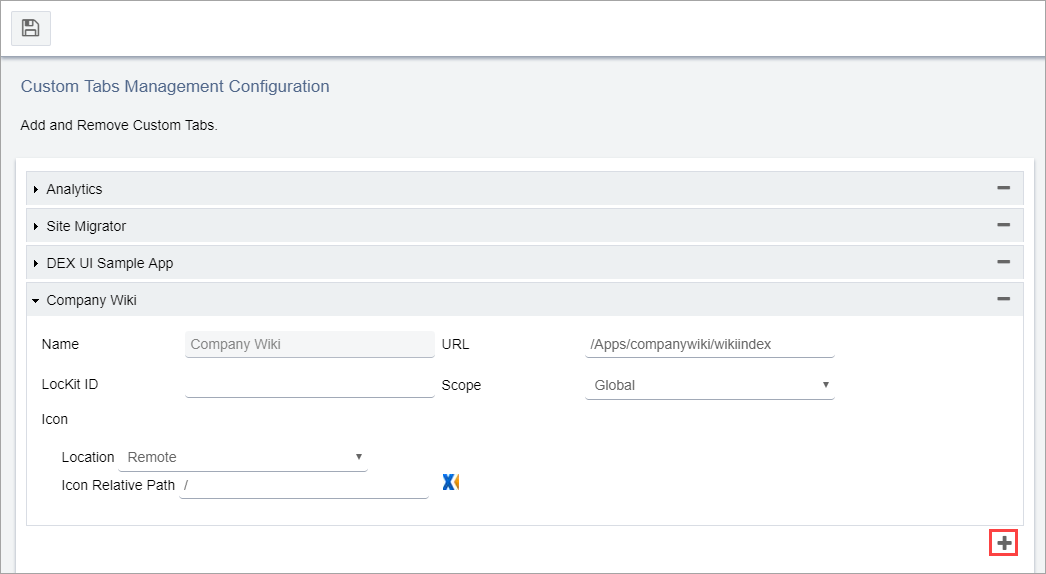
  1. Navigate to Administration > System Options > CMS > Custom Tabs > Management.
  2. Click the Add Custom Tab plus (+) icon.

    Custom Tabs: Management

    Settings for the new application display.
  3. Configure the following fields:
    FieldDescription
    NameThe Name value displays the in custom tabs management area after you save your configuration. The name you provide also displays in the list of custom apps in the navigation pane for global applications or displays as the friendly name on the custom tab for pages.
    URL

    The URL of the custom tab follows this path format:

    Apps/[app folder name]/[app controller name]/[app action name]

    If not specified, the "app action name" section defaults to "index".

    For example, test custom tab app (SampleApp) will use the following URL:

    Apps/SampleApp/CustomTab

    LocKit IDThe tab's localization Kit ID.
    Scope drop-down list

    From the Scope drop-down list options, choose one of the following:

    Global
    Displays the custom tab as a global application in Apps.
    Page
    Displays the custom tab when users select pages in Site.
    Both
    Displays the custom tab as a global application from the Apps area and when users select pages in Site.
    (Icon)Location drop-down list

    This field sets the application's icon that displays in the Apps list. From the Location drop-down list, choose one of the following and then provide the associated icon.

    CMS System
    Select from a set of icons provided by Ingeniux CMS.
    Plugin App
    If the icon resides in a custom folder of a plugin app, provide the icon's relative path. For example, SampleApp/sampleAppIcon.png locates the icon at [sitepath]/App_Data/xml/custom/SampleApp/sampleAppIcon.png.
    Remote
    If the icon resides on a remote site, provide the absolute path to the icon.
  4. Click Save in the upper left corner of Custom Tabs Management Configuration to save your changes.
  5. Before testing the SampleApp custom tab, build its project in Visual Studio.
  6. Navigate to Apps > SampleApp from the list of applications in the navigation pane.
    Note
    SampleApp displays as a global application, which you can access via Apps in the CMS main navigation.

    Sample App Displays

Troubleshooting
If you need to redo the configuration or remove a custom tab application from Administration, click the Remove Custom Tab minus (-) button, and follow the confirmation dialog to complete the removal.